Animate Movements of View using SpringAnimation in Android
Last Updated :
09 Jan, 2023
In Android, we can add animations to an object’s movement. Instead of just updating the position of an object from one point to another, we can add some cool animations for those movements. Android provides a lot of ways that allow you to change the position of a view object on the screen with animations. But, here we are going to have a look at SpringAnimation. Spring Animation is a part of Android Physics-Based animation API. Android Spring Animation allows you to animate the movements of a view like a Spring. The animations are based on the properties like dampness, stiffness, bouncy. Once the SpringAnimation is started, on each frame the spring force will update the animation’s value and velocity. The animation will continue to run until the spring force reaches equilibrium.
Simple SpringAnimation
A sample video is given below to get an idea about what we are going to do in this article. Note that we are going to implement this project using the Java language.
It’s really easy to create a simple spring animation. Here are the steps:
- Add the Support library
- Create an instance of the SpringAnimation
- Set the motion behavior parameters
- Start the animation
Create a Spring animation
We can create a spring animation for an object using SpringAnimation class. First, we want to create an instance of the SpringAnimation class and provide an object(the target object for animation), an object’s property that we want to animate, and a final position for the animation to rest at.
View object = findViewById(R.id.image);
final SpringAnimation animation = new SpringAnimation(object, DynamicAnimation. TRANSLATION_Y, of);
TRANSLATION_X, TRANSLATION_Y, and TRANSLATION_Z
These properties control where the view is located as a delta from its left coordinate, top coordinate and elevation, which are set by its layout container.
- TRANSLATION_X – Left Coordinate
- TRANSLATION_Y – Top Coordinate
- TRANSLATION_Z – Depth of the view relative to its elevation.
Damping ratio:
It describes a gradual reduction in a spring oscillation. There are four damping ratio constants are available in the system :
- DAMPING_RATIO_HIGH_BOUNCY
- DAMPING_RATIO_MEDIUM_BOUNCY
- DAMPING_RATIO_LOW_BOUNCY
- DAMPING_RATIO_NO_BOUNCY
Stiffness:
It describes the strength of the spring. There are four damping ratio constants are available in the system :
- STIFFNESS_HIGH
- STIFFNESS_MEDIUM
- STIFFNESS_LOW
- STIFFNESS_VERY_LOW
High Damping and low stiffness give more oscillation/bounce. To add the stiffness and damping ratio to the spring, perform the following steps
- Call the getString() method to retrieve the spring to add the properties.
- Call setDampingRatio() / setStiffness() method and pass the value that you want to add to the spring.
To start the animation we call either start() or animateToFinalPosition(float Finalposition). Besides, updateListener and removeListener are the respective listeners for listening to update and removing the listener when it’s no longer needed.
animateToFinalPosition() method performs two tasks:
- Sets the final position of the spring.
- Start the animation, if it has not started.
The final position must be defined before starting the animation.
Step by Step Implementation
Let’s see a simple example of adding SpringAnimation to an ImageView. We are going to implement this project using the Java Programming language.
Step 1: Create a new project
First, we want to create a new project. To create a new project in Android Studio please refer to How to Create/Start a new project in Android Studio.
Step 2: To add the support library
In order to use the physics-based support library, we want to add the support library to our project.
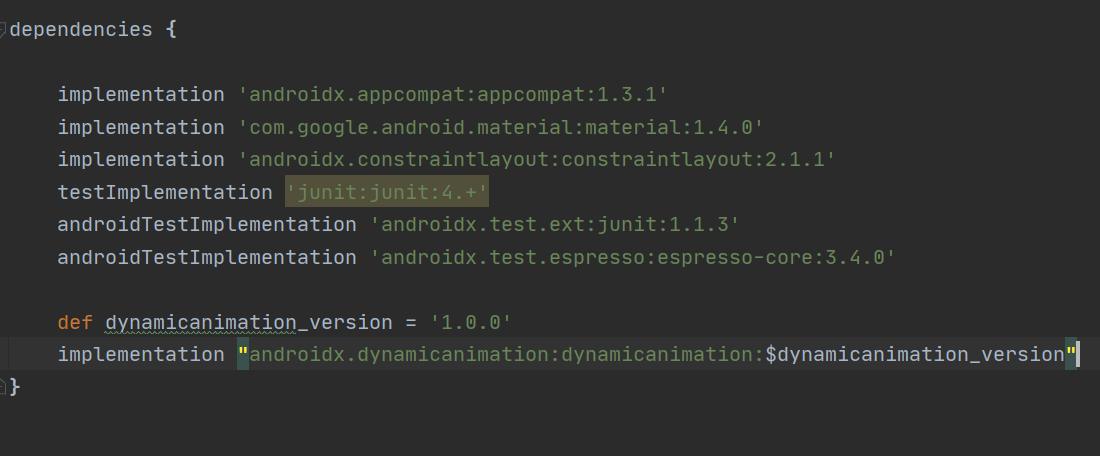
2.1. Open build.gradle file for our app module.
build.gradle file (app module)
2.2. Add the support library to the dependencies
dependencies {
    def dynamicanimation_version = '1.0.0'
    implementation "androidx.dynamicanimation:dynamicanimation:$dynamicanimation_version"
}
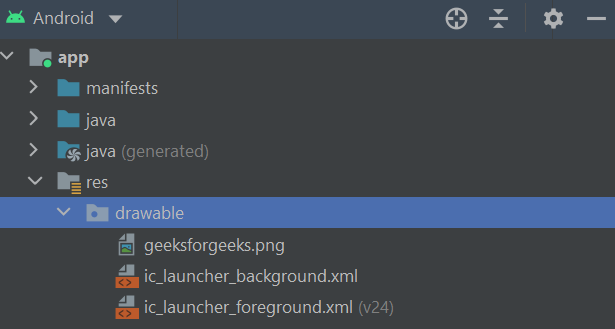
Step 3: Add an Image to the drawable folder
To add an image to the drawable folder please refer to How to Add Image to Drawable Folder in Android Studio. You can simply add an image to the drawable folder by just copying and pasting the image in the drawable folder
Navigation: app > res >drawable
.
Step 4: Working with activity_main.xml file
Navigate to the app > res > layout > activity_main.xml and add the below code to that file. Below is the code for the activity_main.xml file.
XML
<?xml version="1.0" encoding="utf-8"?>
<androidx.constraintlayout.widget.ConstraintLayout
android:layout_width="match_parent"
android:layout_height="match_parent"
android:background="#FFFFFF"
tools:context=".MainActivity">
<ImageView
android:id="@+id/imageView"
android:layout_width="343dp"
android:layout_height="241dp"
app:layout_constraintBottom_toBottomOf="parent"
app:layout_constraintEnd_toEndOf="parent"
app:layout_constraintStart_toStartOf="parent"
app:layout_constraintTop_toTopOf="parent"
app:layout_constraintVertical_bias="0.0"
app:srcCompat="@drawable/ic_launcher_foreground" />
</androidx.constraintlayout.widget.ConstraintLayout>
|
Step 5: Working with the MainActivity.java file
Go to the MainActivity.java file and refer to the following code. Below is the code for the MainActivity.java file. Comments are added inside the code to understand the code in more detail. Add animation to the ImageView and start the animation when the image is clicked.
Java
import androidx.appcompat.app.AppCompatActivity;
import androidx.dynamicanimation.animation.DynamicAnimation;
import androidx.dynamicanimation.animation.SpringAnimation;
import androidx.dynamicanimation.animation.SpringForce;
import android.os.Bundle;
import android.view.View;
public class MainActivity extends AppCompatActivity {
@Override
protected void onCreate(Bundle savedInstanceState) {
super.onCreate(savedInstanceState);
setContentView(R.layout.activity_main);
final View view =findViewById(R.id.imageView);
final SpringAnimation animation = new SpringAnimation(view, DynamicAnimation.TRANSLATION_Y,0f);
animation.getSpring().setDampingRatio(SpringForce.DAMPING_RATIO_HIGH_BOUNCY);
animation.getSpring().setStiffness(SpringForce.STIFFNESS_VERY_LOW);
animation.addEndListener(new DynamicAnimation.OnAnimationEndListener() {
@Override
public void onAnimationEnd(DynamicAnimation animation1, boolean canceled, float value, float velocity) {
view.setY(50f);
animation.animateToFinalPosition(500f);
}
});
view.setOnClickListener(new View.OnClickListener() {
@Override
public void onClick(View v) {
animation.animateToFinalPosition(500f);
}
});
}
}
|
Output:
Here is the output of our project.
Share your thoughts in the comments
Please Login to comment...