Working with Cookies in Spring MVC using @CookieValue Annotation
Last Updated :
17 Dec, 2023
Cookies are the concept of storing user information on the client side in the form of a text file. In this text file lot of information is available about clients or users. Cookies are small pieces of data that are sent by the web servers to the user’s web browsers and those cookies are stored in the client only, the cookies play an important role in web development for tracking the user’s activities while using the website. Mostly the cookies are used in Authentication Tokens, Privacy, Session Handling, Tracking, and Analytics of user activity. Cookies are again categorized into two types of Server-Side Cookies and Client-Side Cookies. In this article, we discuss about @CookieValue Annotation in Spring MVC.
In Cookies, some components are available those are:
- Name-Value Pair: The Cookies consist of a name and value pair, which means the name is the identifier and the value is the data associated with that identifier.
- Domain: It specifies the domain to which, the cookie belongs, and cookies are sent to a domain for every request.
- Path: It defines the Scope of the Cookie.
- Expiration Date: It defines When the cookies are expired. After this cookie expiration automatically, the cookie is deleted by the Browser.
- Secure Flag: If we set this to cookie. Then Cookies are sent only over HTTPS Connections
- HttpOnly Flag: If we set this to Cookie, then those cookies are not accessible from Client-Side Scripts.
Spring MVC
The Spring MVC is a Web module belonging to Spring Framework. And provides the development of Web Applications based on the MVC design pattern. MVC stands for Model, View, and Controller. This MVC design pattern divides the Application into 3 main Components namely Model, View, and Controller. The Spring MVC provides flexibility for developing websites. Nowadays this pattern is used in many domains like mobile application development. At present, most web applications follow this pattern for better performance. Now we discuss each component and its functionality. In this MVC Pattern, all components perform unique operations. And one of the most important advantages of this Spring MVC is Annotation-Based Programming. The Spring Provides different types of Annotations to Handle the MVC pattern. And we can be able to build RESTful Web Services using this pattern. It provides flexible configuration to the developers, and it supports JSP, Thymeleaf, and others.
Model
- The Model Contains business logic and application data.
- In Spring MVC, The Model often consists of POJO (Plain Old Java Object) used to encapsulate the data.
- The POJO is used to transfer data between View and Controller.
View
- The View is used for presenting the data to the user. It will display the data which is provided by the model.
- The View is implemented by using Thymeleaf, JSP, HTML and others.
Controller
- The Controller is handling the user input and flow of the application.
- In Spring MVC we use @Controller annotation for creating controller.
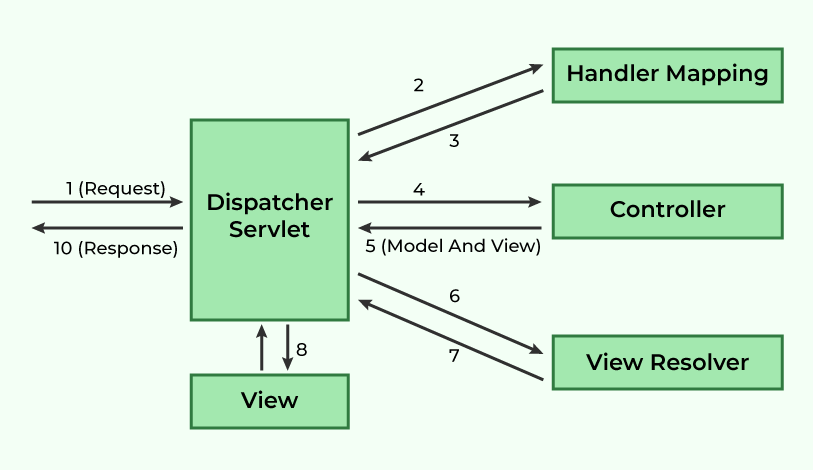
DispatcherServlet
The DispatcherServlet is the central component, which is act as front controller and it receives all incoming requests and direct them to controller and view based on requirement.
View Resolver
The View Resolver is used to resolving the view names to actual view development and it decides which view component is render the response.
Handler Mapping
The Handler Mappings are used to handle the controller mappings.
Pre-Requirements:
- Basic knowledge on Spring MVC
- know the functionality of annotations in spring
- working process of @Controller, @Service annotations
- Spring Tools (I used Spring Tools V4)
- Basics of Thymeleaf
@CookieValue Annotation
In Spring MVC, @CookieValue, this annotation provides a convenient way for working with cookies in controller method. And @CookieValue provides a easy way for extracting cookie values and integrate them into out application. @CookieValue is used in spring MVC for binding method parameters value of a HTTP cookie.
Illustration of @CookieValue Annotation:
Java
import org.springframework.stereotype.Controller;
import org.springframework.web.bind.annotation.CookieValue;
import org.springframework.web.bind.annotation.RequestMapping;
import org.springframework.web.bind.annotation.ResponseBody;
@Controller
@RequestMapping("/gfg")
public class MyController {
@RequestMapping("/readCookie")
@ResponseBody
public String readCookieValue(@CookieValue(value = "cookieName",
defaultValue = "defaultCookieValue") String cookieValue)
{
return "Cookie Value: " + cookieValue;
}
}
|
In the above example, there are lot of annotations are there, before going to @CookieValue you need to know working process of different Annotations in Spring (reference) . This point we already mentioned in Pre-Requirements as well. Then only you can understand this, otherwise it is difficult to understand.
Example of @CookieValue Annotation:
Now we will see the working functionality of @CookieValue in Spring MVC with simple user signup form. In this example we will used Spring Tools V4, Thymeleaf, Post man tool for testing.
Steps for Creating Project (Reference)
- Create a Spring Boot project
- After create a user model (POJO class)
- Then create Controller layer using @Controller
- After that create a HTML page
- The final step is run the application
User.java
Java
package com.gfg.app.model;
public class User {
public User() {
super();
}
public User(String username, String email) {
super();
this.username = username;
this.email = email;
}
public String getUsername() {
return username;
}
public void setUsername(String username) {
this.username = username;
}
public String getEmail() {
return email;
}
public void setEmail(String email) {
this.email = email;
}
private String username;
private String email;
}
|
In above java code, we have created a class called User.java which is POJO class for get and set data by using setters and getters methods username and email. Instead of Generating Getters and Setters methods we can use lombok dependency in Spring Boot. Below it is mentioned that how to use it:
Java
package com.gfg.app.model;
import lombok.AllArgsConstructor;
import lombok.Data;
import lombok.NoArgsConstructor;
@Data
@AllArgsConstructor
@NoArgsConstructor
public class User {
private String username;
private String email;
}
|
UserController.java
Java
package com.gfg.app.controller;
import org.springframework.stereotype.Controller;
import org.springframework.ui.Model;
import org.springframework.web.bind.annotation.CookieValue;
import org.springframework.web.bind.annotation.GetMapping;
import org.springframework.web.bind.annotation.PostMapping;
import org.springframework.web.bind.annotation.RequestMapping;
import org.springframework.web.bind.annotation.ResponseBody;
import com.gfg.app.model.User;
import jakarta.servlet.http.Cookie;
import jakarta.servlet.http.HttpServletResponse;
@Controller
@RequestMapping("/user")
public class UserController {
@GetMapping("/register")
    public String showRegistrationForm(Model model) {
        model.addAttribute("user", new User());
        return "index";
    }
@PostMapping("/register")
public String registerUser(User user, HttpServletResponse response) {
Cookie cookie = new Cookie("usernameCookie", user.getUsername());
response.addCookie(cookie);
return "redirect:/user/welcome";
}
@GetMapping("/welcome")
@ResponseBody
public String welcomeUser(@CookieValue(value = "usernameCookie",
defaultValue = "Guest") String username)
{
return "Welcome, " + username + "!";
}
}
|
In above code, we have used different annotations for different purposes. @Controller Annotation is used for creating a controller layer. And It indicates that particular class serve as a role of controller. After that we have used @RequestMapping Annotation for to map web requests for a specific handler class, And the @RequestMapping annotation is used with @Controller. @RequestMapping It is applied for both class and it’s methods. After that we have used @GetMapping for mapping HTTP Get Requests for a Specific handler class.
- @GetMapping(“/register”) this is used for display the HTML Page on the web browser using Model.
- @PostMapping(“/register”) It is used for submitting the data through the HTML Form.
- @GetMapping(“/welcome”) is used for Displaying the Cookie Value on the web browser.
This piece of code is used for displaying web page on the web browser.
@GetMapping("/register")
public String showRegistrationForm(Model model) {
model.addAttribute("user", new User());
return "index";
}
This piece of code is used for Submitting the user details, At same time the username is set as a cookie name by using Cookie class.
@PostMapping("/register")
    public String registerUser(User user, HttpServletResponse response) {
        // For simplicity, we'll just set a cookie with the username
        Cookie cookie = new Cookie("usernameCookie", user.getUsername());
        response.addCookie(cookie);
        return "redirect:/user/welcome";
    }
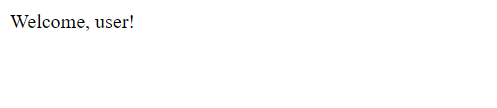
This piece of code is used for displaying the cookie name on the web page.
@GetMapping("/welcome")
    @ResponseBody
    public String welcomeUser(@CookieValue(value = "usernameCookie", defaultValue = "Guest")
                                                      String username) {
        return "Welcome, " + username + "!";
    }
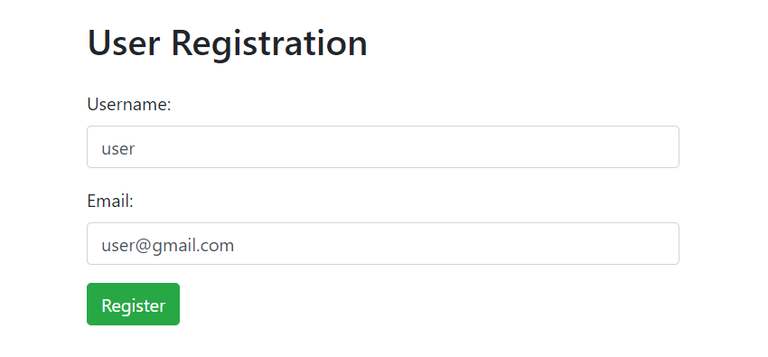
HTML Code:
In below HTML code we have used Thymeleaf and Bootstrap framework. Thymeleaf is used for combining the Application logic and HTML Code.
HTML
<!DOCTYPE html>
<head>
<meta charset="UTF-8">
<meta name="viewport" content="width=device-width, initial-scale=1.0">
<title>User Registration</title>
integrity="sha384-Gn5384xqQ1aoWXA+058RXPxPg6fy4IWvTNh0E263XmFcJlSAwiGgFAW/dAiS6JXm"
crossorigin="anonymous">
</head>
<body>
<div class="container mt-5">
<form th:action="@{/user/register}" th:object="${user}" method="post" class="col-md-6 offset-md-3">
<h2 class="mb-4">User Registration</h2>
<div class="form-group">
<label for="username">Username:</label>
<input type="text" id="username" th:field="*{username}" class="form-control" required>
</div>
<div class="form-group">
<label for="email">Email:</label>
<input type="email" id="email" th:field="*{email}" class="form-control" required>
</div>
<button type="submit" class="btn btn-success">Register</button>
</form>
</div>
integrity="sha384-KJ3o2DKtIkvYIK3UENzmM7KCkRr/rE9/Qpg6aAZGJwFDMVNA/GpGFF93hXpG5KkN"
crossorigin="anonymous"></script>
integrity="sha384-ApNbgh9B+Y1QKtv3Rn7W3mgPxhU9K/ScQsAP7hUibX39j7fakFPskvXusvfa0b4Q"
crossorigin="anonymous"></script>
integrity="sha384-JZR6Spejh4U02d8jOt6vLEHfe/JQGiRRSQQxSfFWpi1MquVdAyjUar5+76PVCmYl"
crossorigin="anonymous"></script>
</body>
</html>
|
HTML Code output:
After Submitting user details, Redirecting to Welcome URL for displaying Cookie Name.
Output of Cookie Value:
Run Project:
- Right click on Project Folder, the select Run as Spring Boot App.
- After That open your Web Browser, open this URL http://localhost:8080/user/register
- After that HTML Form is opened, Then Provide User data and click on the submit button.
- On Successful Data Submission, Redirecting to this URL – http://localhost:8080/user/welcome
- Now We can See the Cookie Value as an Output on The Web Browser.
Conclusion
The Spring MVC is the most famous framework for Handling Business logic and Application Flow controller. In this article I clearly explain about @CookieValue Annotation with an example. Mostly the cookies are used to tracking the use state while using the web services on the internet. And the cookies are store on client side, I already mentioned in the above this. This coding example is simple and straight forward for bettering the Functionality of the @CookieValue Annotation in Spring MVC.
Share your thoughts in the comments
Please Login to comment...