How to Run Spring Boot Application?
Last Updated :
12 Mar, 2024
Spring Boot is built on the top of Spring and contains all the features of Spring. And it is becoming a favorite of developers these days because of its rapid production-ready environment which enables the developers to directly focus on the logic instead of struggling with the configuration and setup. Spring Boot is a microservice-based framework and making a production-ready application in it takes very little time. Following are some of the features of Spring Boot:
- It allows for avoiding heavy configuration of XML which is present in spring.
- It provides easy maintenance and creation of REST endpoints.
- It includes an embedded Tomcat server.
- Deployment is very easy; war and jar files can be easily deployed in the Tomcat server.
For more information, please refer to this article: Introduction to Spring Boot
Generally, to develop a Spring Boot Application we choose Eclipse, Spring Tool Suite, and IntelliJ IDEA IDE. So, in this article, we are going to run our application in these 3 IDEs.
Run Spring Boot Application in Eclipse IDE
The Eclipse IDE is famous for the Java Integrated Development Environment (IDE), but it has a number of pretty cool IDEs, including the C/C++ IDE, JavaScript/TypeScript IDE, PHP IDE, and more.
Step by Step Implementation:
- Create and set up Spring Boot project.
- Add the spring-web dependency in your pom.xml file.
- Create one package and name the package as “controller”.
- Run the Spring Boot application.
Step 1: Create and Setup Spring Boot Project in Eclipse IDE
One should know how to create and set up Spring Boot Project in Eclipse IDE and create your first Spring Boot Application in Eclipse IDE.
Step 2: Add the spring-web dependency in your pom.xml file. Go to the pom.xml file inside your project and add the following spring-web dependency.
<dependency>
    <groupId>org.springframework.boot</groupId>
    <artifactId>spring-boot-starter-web</artifactId>
</dependency>
Step 3: In your project create one package and name the package as “controller”. In the controller package create a class and name it as DemoController. Below is the code for the DemoController.java file.
Java
                    package com.example.demo.controller;

import org.springframework.stereotype.Controller;
import org.springframework.web.bind.annotation.RequestMapping;
import org.springframework.web.bind.annotation.ResponseBody;

@Controller
public class DemoController {

    @RequestMapping("/hello")
    @ResponseBody
    public String helloWorld()
    {
        return "Hello World!";
    }
}
We have used the below annotations in our controller layer. Here in this example, the URI path is /hello.
- @Controller: This is used to specify the controller.
- @RequestMapping: This is used to map to the Spring MVC controller method.
- @ResponseBody: Used to bind the HTTP response body with a domain object in the return type.
Now, our controller is ready. Let’s run our application inside the DemoApplication.java file. There is no need to change anything inside the DemoApplication.java file.
Java
                    package com.example.demo;

import org.springframework.boot.SpringApplication;
import org.springframework.boot.autoconfigure.SpringBootApplication;

@SpringBootApplication
public class DemoApplication {

    public static void main(String[] args) {
        SpringApplication.run(DemoApplication.class, args);
    }

}
Step 4: Run the Spring Boot Application
To run the application, click on the green icon as seen in the below image.

After successfully running the application, you can see the console as shown in the below image. Your Tomcat server started on port 8989.

Try this Tomcat URL, which is running on http://localhost:8989/hello

Run Spring Boot Application in IntelliJ IDEA
IntelliJ IDEA is an integrated development environment (IDE) written in Java. It is used for developing computer software. This IDE is developed by Jetbrains and is available as an Apache 2 Licensed community edition and a commercial edition. It is an intelligent, context-aware IDE for working with Java and other JVM languages like Kotlin, Scala, and Groovy on all sorts of applications. Additionally, IntelliJ IDEA Ultimate can help you develop full-stack web applications, thanks to its powerful integrated tools, support for JavaScript and related technologies, and advanced support for popular frameworks like Spring, Spring Boot, Jakarta EE, Micronaut, Quarkus, Helidon. So in this article, we are going to discuss how to run your first spring boot application in IntelliJ IDEA.
Prerequisite: Download and Install IntelliJ IDEA in your system. Please refer to this article Step by Step guide to install Intellij Idea to Install IntelliJ IDEA in Your System.
Procedure:
- Create and Setup Spring Boot Project
- Creating or importing the spring boot project a file name Application.java
- Run the Spring Boot Application
- Tomcat server will be started.
- Re-run the application again
Step 1: Create and Setup Spring Boot Project in IntelliJ IDEA
You may refer to this article How to Create and Setup Spring Boot Project in IntelliJ IDEA and create your first Spring Boot Application in IntelliJ IDEA.
Step 2: After successfully creating or importing the spring boot project a file name Application.java (Here DemoApplication) will be created automatically and this is your entry point. You can consider it as the main method of a Spring Boot application.

Step 3: Run the Spring Boot Application
Method 1: To run this application now Right-click on the Application.java > Run “DemoApplication.main()” as shown in the below image. or you may type the shortcut key combination (Ctrl + Shift + F10) to run the application.

Method 2: Directly click on the green color triangle button as shown in the below image then choose Run ‘DemoApplication.main()’.

Step 4: After successfully running the application, you can see the console as shown in the below image. Your Tomcat server started on port 8080.

The default port of the Tomcat server is 8080 and can be changed in the application.properties file by using this following line of code.
server.port=8989
Step 5: Now re-run the application again and you can see that your Tomcat server has started on the port that you have given, like in the below image.
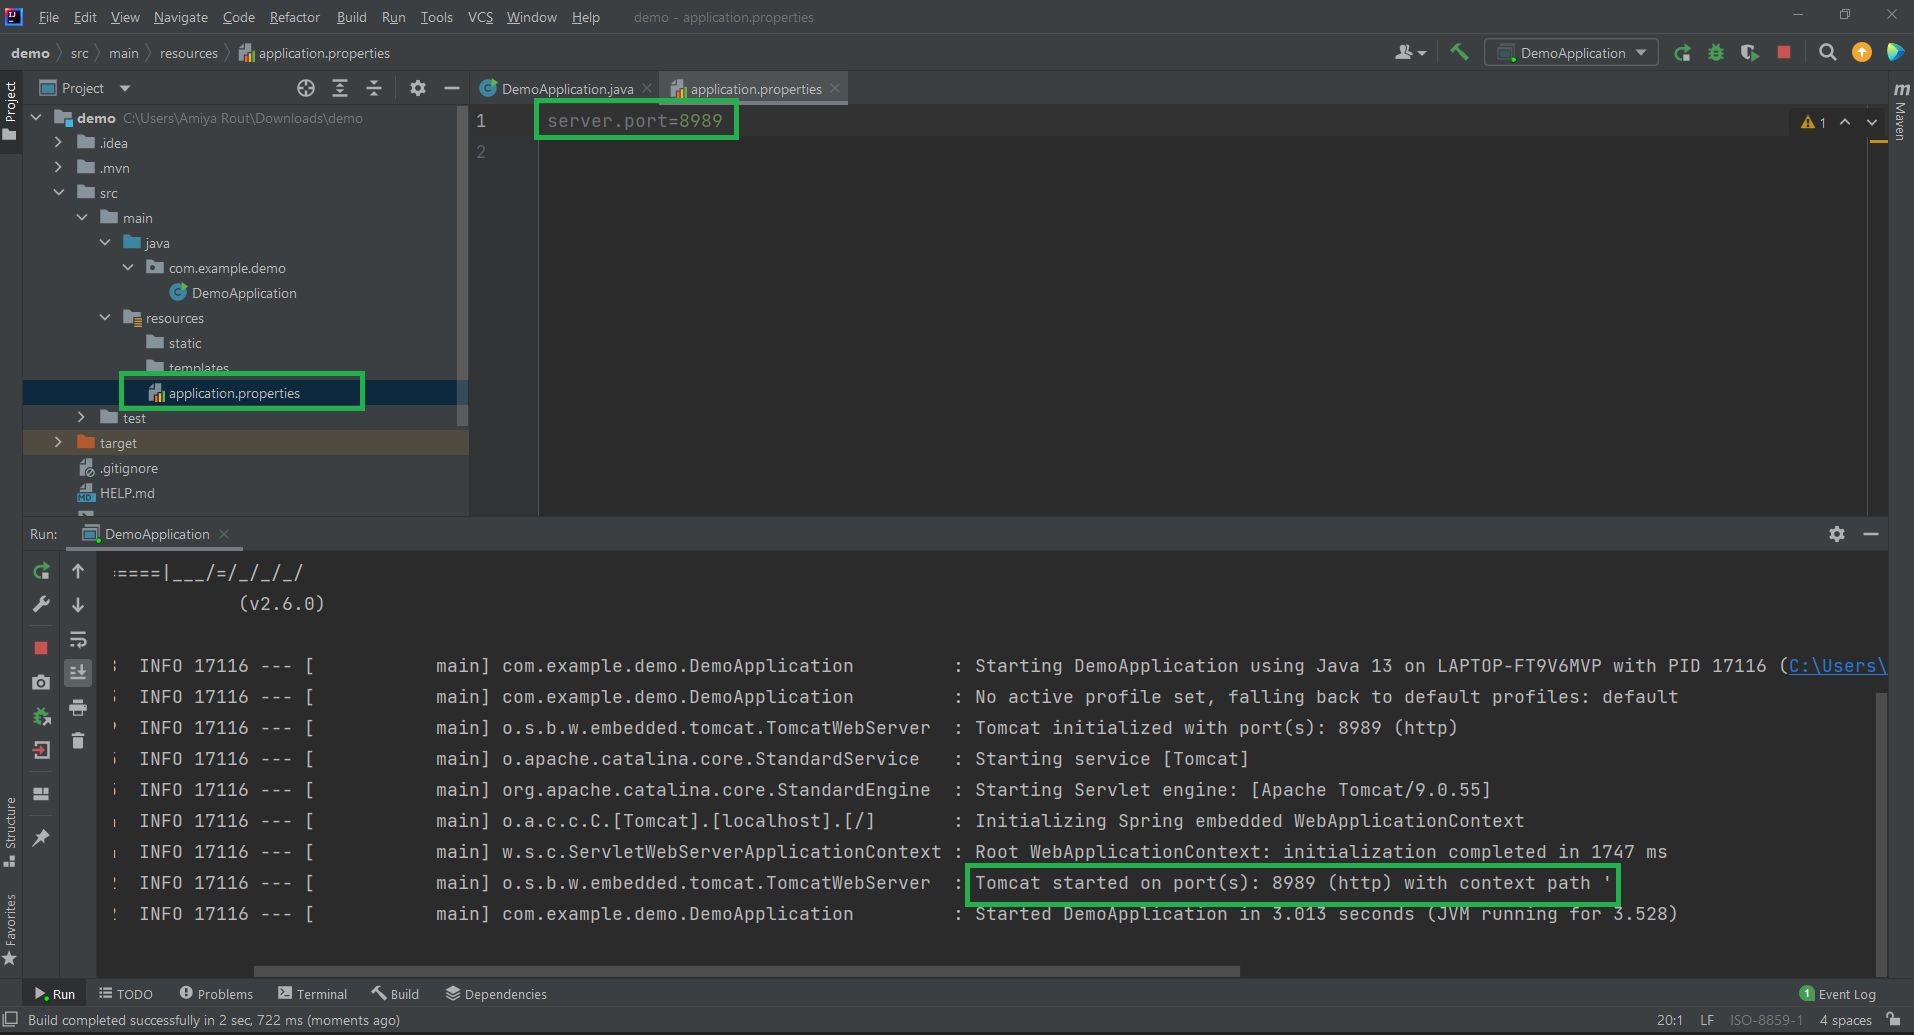
You can access the output screen from the following URL: http://localhost:8989/. Note that at last you need to provide your port number.
Run Spring Boot Application in Spring Tool Suite
Spring Tool Suite (STS) is a Java IDE tailored for developing Spring-based enterprise applications. It is easier, faster, and more convenient. And most importantly it is based on the Eclipse IDE. STS is free, open-source, and powered by VMware. Spring Tools 4 is the next generation of Spring tooling for the favorite coding environment. Largely rebuilt from scratch, it provides world-class support for developing Spring-based enterprise applications, whether you prefer Eclipse, Visual Studio Code, or Theia IDE. So in this article, we are going to discuss how to run your first spring boot application in STS.
Prerequisite: Download and Install Spring Tool Suite (Spring Tools 4 for Eclipse) IDE in your system. You may refer to this article: How to Download and Install Spring Tool Suite (Spring Tools 4 for Eclipse) IDE?
Procedure:
- Create Spring Boot project in Spring Tool Suite
- Import the Project into STS IDE
- An entry file named Application file will be created for STS
- Run the application on the server.
Step 1: Create Your Spring Boot Project in Spring Tool Suite
You may refer to this article How to Create and Setup Spring Boot Project in Spring Tool Suite and create your first Spring Boot Application. Or you may Create Your Spring Boot Project in Spring Initializer and import the project into your STS IDE. Please refer to this article to Create Spring Boot Project in Spring Initializer.
Step 2: How to Import the Project into Your STS IDE?
2.1: Go to your STS IDE > File > Open Project from File System as shown in the below image.

2.2: A pop-up window will occur like the following. Here you have to choose the directory that has been generated while creating the Spring Boot project in Spring Initializer. And then click on the Finish button.

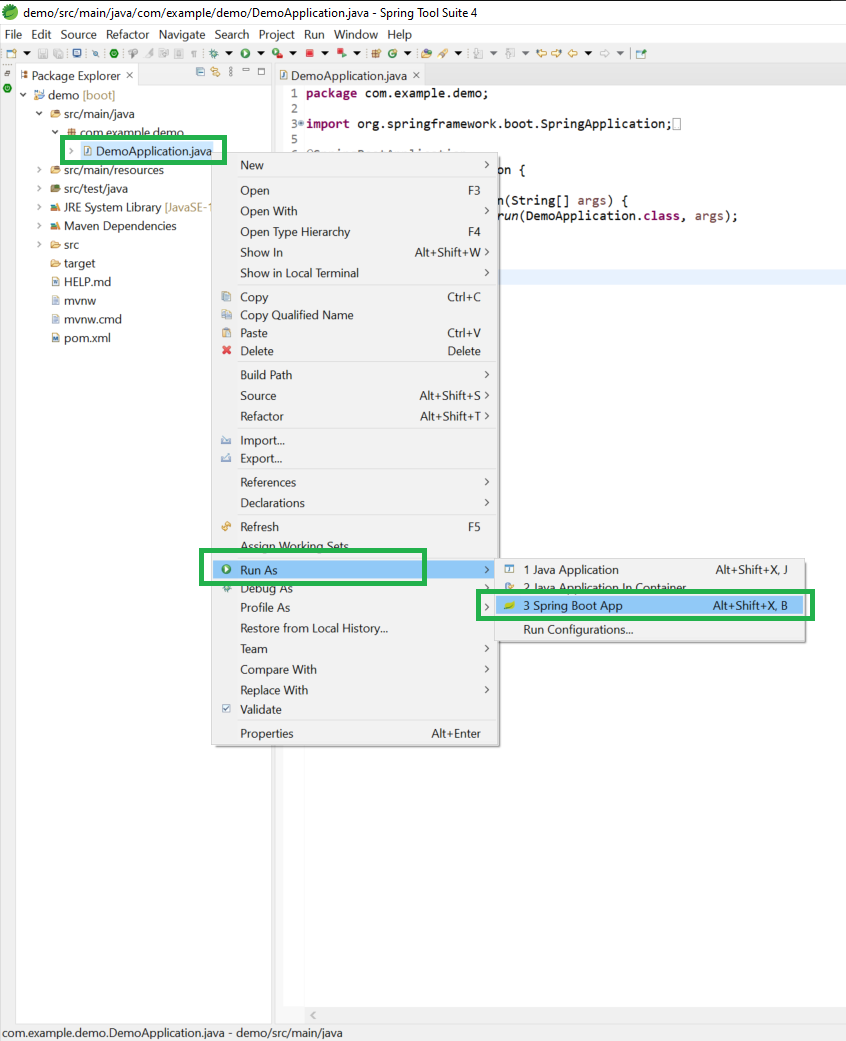
Step 3: After successfully creating or importing the spring boot project a file name Application.java (Here DemoApplication) will be created automatically and this is your entry point. You can consider it as the main method of a Spring Boot application.

Step 4: In order to run this application now, Right-click on the Application.java > Run As > Spring Boot App as shown in the below image.
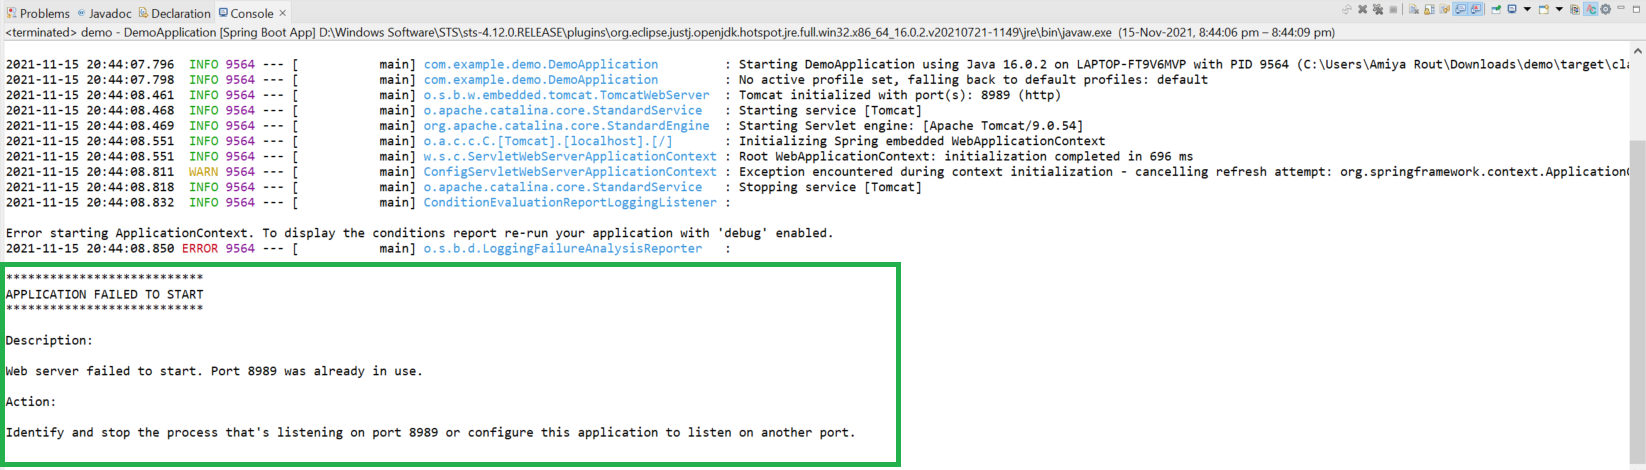
Step 5: After successfully running the application, you can see the console where the Tomcat server starts on default port number 8080 as shown in the below image.

Now geeks you must be wondering about what to do if we do not want it to be run on the default port number, that is if we do not want the application to be run on the default port of the Tomcat server, which is 8080. We can change the port number in the application.properties file by using the following line of code as follows:
server.port=8989
A. Now re-run the application again and you can see Your Tomcat server started on the port that you have given like the below image.

B. If you are encountered with the following error then it is highly recommended that you should change your port number.
Note: You can access the output screen in the following URL: http://localhost:8080/. Note that at last provide your port number.
Like Article
Suggest improvement
Share your thoughts in the comments
Please Login to comment...