What is ExifInterface in Android?
Last Updated :
25 Aug, 2021
We make significant use of images in our apps. For some Picture-Related Applications, all of the image information is necessary. However, we cannot always read the picture’s features immediately from the image. There may be a requirement to know picture information such as GPS position, date/time, settings at the moment of capture, orientation, and so on. Previously, we had to extract metadata from different techniques individually and read it to comprehend the Image attributes. Even if altering the photos, such as deleting GPS tags or changing the orientation, would be difficult jobs when we read. Exif files and ExifInterface are the answer to these problems.
What exactly is Exif?
Exchangeable Image File Format (Exif) is an acronym for Exchangeable Image File Format. This is a standard that specifies detailed information about a photograph or other piece of media recorded by a camera. It may save critical information like camera exposure, the date/time the image was taken, and even GPS position.
The following is an example of an Exif file:
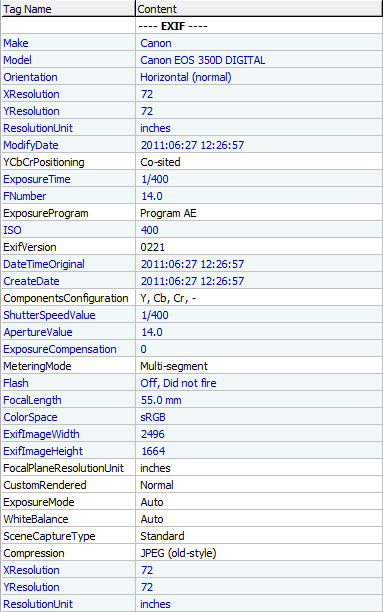
EXIF Data Example Source Link – https://www.photographymad.com/files/images/exif-data.jpg
If you look at the image above, you’ll notice that it has attributes such as image length and width, date and time of image capture, device from which the image was captured, Orientation code, and some of the image’s attributes such as light, white balance, focal length, whether the flash was on or not, and GPS information for the image, i.e. the lat long of the image where it was captured. We can see all of the image’s features just by gazing at it. You should now have a good understanding of EXIF files.
How to Get EXIF Data on Android?
We learned what Exif is and what it includes by using the ExifInterface in Android. Let’s have a look at how we can get Exif data from pictures on Android. Since version 25.1.0, ExifInterface has been included in the android support library. Even though the feature has existed since Android 7.1, with all of the possibilities offered to the UI, it only made sense from Android 9+. This has been enhanced with over 100 characteristics for reading Exif tags, which include information on the camera, camera settings, orientation, and GPS coordinates
It can only read the Exif of JPEG files or a RAW picture file at the moment. JPEG, DNG, CR2, NEF, NRW, ARW, RW2, ORF, PEF, SRW, RAF, and HEIF are all supported formats.
You must add the following dependency to your build.gradle if you wish to utilize ExifInterface.
implementation 'androidx.exifinterface:exifinterface:1.3.2'
One thing to remember about Exif data is that there are no mandatory tags: every tag is optional, and some services even remove Exif data entirely. As a result, you should always address instances where there is no Exif data, whether it’s because there is no data for a single property or because the image format cannot allow the data at all to be linked like the infamous WebP format
What Are Exif Attributes and How Do I Read Them?
Let’s look at how ExifInterface can read EXIF characteristics from various sources and some of the usage cases. You’d just use the getAttributeInt(), getAttributeDouble(), or getAttribute() (for Strings) methods for most attributes.
Uri for extracting data from content:
Kotlin
Uri gfgUri;
InputStream gfgIn;
try {
gfgIn = getContentResolver().openInputStream(gfgUri);
ExifInterface exifInterface = new ExifInterface(gfgIn);
} catch (IOException e) {
} finally {
if (gfgIn != null) {
try {
gfgIn.close();
} catch (IOException ignored) {}
}
}
|
GeekTip: that external InputStreams, such as those returned by a HttpURLConnection, will not function with ExifInterface. It is strongly advised that they only be used with content:/ or file:/ URIs.
For camera apps:
The writing properties are more essential once the image has been captured. It’s still restricted to JPEG pictures for the time being. We may simply change the JPEG ORIENTATION, JPEG GPS LOCATION, or the equivalent using ExifInterface. At the user’s request, we can also delete these characteristics.
Kotlin
var gfgExif : ExifInterface = ExifInterface(pictureFile.getPath())
gfgExif.setAttribute(ExifInterface.TAG_ORIENTATION, "" + getPhotoOrientation(configurationProvider.getSensorPosition()))
gfgExif.saveAttributes()
|
The image orientation:
Which is kept in the appropriately called TAG ORIENTATION, which yields one of the ORIENTATION_ constants, is one of the most essential properties when it comes to presenting pictures. You may post-process the value to convert it to a rotation angle.
Java
int gfgRoatation = 0;
int gfgOrientation = exifInterface.getAttributeInt(
ExifInterface.TAG_GFGORIENTATION ,
ExifInterface.GFGORIENTATION _UNDEFINED);
switch (gfgOrientation ) {
case ExifInterface.GFGORIENTATION _ROTATE_90:
gfgRoatation = 180;
break;
case ExifInterface.GFGORIENTATION _ROTATE_180:
gfgRoatation = 0;
break;
case ExifInterface.GFGORIENTATION _ROTATE_270:
gfgRoatation = 270;
break;
}
|
Step #1: Create the ExifInterface first:
Java
ExifInterface gfgexif = new ExifInterface(uri.getPath());
|
Step #2: Then rotate the bitmap using the Exif rotation angle:
Java
int gfgrotation = gfgexif.getAttributeInt(ExifInterface.TAG_ORIENTATION, ExifInterface.ORIENTATION_UNDEFINED);
|
Step #3: To convert Exif rotation to degrees, use the following formula:
Java
int gfgDegRotation = exifToDegrees(gfgRotation);
|
Step #4: Then, using a Matrix, rotate the picture using the image’s actual rotation as a reference point:
Java
Matrix gfgMatrix = new Matrix();
if (gfgrotation != 0) {
gfgMatrix.postRotate(rotationInDegrees);
}
|
Step #5: The Bitmap.createBitmap function, which accepts a Matrix as an input, is used to make the new rotated image:
Java
Bitmap.createBitmap(Bitmap source, int x, int y, int width)
|
And voila, the EXIF Data is created!
Some Examples of How ExifInterface May be Used
- When a photograph is taken, ExifInterface is used to write the image information. It’s also useful to keep track of the image’s orientation when storing it in your phone’s memory.
- We may need to reduce the picture size and update the Exif information; in this case, we will need to get the Exif information and save the new information back to the image.
- The image headers are also retrieved and parsed using ExifInterface.
- When the device is turned, the visual orientation remains consistent.
- Obtaining a picture from the gallery and presenting it with the appropriate orientation and other data that were saved with the image.
Share your thoughts in the comments
Please Login to comment...