Different Ways to Change Android SDK Path in Android Studio
Last Updated :
31 Oct, 2022
Android SDK is one of the most useful components which is required to develop Android Applications. Android SDK is also referred to as the Android Software Development Kit which provides so many features which are required in Android which are given below:
- A sample source code.
- An Emulator.
- Debugger.
- Required set of libraries.
- Required APIs for Android development with their documentation.
- Tutorials required for Android OS development.
Why There is a Need to Change Android SDK Path?
Android SDK comes itself when we download Android Studio. It downloads when we download our Android Studio. But many times due to some issue in our pc these SDK files may get deleted. And without your Android SDK Android studio is not able to work and we cannot develop any application. Android SDK is the heart of Android studio. We can easily download Android SDK from the android developers’ site, but we have to set the path for this SDK in our Android studio as well to use this SDK.
Now the point that comes here is how we can change the SDK path for our Android application in Android Studio. So in this article, we are going to discuss three different methods to Change Android SDK Path in Android Studio.
Method 1
Step 1: Create a new Project in Android Studio
Navigate to the File > New > New Project and create your new project. The language used for this will not matter as this process will be the same for both java as well as Kotlin.
Step 2: Opening project structure
Navigate to the File > Click on Project structure which is shown in the list and click on the Project structure option. After clicking that option you will get to see the below screen.

Inside the above screen, click on the SDK Location option you will get to see the below screen.
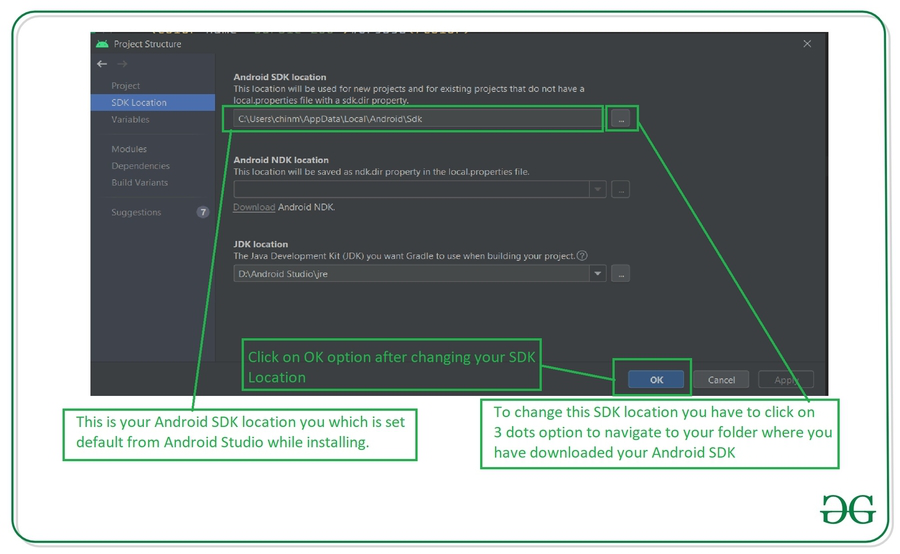
In the above image, you will get to see the current SDK location for your Android Studio. To change this SDK location you have to click on the 3 dots which are being displayed and then select your SDK location folder. After selecting this folder click on the OK option to save your SDK path.
Step 3: Sync your project after adding your SDK path
Now sync your project with Gradle files to check that SDK is working fine. To do this click on File > you will get to see the option as Sync Project With Gradle files option click on that option and sync your project. On successful sync of your project, your SDK location is set perfectly and now you are good to go in developing Android Applications.
Method 2
Step 1: Create a new Project in Android Studio
Navigate to the File > New > New Project and create your new project. The language used for this will not matter as this process will be the same for both java as well as Kotlin.
Step 2: Opening Android Studio Settings
Navigate to the File > Settings option you will get to see below dialog screen. Inside that screen. Click on Appearance and Behavior option > System Settings options and then click on the Android SDK option to get to see the below screen.

Inside this screen, you will get to see your SDK path. You can update your SDK path by clicking on the Edit option. After that select your SDK path, then click on Apply option, and then click on the OK option.
Step 3: Sync your project after adding your SDK path
Now sync your project with Gradle files to check that SDK is working fine. To do this click on File > you will get to see the option as Sync Project With Gradle files option click on that option and sync your project. On successful sync of your project, your SDK location is set perfectly and now you are good to go in developing Android Applications.
Method 3
Step 1: Create a new Project in Android Studio
Navigate to the File > New > New Project and create your new project. The language used for this will not matter as this process will be the same for both java as well as Kotlin.
Step 2: Opening project structure.
Inside your Android Studio in the top right corner, You can get to see the icon below the image for opening the project structure. Click on that option to open your project structure option. You will get to see the below screen. For opening this Project Structure we can also use a shortcut key as:
|
Operating System
|
Shortcut Key
|
| Windows |
Ctrl+Alt+Shift+S |
| Mac OS |
Command + ; (semi-colon) |
| Linux |
Ctrl+Alt+Shift+S |

After clicking on this option we simply have to follow Step 1 to update our Android SDK.
Inside the above screen, click on the SDK Location option you will get to see the below screen.
In the above image, you will get to see the current SDK location for your Android Studio. To change this SDK location you have to click on the 3 dots which are being displayed and then select your SDK location folder. After selecting this folder click on the OK option to save your SDK path.
Step 3: Sync your project after adding your SDK path
Now sync your project with Gradle files to check that SDK is working fine. To do this click on File > you will get to see the option as Sync Project With Gradle files option click on that option and sync your project. On successful sync of your project, your SDK location is set perfectly and now you are good to go in developing Android Applications.
Like Article
Suggest improvement
Share your thoughts in the comments
Please Login to comment...