What is Collaboration in Git?
Last Updated :
31 May, 2023
Pre-requisite: Git & GitHub
Collaboration is the way different people can work on the same project together. It is like creating a group in GitHub just like Groups in other social media. The people added to the collaborator’s list can be able to push, merge, and do other kinds of similar things on the project.
Steps for Collaboration in GIT
Step 1: Create a Repository
Step 2: Add files to your project. Open Git Bash into your local working directory where files are saved and follow the commands:
$ git init
$ git add
$ git commit -m "initial commit"
$ git remote add origin remote repository URL
$ git remote -v
$ git push -f origin master
Step 3: Adding your Collaborators. Click on settings and then follow the below steps :
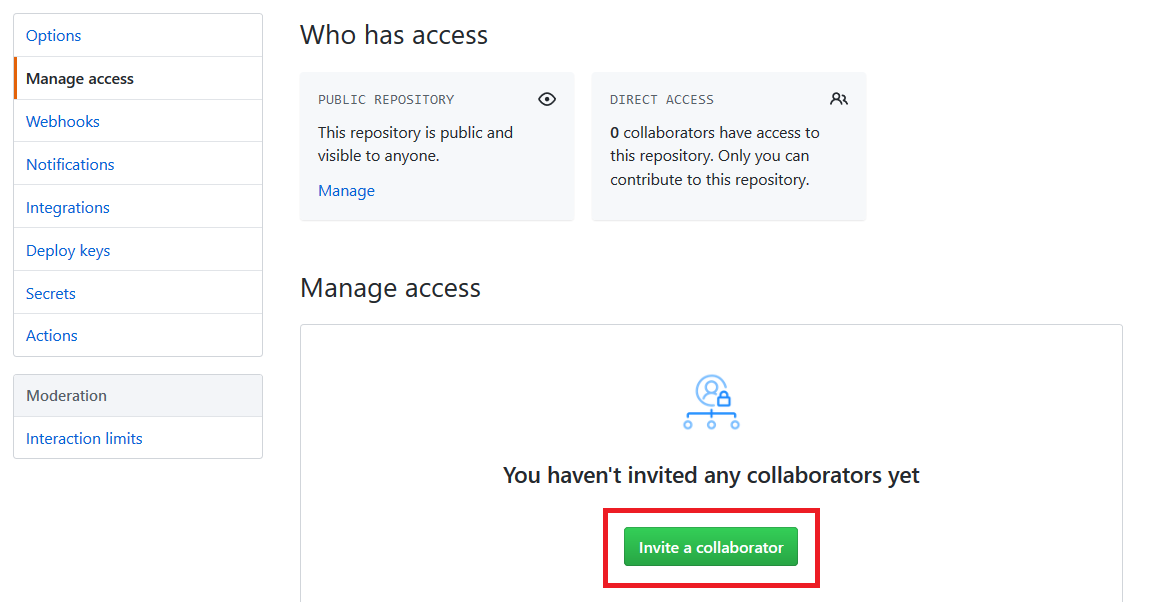
After clicking on “Invite a collaborator” fill in the required details and then you are done.
Note: In order to perfectly work in a collaborative team you need to know below terminologies and their applications.
Creating Signed and Unsigned Tags
First, the question arises why do we sign a code? Well, the reason is that it shows the authority of the code, that who has written it, and who needs to be blamed if any bug arises. To create a simple tag just write:
$ git tag example
This creates a tag based on the current repository’s version.
In order to create an unsigned annotated tag containing a message just write :
$ git tag -a v1 -m "Version 1 release"
At last if you want to sign on a tag just write :
$ git tag -s mytag
In order to verify your signed tag just write :
$ git tag -v mytag
Git Checkout
The git checkout command lets you navigate between the branches created by the git branch. It lets you check files in the working directory to match the version stored in that branch.
$ git checkout branch_name
This command can be easily confused with git clone but both are different. The difference between the two commands is that clone works to fetch code from a remote repository, alternatively, checkout works to switch between versions of code already on the local system.
Other Related Terminologies
push : This command is used to push the files from your local machine to the GitHub repository.
$ git push -f origin master
fetch : It is useful when you are interacting with the remote repository. Basically, this command is used to retrieve the work done by other people and update your local project accordingly.
$ git fetch remotename
pull request: It is a method of submitting your contributions to the project. It occurs when a developer asks for changes committed to an external repository to be considered for inclusion in a project’s main repository after the peer review.
$ git pull remote_name
Fetch the specified remote’s copy of the current branch and immediately merge it into the local copy. This command is the same as git fetch followed by git merge
Deleting any tag: For deleting any tag navigate to your local GitHub repository and type the following command :
$ git tag -d tagName
$ git push origin :tagName
Searching Code
GitHub provides users the feature to search code with a repository or organization. Well there are some restrictions also imposed by GitHub while searching the code. These restrictions are imposed due to the complexity of searching code. Below are the valid searches you can perform on GitHub.
- Search by the file contents or file path
- Search within a user’s or organization’s repositories
- Search by file location or file size
- Search by language
- Search by file name or file extension
Check Previous Logs
To look back into what are all the commits that are made in the repository you can simply use:
$ git log
By default, if no argument is passed with this command. It will show the logs in reverse chronological order.
Collaboration in GitHub
GitHub is used by developers to collaborate and share the changes made by them remotely. Where other developers can pull the changes that are made by others and can stay up-to-date and can manage workflow efficiently. The following are the aspects we should consider while collaborating on GitHub.
- The registry is a collection of repositories that contain the files pushed by developers. The registry will be maintained remotely who have the access to the they can access the repository and can pull the repository and make the changes and push back to the registry with the changes.
- The repository is a collection of no.of files and folders which is located remotely in the registry where each a every developer who is working on the project can make the changes. In GitHub you can creaate public repository where every one can acesess the repository and private repository where only developer who had aceses can work on it.
- By using “git pull“ command you can pull the code from the GitHub and can stay upto date with the otheer developers.
- “Git push” command will help you to push the code to Github remote repository with the changes that you have made and from there other developers will the pull code and can stay uptodate.
- To increase the coordination between team members GitHub provides different collaboration tools like inline commenting, notifications, integaration and project boards etc.
Share your thoughts in the comments
Please Login to comment...