Git Workflows With Open Source Collaboration
Last Updated :
26 Feb, 2024
Open source is a space where people can modify and design something that is publiclycaly accessible to everyone. Software or codebases that are open source facilitate collaboration and innovation, which is not just limited to a team, but the whole public. GitHub is a platform that houses a wide range of projects and repositories from all over the world, enabling developers to contribute to public code, enhance their skills as well as improve the software that they rely on. The project owners also benefit by gaining expertise and innovating ideas from contributors all over the world.
In this article we are going to explore the general workflow followed by contributors while making contributions to public repositories present on GitHub. It is recommended that you create an account on GitHub and install the latest version of git, before commencing with the article. Note: This workflow has been designed keeping in mind the public repositories.
Primary Terminologies
The Git workflow for open-source collaboration typically involves the following steps:
- Git: Git is a distributed version control system that allows developers to track changes to their code, collaborate with others, and manage different versions of their projects.
- GitHub: GitHub is a web-based platform that provides hosting for Git repositories. It offers features like collaboration tools, issue tracking, and pull requests, making it popular for open-source development.
- Fork : Forking a repository creates a personal copy of it under your GitHub account. It allows you to freely experiment with changes without affecting the original project.
- Clone: Cloning a repository creates a local copy of it on your computer, allowing you to work on the code offline. It establishes a connection between your local copy and the remote repository on GitHub.
- Branch: A branch is a parallel version of a repository’s code, allowing you to work on different features or fixes separately from the main codebase. It enables isolation and organization of changes before they are merged back into the main branch.
- Pull Request: A pull request (PR) is a request to merge changes from one branch into another. It allows collaborators to review and discuss proposed changes before they are merged.
- Staging: Staging refers to the process of preparing changes to be committed in Git. It involves selecting which changes to include in the next commit using the git add command.
- Commit: A commit records changes to the repository’s history, creating a snapshot of the project at a specific point in time. It captures the changes made to files that have been staged with git add and includes a descriptive commit message.
- Repository: A repository (repo) is a storage space where your project’s files and version history are stored. It contains all the files and folders that make up your project, along with metadata like commit history and branches.
- Upstream: Upstream refers to the original repository that your forked repository is based on. It allows you to keep your forked repository in sync with changes made in the original repository.
- Push – Pushing refers to uploading local changes to a remote repository, typically on GitHub. It updates the remote repository with your latest commits, making your changes accessible to others.
- Merge – Merging combines changes from one branch into another, typically merging a feature branch into the main branch. It integrates changes made in different branches, creating a single unified history.
- Fetch – Fetching retrieves changes from a remote repository without merging them into your local branch. It allows you to see what changes have been made in the remote repository before deciding to merge them into your branch.
- Pull – Pulling fetches changes from a remote repository and merges them into your local branch. It is a combination of the git fetch and git merge commands, updating your local branch with the latest changes from the remote repository.
Contribution To GitHub Repository: A Step By Step Guide
Step 1: Fork the Repository
- Start by forking the repository of the project you want to contribute to. This creates a copy of the repository under your GitHub account.
- Select the repository you want to fork, and click on the fork button on the upper right corner.

- You will be directed to a form, where you can name your fork with whatever name you want. Click on create fork after naming the repository.

- The fork has been created successfully in the personal account.

A copy of the repository has been created in the personal account
Step 2: Clone The Repository
- Clone the forked repository to your local machine using the git clone command.
- This creates a local copy of the repository on your computer.
- You can get the link of your repository by clicking on code and then copying the link.
- Cloning using this link, will connect your local repository to your remote repository automatically and will help you avoid extra steps associated with other approaches.
git clone https://github.com/TAN347/Game-Aider.git
- Now in the forked repository, click the Code button and copy the link provided.

- Open your git bash terminal or any other terminal where you run your git commands and navigate to the folder where you want to make a clone.
- The write the git clone command and paste the copied URL. The project will be cloned.
-(1)-compressed.jpg)
Step 3: Preparing the Repository
1. Add Remote Upstream
- Add the original repository (the one you forked from) as a remote to keep your local copy in sync with the upstream changes.
- What happens with public repositories is that many people can be contributing to them at the same time.
- So if there are any changes in the upstream repository, you’ll have to keep syncing it to avoid any merge conflicts when you push your own code.
git remote add upstream https://github.com/Tanya347/Game-Aider.git

2. Sync With Upstream
- If the upstream repository has any changes then fetch them using the following commands. This enables us to fetch changes from the original repository.
Note: this won’t update you forked repository present on your account. It directly updates the local repository on your machine. If you want to update your forked repository, then you can always push the new changes using git push command.
git fetch upstream
- After fetching changes from the upstream repository, you can merge them into your local branch (usually master or main).
- Replace master with the branch name you are working on if it’s different.
git merge upstream/master
- Two avoid two steps you can directly use the following command, which basically fetches and then merges in one go.
git pull upstream
- Alternatively, you can also rebase your changes onto the changes from the upstream repository.
- Or you can manually fetch code from the upstream repository to your forked repository and pull it to your local repository.
3. Create a Branch
In this tutorial, we will change the following button on the Truth and Dare page by making it slightly bigger and the font more bold:

Button to be changed
Create a new branch for your feature or bug fix. It’s best practice to create a branch for each new feature or issue you’re working on. The branch name should be short, descriptive and unique.
git checkout -b feature-branch

Step 4: Make Changes In Working Area
- Make changes to the codebase in your local branch.
- Implement the feature or fix the bug you’re working on.
- It is good practice to keep running the git status command to check the status of our repository and perform the required actions whenever needed.
git status
- As I haven’t made any changes the working tree seems to be clean:
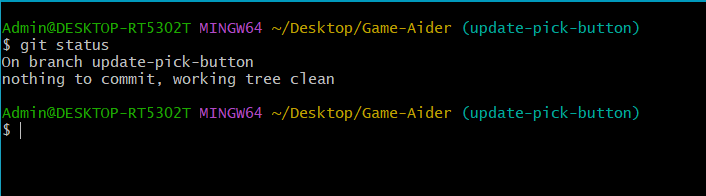
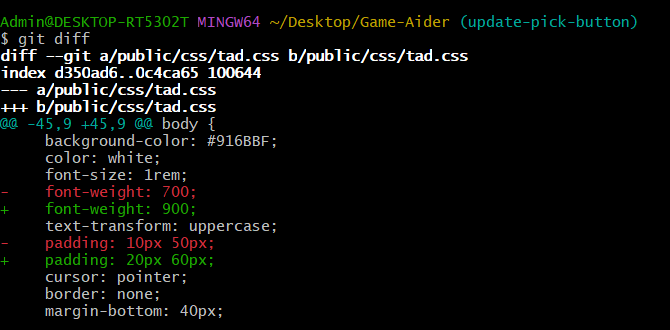
- Now I will update the code to make my button bigger. And then run git status command again. And we can see that a file has been updated.

- You can also check the changes that have been made using the git diff (checks all the files for changes) and git diff <file_name> (checks the particular file for changes).
- Once you’ve made changes, stage them for commit using git add, and then commit them with a descriptive commit message.
git add .
git commit -m "Add feature or fix bug"
Note: git add . command adds all the files with changes to the staging area. If you don’t want that and just want one or few select files to be staged, then you can do it like this:
git add <file_name1> <file_name2> <file_name3>
Step 5: Push Changes to Your Fork
- Push your local branch to your forked repository on GitHub.
git push origin feature-branch

Step 6: Create Pull Request
- Go to your forked repository on GitHub and create a pull request (PR) from your feature branch to the original repository’s main branch. Provide a descriptive title and description for your PR.
- When a commit is made to the Remote Repository, it will automatically show that there are updates and by how many forks the code is ahead of the original repository.
- It will also show the Compare & Pull Request option which we will use to create pull requests.
-(1).png)
- A form is displayed when click on Create Pull Request. It will show various details like from which repository to which repository the pull request is being created, which branch is being compared and whether the code is able to merge i.e. whether or not it creates any merge conflicts or not.
- After naming the PR click on the create pull request button.
-(1).png)
- We can see in the following image that the PR has been created.

Step 7: Review and Iterate
- Wait for feedback from maintainers and other contributors.
- Be prepared to make changes to your code based on code reviews and discussions.
- There can also be merge conflict issues that may need to be resolved.
- After completion of all final checks the pull request (PR) is merged into the main repository.
.jpg)
Step 8: Merge And Delete
- After your changes have been merged, you can delete the feature branch both locally and on your forked repository.
git branch -d feature-branch
git push origin --delete feature-branch
GitWorkFlows – FAQ’s
What are the three stages of Git Workflow?
The three stages of Git Workflow are: modified, staged, committed.
Why is a forked repository required?
Forking a repository creates a copy of the original repository under your GitHub account. It allows you to freely experiment with changes without affecting the original project. You can also contribute to the project by submitting pull requests from your forked repository.
How to keep the forked repository synced with the original repository?
To keep your forked repository in sync with the original repository, you need to add the original repository as a remote (upstream). Then, you can fetch changes from the original repository and merge them into your local branch. Finally, you can push the changes to your forked repository.
Is creating a new branch compulsory for a new feature or bug fix?
Creating a new branch for each feature or bug fix isolates your changes from the main codebase, making it easier to manage and review. It also allows you to work on multiple features concurrently without interfering with each other.
How to handle merge conflicts when a pull request is created?
Merge conflicts occur when there are conflicting changes between your branch and the target branch. You need to resolve these conflicts by manually editing the affected files to reconcile the differences. Once resolved, you can commit the changes and continue with the pull request process.
Share your thoughts in the comments
Please Login to comment...