Git is a distributed version control system and open-source software used by developers to manage different versions of source code by tracking changes in files. It is used by developers to work together on the same project from anywhere. Whether you are a professional developer or just starting your coding journey, Git is essential for becoming a pro developer.

In this article, we will see some of the top git tricks that will surely help you to improve your development skills. From interactive staging to stashing and checkout, you will be able to save time and increase productivity, after learning these. Also, it is important to note that mastering Git will help you to get better at development workflow but it is equally important to have a strong foundation of software engineering principles and software design patterns to build software
Top 20 Git Commands to Become a Pro Developer
As a programmer, it is a must-know git due to its huge advantage in making your project organized and versionable. It is used to check the project history and versions. Whether you are working on a project with your teammates, managing repositories, or tracking the changes, git commands will help you in all of that. So here are some of the top git commands which cover beginner to advance commands and developers should know to increase their performance :
1. git config
git config is one of the basic git commands that every developer should know and without applying this command git won’t let you proceed further. git config is used to set up the user configuration such as name, email, etc.
Syntax:
$ git config --global user.name "Harsh"
$ git config --global user.email harsh@example.com
Example:

2. git init
This command is used to initialize the git repository for our local project folder. For using the git init command you have to move to the directory where you have initialized the project on terminal/cmd and enter this command.
Syntax:
git init
Example:

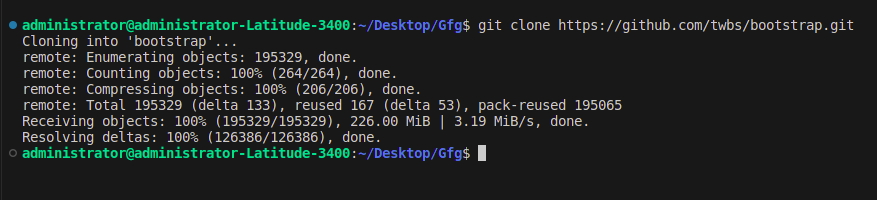
3. git clone
This command is used to obtain an already existing repository to your local system from a repository link. In cases, When you want to add a feature to someone’s project then you need this command. git clone command works when you paste the URL after this command on the terminal or Cmd.
Syntax:
git clone <repository-link>
Example:
4. git add
This command is used to add untracked changes to the repository which are ready to commit. git add command will help the changes files to get the staging area. Also, you can choose to add all the changes or add only specific changes to the staging area, as per your requirement.
Syntax:
git add .
Example:

5. git commit
This command is used to store the current snapshot of files in the repository with a message assigned to it. git commit is the main command using which we can check the version history. All the files in the current directory are stored in the Git file system.
Syntax:
git commit -m "Add a Message"
Example:

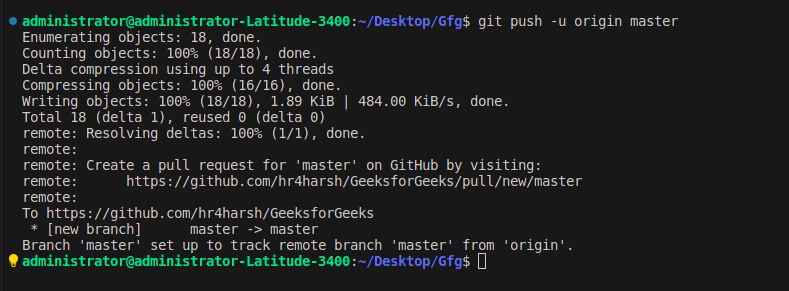
6. git push
When we are working with remote projects then it is important to timely update your changes to the remote repositories. After adding and commit of the changes you can push the changes to the branches of the repository using the git push command.
Syntax:
git push -u origin master
Example:
7. git tag
It will help the commits by giving them a particular tag, using which we can find the version of our project very easily. Also, the git tag is used to make release point on our code.
Syntax:
git tag {tag name}
Example:

8. git merge
It allows 2 branches to combine their work into 1 branch. When developers build some feature they prefer to work on a separate branch similar to the master branch so that the main code does not affect. And when the feature is ready to merge, it will be merged using the git merge command to the master branch.
Syntax:
git checkout master
git merge <branch-name>
Example:

9. git pull
While working on a remote or team project, it is important to stay updated on the codebase. The git pull command fetch and merge changes on the remote repository from your working directory.
Syntax:
git pull origin master
Example:

10. git checkout
While working on a real project we always make multiple branches, and to switch between those existing branches we use the git checkout command. But before switching to another branch, make sure to commit or stash the changes of your current branch. To switch to an existing branch use the below syntax.
Syntax:
git checkout <branch-name>
Example:

11. git amend
It is used to change the commit history. It gives you access to update and change messages and commits entirely. Sometimes after the commit, you remind the change, that is where ‘–amend’ is used. You can edit the last commit message using the git amend.
Syntax:
git commit --amend -m “Updating XYZ file”
Example:

Amend
If you have added files after the last commit, you can use the ‘–amend’ command to maintain the change in the last commit using the below syntax:
Syntax:
git commit --amend --no-edit
Note: Amending a commit modifies the original commit. So if other people have cloned it before amend then they need to be informed.
12. git stash
If we are working on a feature(feature-A) that is currently incomplete and uncommitted and comes up with a new feature-B and want to implement feature-B first. So, in this case, you have to save the uncompleted feature-A code locally using the ‘git stash’ command and get the last committed code and start working on feature-B. And once feature-B is completed, you can roll back earlier modification of feature-A. To stash(save locally) the current change use the below syntax.
Syntax:
git stash
Example:

stash
To roll back change use the below syntax:
git stash pop
Example:

There are multiple functionalities of stash which you can refer to here – Git Stash
13. git log
The importance of git is to maintain the versions by saving the old versions. ‘git log’ is used to retrieve the history of commits.
What is its need?
When we need to find a specific version of a project to integrate some functionality there or to remove some bug we need this log command.
Syntax:
git log
Example:
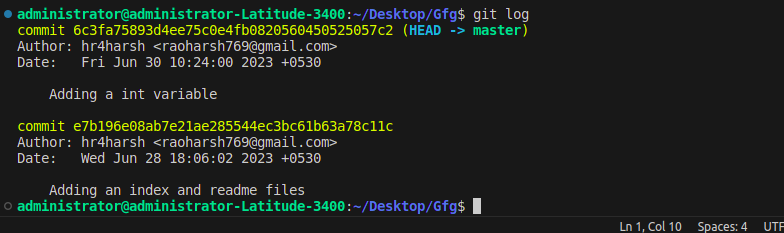
git log
You can use several flags like ‘-graphs’, ‘-decorate’, or ‘–oneline’ to make it more readable and interactive.
14. git status
The ‘git status’ command is very useful during the commit because it gives us the status of the git repository, whether there is any changed file or not. The git status command displays the state of the local directory and the staging area.
Syntax:
git status
Example:

And if the ‘work tree is not clean’, it means there is a need to add and commit changes in the directory. And once the directory has no change to save, then the status will be ‘Work tree is clean’.
15. git blame
Since one file of a project can be modified by multiple developers. So git provides us the functionalities of finding out the author of a particular line of code.
Using the ‘git blame’ command you can find out the author of a particular section of code.
Syntax:
git blame <file_name>
Replace file_name with the name of the file, for which you want this information.
Example:

git blame
16. git alias
if you are using git daily, then to make the commands more simple and user-friendly, you need to make aliases using the git alias command.
Syntax:
git config --global alias.alias_name “name_of_the_git_command”
Example:

alias
For more information about git alias, refer to –Git Alias
17. Add and Commit changes in 1 command
You can save time by adding and committing changes in one command and it is more simple and quick as well. If you are using git regularly, you need to make the process as quick as possible. So instead of using this command
git add.
git commit -m “Message”
We can directly use this command
Syntax:
git commit -am “Message”
Example:

Add and commit in 1 command
Conclusion
Lastly, if you are a Developer, then it is a must-known tool for you. Git will help developers to collaborate on the same projects from anywhere. Once, a developer gets comfortable with basic git commands, then learning some advanced and tricky commands will increase their productivity and save their time as well. In this article, we have discussed multiple advanced and interesting commands to make you more productive such as – amend, stash, log, status, blame, and alias. You can learn more about them individually as well by clicking on their individual heading.
Top Git Commands FAQs
1. What are the Top git commands?
1. git config
2. git init
3. git clone
4. git add
5. git commit
6. git push
7. git tag
8. git merge
9. git pull
10. git checkout
2. How to increase your git performance?
By learning the basic fundamentals, after that gradually learning advanced and tricky commands and with consistent practice will boost your performance.
3. From where to learn top git commands?
GeeksforGeeks has all the material related to git, which any developer may require. For more information, you can refer to this article- Git Tutorial.
Share your thoughts in the comments
Please Login to comment...