Swapon Command in Linux
Last Updated :
15 Nov, 2023
The Linux swapon command serves the purpose of activating a swap partition in Linux systems. A swap partition is essentially a dedicated space used when the system’s RAM (Random Access Memory) becomes fully utilized.
It temporarily holds data that can be retrieved when required, making it particularly beneficial for systems with limited RAM capacity.
Swap space can take the form of either a device or a file. Typically, a device refers to a partition in most distributions, whereas a swapfile is a distinctive type of file located within the root directory (/). The swap partition or the swapfile is known as the specialfile which gives you two choices to activate it.
- -L Label: You can use this option to specify the device or file by its label, which is a human-readable name assigned to the device or file.
- -U uuid: You can use this option to indicate the device or file by its Universally Unique Identifier (UUID). A UUID is a unique and standardized identifier assigned to the device or file, providing a highly precise way of specifying it.
Note: You can utilize swapoff as an alternative to swapon for disabling a swap partition or swapfile. swapoff follows the same set of parameters as swapon.
Options available in `swapon` command in Linux
|
Enable all swap devices listed in /etc/fstab.
|
|
Enable the discard option for swap devices.
|
|
Set the priority of the swap device.
|
|
Display swap usage summary.
|
|
Display verbose information during execution.
|
Examples
1. `-a`, `-all` option in swapon
This command serves the purpose of enabling all swap partitions and swap files listed in the /etc/fstab entry. To review the comprehensive list of available swap partitions and files on your system, you can utilize the cat /etc/fstab command.
$ swapon -a
or
swapon -all
2. `-d`, `–discard` option in swapon
The discard option is related to the use of the TRIM command for SSDs (Solid State Drives). When this option is enabled on a swap device, it indicates that the swap space should inform the SSD when data is no longer in use and can be safely erased, essentially marking the space as free for future use.
$ swapon --discard
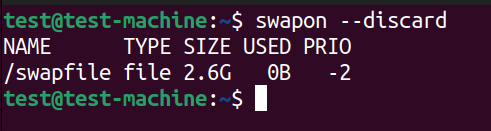
Commnad: swapon –discard
3. `-p`, `–priority` option in swapon
This option serves to define a priority level for the swap space. Swap areas with higher priorities will be exhausted before lower-priority ones are utilized.
$ swapon -p <priority number> <path to swapfile or partition>

Setting priority to 1 for the swapfile
4. `-s`, `–show` option in swapon
The –show option, when used, displays a comprehensive list of all currently active swap spaces on the system.
$ swapon --show
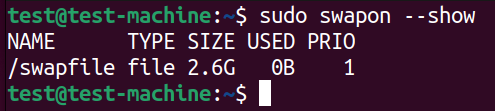
Showing all the active swap spaces
5. `-v`, `–verbose` option in swapon
The –verbose option is used to provide detailed and verbose information during the execution of a command.
$ swapon --all --verbose

The –verbose option provides a detailed information regarding the ongoing execution process.
Commonly Used Commands
1. Using the –help option
The –help option in the swapon command is a valuable resource for users as it offers a comprehensive and detailed list of all available options, flags, and features.
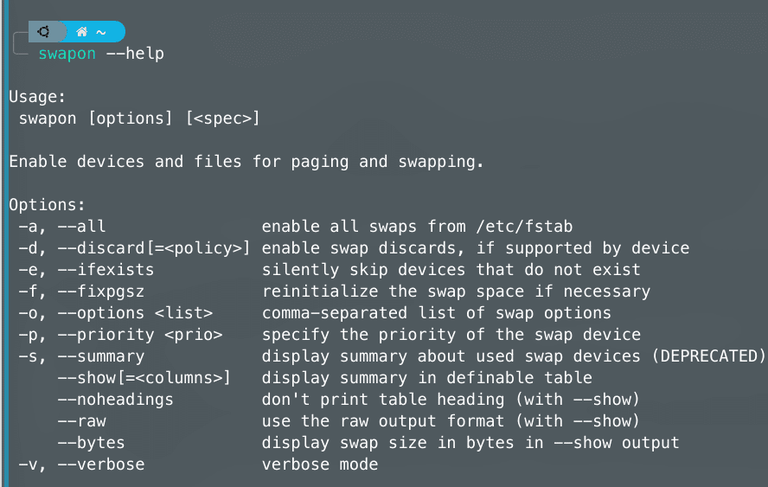
Complete set of options and flags provided by the swapon command
2. Getting the summary of all swap partitions
The purpose of this command is to provide a summary of utilized swap devices.
$ swapon -s # or --summary

Command to show the summary of all swap partitions
3. Activating a single swap area
When you supply a path to the swapon command, it activates a single swap area instead of enabling all swap areas simultaneously.
$ swapon <path to swap area>

Activating a single swap space
Troubleshooting
The swap area is present in the system but remains inactive
If you encounter any issues with activating your swap partition, it’s advisable to inspect your /etc/fstab file and verify that the swap area you’re attempting to activate is listed there. If it’s not present, you can follow the procedure given below to append a new swap area entry to the /etc/fstab file.
Open your /etc/fstab file with your preferred text editor as root, such as Emacs, Vim, or Nano, and append the provided line to the end of the file.
<path to swap area> swap swap defaults 0 0
Now, execute the command – swapon <path to swap area> to activate your swap area.
Changing Permissions
You want to ensure that only the root user has access to the swap area. To determine the owner of your swap area, execute the following command:
$ ls -la <path to your swap area> | grep swapfile

In the screenshot above, the default user is root. However, if this isn’t the case for your system, you might need to alter the ownership. Follow these commands to do so:
$ sudo chown root:root <path to swap area>
$ sudo chmod 0600 <path to swap area>
The commands mentioned above will modify the ownership of the swap area and adjust the permissions for the root user.
Conclusion
In this article, we’ve delved into the swapon command and its practical applications. Swapon serves as a robust tool for managing swap spaces in various Linux distributions. It typically comes pre-installed in the majority of distributions, leaving minimal room for oversight by maintainers. Additionally, I’ve addressed two prevalent troubleshooting issues related to swap spaces: adding a swap entry to the /etc/fstab file and modifying the ownership of a swap area.
Share your thoughts in the comments
Please Login to comment...