SQL Server is a relational database management system. SQL Server offers robust security features to protect data integrity and confidentiality. It includes authentication, authorization, encryption, and various mechanisms to secure the database environment. It is designed to scale from small applications to large, enterprise–level databases. It provides features like parallel processing, indexing, and query optimization to ensure high performance.
In this article, We will understand the SQL Server SELECT INTO Statement along with the syntax and detailed implementation of various examples along with their output and so on.
SELECT INTO Statement in SQL Server
SELECT INTO is used to copy the result set into the new table. SELECT INTO consists of two operations first to create a table with columns that are to be stored and then the data is copied into that table.
There are different cases where we want to store the intermediate result, there we can use this. SELECT INTO is also used to create the backup of a table.
Syntax of SELECT INTO:
SELECT <select_list>
INTO new_table
FROM old_table
[WHERE condition];
Explanation: “Select_list” will contain the columns from which the data has to be copied. We can declare all the columns using (*) or we could give the subset of it. Based on these columns the schema of new_table is finalised. Where the condition is optional in this syntax.
Example of SELECT INTO Statement
To understand the SQL Server SELECT INTO Statement in good manner. We will need a table on which we will perform various queries. So we will create a Employee table and also insert some records into it.
Query to Create a table:
CREATE TABLE Employee
(
    EmployeeID INT PRIMARY KEY,
    FirstName VARCHAR(50),
    LastName VARCHAR(50),
    Department VARCHAR(50),
    Salary DECIMAL(10, 2)
);
Query to Insert data into it:
INSERT INTO Employee (EmployeeID, FirstName, LastName, Department, Salary)
VALUES
    (1, 'John', 'Doe', 'IT', 60000.00),
    (2, 'Jane', 'Smith', 'HR', 55000.00),
    (3, 'Bob', 'Johnson', 'IT', 65000.00),
    (4, 'Alice', 'Williams', 'Finance', 70000.00),
    (5, 'Charlie', 'Brown', 'HR', 60000.00),
    (6, 'David', 'Miller', 'Finance', 75000.00),
    (7, 'Eva', 'Davis', 'IT', 62000.00),
    (8, 'Frank', 'Clark', 'Finance', 72000.00),
    (9, 'Grace', 'Moore', 'HR', 58000.00),
    (10, 'Harry', 'Young', 'IT', 63000.00),
    (11, 'Isabel', 'Hall', 'HR', 59000.00),
    (12, 'Jack', 'Baker', 'Finance', 71000.00),
    (13, 'Olivia', 'Turner', 'IT', 60000.00),
    (14, 'Paul', 'Moore', 'Finance', 73000.00),
    (15, 'Quinn', 'Parker', 'HR', 60000.00),
    (16, 'Ryan', 'Scott', 'IT', 64000.00),
    (17, 'Samantha', 'Bryant', 'HR', 61000.00),
    (18, 'Tyler', 'Ward', 'Finance', 70000.00),
    (19, 'Ursula', 'Hill', 'IT', 61000.00),
    (20, 'Victor', 'Gomez', 'HR', 59000.00),
    (21, 'Wendy', 'Fisher', 'IT', 62000.00),
    (22, 'Xavier', 'Jordan', 'Finance', 71000.00),
    (23, 'Yvonne', 'Lopez', 'HR', 58000.00),
    (24, 'Zachary', 'Evans', 'IT', 63000.00),
    (25, 'Ava', 'Hernandez', 'Finance', 69000.00);
Employee Table looks like:
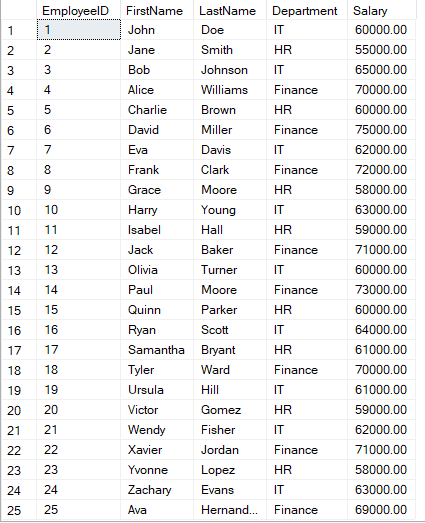
Employee Table
Explanation: Now we will take the backup of this table into an EmpBackup using the syntax discussed above. In this query we will take the data from employee table to the EmpBackup with the same schema of employee table.
Example 1: Simple SELECT INTO Statement
Let’s Create a backup of the existing employee data stored in the “employee” table by copying all columns and rows into a new table named “EmpBackup.” The backup table should be appropriately structured to preserve the data integrity of the original table.
Query:
SELECT *
INTO EmpBackup
FROM employee
Output:

Structure of EmpBackup
Explanation: This will create a new table named EmpBackup and the data is the same as the Employee table. Now let’s have a look at the type of column.
We can see that the type of each column is the same as the type we have defined in the employee table. But in this table Primary Key is not copied because the creation of a new table is based on a select list and thus new table doesn’t have any idea about any Constraint.
Example 2: SELECT INTO Using WHERE Clause
Now let’s look at Select into with WHERE clause, here we have taking the data from employee table which are of department “HR“, and then that data will only going to be inserted into EmpBackupHR.
Query:
SELECT *
INTO EmpBackupHR
FROM employee
WHERE department='HR'
Output:

EmpBackupHR
Explanation: The above query creates a department-specific backup named “EmpBackupHR” by selecting and copying records from the “employee” table where the department is ‘HR.
Example 3: SELECT INTO Using JOIN
We can also use select into with join. We just have to add the INTO statement before the FROM clause. Select Into is executed at the end of all operation and here also firstly the join is executed and on that select into will work.
Let’s Create a SQL query using the SELECT INTO statement to construct the ProductCategory table. The query should join the categories and products tables based on the category_id and include all columns from the products table, along with an additional category_name column
Query:
SELECT p.*, c.category_name
INTO ProductCategory
FROM categories c
JOIN products p
ON c.category_id=p.category_id
Output:

ProductCategory
Explanation: Here, a new table would be created using the columns from both tables.
Example 4: SELECT with INSERT INTO
Now we understand that SELECT INTO will create a table, and then data is inserted into the table. But what if the table is created and then we have to copy the data? For that, we use the Select statement with INSERT INTO.
Let’s say we have a table EmpCopy which looks like:
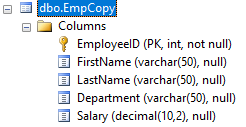
EmpCopy
Now we have to copy the data of the employee table into this one. So, as the table is already created and thus we cannot use SELECT INTO. So, we will insert the data using an insert statement.
In the below query we are using the EmpCopy table which was created above and the data from the employee table is copied into it. Remember that the schema is not copied.
Query:
INSERT INTO EmpCopy
SELECT *
FROM Employee
Output:

EmpCopy
Explanation: The above query uses the INSERT INTO statement to add records into the “EmpCopy” table. The SELECT * FROM Employee retrieves all columns and rows from the “Employee” table, and these records are then inserted into the “EmpCopy” table, effectively creating a duplicate of the original data.
Conclusion
After reading whole article now have understand the SELECT INTO used for different scenarios. One of them is to create a backup table that will contain all the data of the main table. We can store the intermediate result in the temporary table to take a look at it. One of the best things about SELECT INTO is that it will also copy the schema of the table and thus we don’t have to take care of it. We can also create a table with the schema of another table and not copy the data using the where clause which returns the false.
Share your thoughts in the comments
Please Login to comment...