Spring MVC – InternalResourceViewResolver Configuration
Last Updated :
28 Dec, 2023
Spring MVC is a powerful tool to create web projects provided by the Spring framework. Spring MVC follows the Model-View-Controller Architecture internally to handle and process the data, where the data will be visualized via the View to the user from the Model layer. The interaction will be monitored and handled by the Controller layer of the Architecture.
In Spring MVC, InternalResourceViewResolver is a class that plays a vital role in mapping the logical view name to the actual physical resource view. Using logical view names helps us to achieve code modularity and a flexible way to manage the views.
Prerequisite
- Java – Core and Advanced Java
- Spring & Spring MVC
- Maven & Eclipse or any other IDE’s for Java
InternalResourceViewResolver
In Spring MVC, the views are returned as a response to the requests, one can directly return the physical resource name but it will make the code tightly coupled to the physical resource, and changing the view templates will be hard. Another way would be
- To return a logical view name and let the resolver map the logical view name to the actual physical view resources.
- Changing the view templates will make it easier to do so.
InternalResourceViewResolver is a class that helps us map the logical view names to the physical resource under a preconfigured directory. We will be adding some prefixes and suffixes to the logical view name to locate the actual physical resource.
Normally we use JSP or else we can also use different templating engines like Thymeleaf, and Apache Freemaker, …
Project Structure
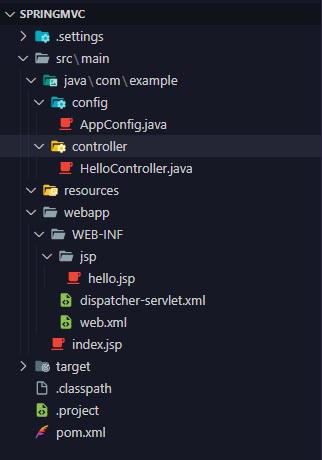
Initial Setup
Before starting with the InternalResourceViewResolver configuration we need to have a working Spring MVC project to carry out the configuration. Let’s set it up first.
Step 1: Open your Eclipse IDE or any of your favorite IDEs that support Spring development.
Step 2: Create a maven webapp project.
Step 3: Add the spring context, spring mvc, jakarta-servlet-api dependency in the pom.xml file.
XML
<modelVersion>4.0.0</modelVersion>
<groupId>com.example</groupId>
<artifactId>springmvc</artifactId>
<packaging>war</packaging>
<version>0.0.1-SNAPSHOT</version>
<name>springmvc Maven Webapp</name>
<dependencies>
<dependency>
<groupId>org.springframework</groupId>
<artifactId>spring-context</artifactId>
<version>6.0.9</version>
</dependency>
<dependency>
<groupId>org.springframework</groupId>
<artifactId>spring-webmvc</artifactId>
<version>6.0.9</version>
</dependency>
<dependency>
<groupId>jakarta.servlet</groupId>
<artifactId>jakarta.servlet-api</artifactId>
<version>6.0.0</version>
</dependency>
<dependency>
<groupId>junit</groupId>
<artifactId>junit</artifactId>
<version>3.8.1</version>
<scope>test</scope>
</dependency>
</dependencies>
<build>
<finalName>springmvc</finalName>
</build>
</project>
|
Step 4: Create a folder with the name Java under the main method and add the com/example/controller package inside the java folder.
Step 5: Create a controller named HelloController.java under the controller package and add the below code.
Java
package com.example.controller;
import org.springframework.stereotype.Controller;
import org.springframework.web.bind.annotation.GetMapping;
import org.springframework.web.bind.annotation.RequestParam;
import java.util.Map;
@Controller
public class HelloController {
@GetMapping("/hello")
public String getView(@RequestParam("name") String name,
Map<String, Object> map)
{
map.put("name", name);
return "/WEB-INF/jsp/hello.jsp";
}
}
|
Explanation of the above code:
- Create a Spring controller by annotating the class with @Controller from the Spring framework.
- A Get request is created at /hello and mapped to the getView() method using GetMapping annotation.
- Fetch the name parameter from the request object with the @RequestParam annotation.
- Add a map to transfer the name attribute to the result view.
- Return the view hello.jsp along with its path starting from webapp folder.
Step 6: Open your web.xml under the /webapp/WEB-INF folder and configure the DispatcherServlet to handle every incoming request.
XML
<!DOCTYPE web-app PUBLIC
"-//Sun Microsystems, Inc.//DTD Web Application 2.3//EN"
<web-app>
<display-name>Archetype Created Web Application</display-name>
<servlet>
<servlet-name>dispatcher</servlet-name>
<servlet-class>org.springframework.web.servlet.DispatcherServlet</servlet-class>
</servlet>
<servlet-mapping>
<servlet-name>dispatcher</servlet-name>
<url-pattern>/</url-pattern>
</servlet-mapping>
</web-app>
|
Explanation of the above code:
- In Spring MVC, every request will be served via the DispatcherServlet so configure the DispatcherServlet to intercept every request to the “/” root context path.
- Create a servlet with the <servlet> tag, map the class DispatcherServlet class to it using <servlet-class> child tag, and also provide a name to it using <servlet-name> tag for servlet-mapping.
- Map “/” URL-pattern to the DispatcherServlet using its servlet-name, here dispatcher is used as servlet-name.
Step 7: Create a servlet config file for the servlet just created inside the web.xml, note the servlet config filename should follow the pattern servlet_name-servlet.xml, where servlet_name is the created servlet name in web.xml. I used dispatcher as the servlet name so the filename is dispatcher-serlvet.xml under the WEB-INF folder.
XML
<?xml version="1.0" encoding="UTF-8"?>
xsi:schemaLocation="
<mvc:annotation-driven />
<context:component-scan base-package="com.example"></context:component-scan>
</beans>
|
- A dispatcher-servlet.xml is created to configure the servlet and add an annotation-driven tag to use the annotation-based configuration in the servlet.
- Configure the context’s component-scan base package to scan for controllers and configurations.
Step 8: Create an index.jsp file under webapp folder to be accessible for everyone. Call the MVC controller class function from the form to get the JSP view as a response.
HTML
<%@ page language="java" contentType="text/html; charset=ISO-8859-1"
pageEncoding="ISO-8859-1" isELIgnored="false" %>
<html>
<head>
<title>Spring MVC</title>
</head>
<body>
<form action="hello">
<label for="name">Enter your name: </label> <input type="text" id="name"
name="name">
<button>Submit</button>
</form>
</body>
</html>
|
- A form with the action /hello attribute to call default get mapping.
- An input tag with a name as name is included to get the name and transfer it to /hello to get mapping.
Step 9: Create a hello.jsp under /WEB-INF/jsp/ folder to return the hello result view from the controller and render the name inserted in the model.
Note: Only add public files under the webapp folder, if you want to secure files from direct access, put it under /webapp/WEB-INF/ as files under WEB-INF can be served only via controllers.
HTML
<%@ page language="java" contentType="text/html; charset=ISO-8859-1"
pageEncoding="ISO-8859-1" isELIgnored="false" %>
<!DOCTYPE html>
<html>
<head>
<meta charset="ISO-8859-1">
<title>Insert title here</title>
</head>
<body>
<h1>Welcome ${name} !</h1>
</body>
</html>
|
Step 10: Deploy this spring mvc webapp in the Tomcat server, this will give you a simple index page to enter your name and upon submitting will welcome you by your name.
initial output
Configuring InternalResourceViewResolver
In the initial configuration we have returned a string as a view name /WEB-INF/jsp/hello.jsp as doing so our code is tightly coupled with that hello.jsp in that particular directory. Changing the path and templating extension will be hard as we need to edit all our view_name in Controllers.
But we can configure InternalResourceViewResolver for us to dynamically map the logical name returned by us to the particular physical resource located in any directory and using different template extensions.
Split the actual physical resource name into multiple parts:
Actual path => prefix + view_name + suffix
- prefix: path from webapp to the directory which contains the view file. (/WEB-INF/jsp/)
- view_name: file name of the view (hello)
- suffix: extension used by the template engine (.jsp)
In the controllers that use only the logical view_name, our configured InternalResourceViewResolver will map our view_name by adding the prefix and suffix and will resolve the view_name to the actual physical resource name.
Configuration Method
To configure the InternalResourceViewResolver, you typically define it as a bean in the Spring application context. Two configuration methods are
- XML based configuration
- Java Annotation based configuration.
1. XML Configuration
A traditional way to provide configuration is via XML files to the Spring context. Provide the spring beans in the servlet configuration XML file.
- Add the InternalResourceViewResolver as a bean in the dispatcher-servlet.xml file using the <bean> tag.
- Use the property tag to set the prefix and suffix property of the bean.
XML
<?xml version="1.0" encoding="UTF-8"?>
xsi:schemaLocation="
<mvc:annotation-driven />
<context:component-scan base-package="com.example"></context:component-scan>
<bean id="viewResolver"
class="org.springframework.web.servlet.view.InternalResourceViewResolver">
<property name="prefix" value="/WEB-INF/jsp/" />
<property name="suffix" value=".jsp" />
</bean>
</beans>
|
Explanation of the above code:
- A bean is created using the <bean> tag and the class is set to the InternalResourceViewResolver class.
- Configure the prefix and suffix properties of the bean using property tags.
- Provide the name of the property tag and the preferred value in the value attribute.
- Here prefix is the directory path from webapp /WEB-INF/jsp/ and the suffix is the .jsp extension of the files.
2. Java Configuration
Spring also provides a way for configuration programmatically using Java Annotations. This way of configuration is less verbose compared to XML-based configuration. Providing only a configuration class and some beans will be enough.
Procedure to configure InternalResourceViewResolver using Java code:
- Create a configuration class under the config subpackage.
- Provide configuration objects in terms of spring beans using @Bean annotated methods.
- Configure the prefix and suffix attribute of the InternalResourceViewResolver bean.
Java
package com.example.config;
import org.springframework.context.annotation.Bean;
import org.springframework.context.annotation.Configuration;
import org.springframework.web.servlet.config.annotation.WebMvcConfigurer;
import org.springframework.web.servlet.view.InternalResourceViewResolver;
@Configuration
public class AppConfig implements WebMvcConfigurer {
@Bean
public ViewResolver getInternalResourceViewResolver(){
InternalResourceViewResolver viewResolver
= new InternalResourceViewResolver();
viewResolver.setPrefix("/WEB-INF/jsp/");
viewResolver.setSuffix(".jsp");
return viewResolver;
}
}
|
Explanation of the above code:
- A configuration class has been created with @Configuration spring-context annotation to provide configurations.
- The configuration class should implement the WebMvcConfigurer Interface to provide Spring MVC configuration.
- Create a method and annotate it @Bean to provide Spring Beans, here InternalResourceViewResolver is provided as a bean.
- Create an object of type InternalResourceViewResolver and configure the prefix and suffix of it using setter methods.
- Set the parent directory path in the prefix and the extension of the resource in the suffix of the object.
- Return the InternalResourceViewResolver object to use it as a bean in the Spring application context.
Using InternalResourceViewResolver
Now that, we have configured InternalResourceViewResolver with any of the above types, then we can use logical view names in our controllers, instead of the physical resource path.
Our configured InternalResourceViewResolver will map our logical view_name to the actual physical resource by adding the prefix and suffix to the logical name.
- In the controllers edit the view_name string to only contain the logical name(filename)
- In the controllers while returning the view_names as the output omit the path and extension.
Java
package com.example.controller;
import org.springframework.stereotype.Controller;
import org.springframework.web.bind.annotation.GetMapping;
import org.springframework.web.bind.annotation.RequestParam;
import java.util.Map;
@Controller
public class HelloController {
@GetMapping("/hello")
public String getView(@RequestParam("name") String name,
Map<String, Object> map)
{
map.put("name", name);
return "hello";
}
}
|
Output:
output gif
Explanation of the above code:
- In the above code, the result view_name has been edited to only contain the logical name and not the entire path.
- Our configured InternalResourceViewResolver will add the prefix of /WEB-INF/jsp/ and a suffix of .jsp to the logical view name “hello” will be resolved to /WEB-INF/jsp/hello.jsp at runtime.
Conclusion
Configuring the InternalResourceViewResolver in Spring MVC is a vital step if you need a modular and easy-to-maintain codebase. We have removed the coupling of the physical path and used a logical view name, if we need to change the template engine or move the file around we can easily do that without touching any code by just changing the configuration in the config files.
Share your thoughts in the comments
Please Login to comment...