Spring Boot – Validation using Hibernate Validator
Last Updated :
08 Jan, 2024
Hibernate validator offers validation annotations for Spring Boot that can be applied to the data fields within your Entity class, and allows you to follow specific rules and conditions for fields in which we are applying validators to meet your custom constraints. These annotations help ensure that the data meets all the conditions applied using the validators.
Internally Hibernate validator uses default JRS-380 implementation to validate upon the argument.
Hibernate validators are very useful and they provide the following annotations that are very helpful for software development.
| @NotNull |
Char Sequence, Collection, Map, or Array object can be validated with this and they should not be null but can be empty |
| @NotEmpty |
Char Sequence, Collection, Map, or Array object can be validated with this and they should not be null and not empty |
| @NotBlank |
Char Sequence, Collection, Map, or Array objects can be validated with this and they should not be null and not empty and not blank |
| @Min |
Given Minimum value has to be satisfied |
| @Max |
Given Maximum value has to be satisfied |
| @Size |
Field size should be less than or greater than the specified field size |
| @Email |
Email can be validated with this |
| @Pattern |
Given RegEx Pattern has to be satisfied. |
Let us go with a sample project that includes a Hibernate validator.
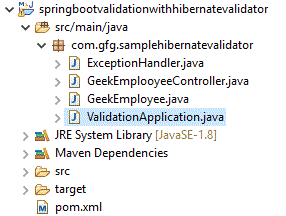
1. Folder structure layout:

This is the maven project and hence the required dependencies need to be placed in pom.xml
2. Configuration for Validators
2.1 Dependency for hibernate validator:
You need to add this dependency in your project settings file i.e. pom.xml to use validators in your project.
XML
<dependency>
<groupId>org.springframework.boot</groupId>
<artifactId>spring-boot-starter-validation</artifactId>
</dependency>
|
2.2 Examples of Validator Annotations
Let us start with a bean class GeekEmployee.java below contains examples of validators. In this we will be using Lombok dependency to generate boilerplate code i.e. for Getter, Setter, etc.
2.2.1 @NotNull
Let’s create a field Emp_id. Initially, the first thought that comes to our mind about Employee Id is that it can not be a NULL but can be left Empty in case it is auto-generated i.e. it should be assigned with any number, NULL can not be assigned.
Java
import javax.validation.constraints.NotNull;
import lombok.Data;
@Data
public class GeekEmployee {
@NotNull(message = "Enter a valid Employee Id")
private Long Emp_id;
}
|
Note: @Data Annotation is used to generate Getter, Setter, etc for the data fields.
2.2.2 @NotEmpty
Now create Phone Number field for an Employee. As Phone Number cannot be NULL and also it can not be left Empty.
Java
import lombok.Data
import javax.validation.constraints.NotEmpty;
@Data
public class GeekEmployee {
@NotEmpty(message = "Must not be Empty and NULL")
private String phoneNumber;
}
|
2.2.3 @NotBlank
For field ‘Name’, it can’t be assigned with NULL, must contain some value, not be Blank. Overall it contains @NotEmpty.
Java
import javax.validation.constraints.NotBlank;
import lombok.Data
@Data
public class GeekEmployee {
@NotBlank(message = "employee name can't be left empty")
private String geekEmployeeName;
}
|
2.2.4 @Min and @Max
We can apply these annotations to Age field of Employee. The maximum working age must be 60 and for minimum working age it should be 18.
Java
import lombok.Data
import javax.validation.constraints.Max;
import javax.validation.constraints.Min;
@Data
public class GeekEmployee {
@Min(value=18, message = "Minimum working age 18")
@Max(value=60, message = "Maximum working age 60")
private Integer age;
}
|
2.2.5 @Email
You can configure Email using regexp and also email must not be NULL.
Java
import lombok.Data
import javax.validation.constraints.Email;
import javax.validation.constraints.NotNull;
@Data
public class GeekEmployee {
@Email(message = "Please enter a valid email Id")
@NotNull(message = "Email cannot be NULL")
private String geekEmailId;
}
|
Note: You can apply more than one Validator to any field.
2.2.6 @Pattern
this annotation provide a powerful tool to customize inputs for any field, it allows us to validate data as per a regexp we can be used to add constraint to any data.
Java
import lombok.data;
import javax.validation.constraints.Pattern;
@Data
public class GeekEmployee {
@Pattern(regexp = "^[0-9]{5}$", message = "Employee postal code must be a 5-digit number.")
private String employeePostalCode;
}
|
Note: @Pattern can be used to create a custom Email annotation using regexp.
2.2.6 @Size
As the name suggests @Size can be used to add a constraint of length to any field.
Java
import lombok.Data
import javax.validation.constraints.Size;
@Data
public class GeekEmployee {
@Size(
min = 10, max = 100,
message= "Address should have a length between 10 and 100 characters.")
private String employeeAddress;
}
|
Now combining the all above explained data into a code GFGEmployee.java
Java
import lombok.Data;
import javax.validation.constraints.*;
@Data
public class GeekEmployee {
@NotNull(message = "Enter a valid Employee Id")
private Long Emp_id;
@NotEmpty(message = "Must not be Empty and NULL")
private String phoneNumber;
@NotBlank(message = "Employee name can't be left empty")
private String geekEmployeeName;
@Min(value = 18, message = "Minimum working age 18")
@Max(value = 60, message = "Maximum working age 60")
private Integer age;
@Email(message = "Please enter a valid email Id")
@NotNull(message = "Email cannot be NULL")
private String geekEmailId;
@Pattern(regexp = "^[0-9]{5}$", message = "Employee postal code must be a 5-digit number.")
private String employeePostalCode;
@Size(
min = 10, max = 100,
message = "Address should have a length between 10 and 100 characters.")
private String employeeAddress;
}
|
- Annotations used are explained above and summarised into the table.
2.3 Exception handling for Validators
To collect all the errors, we need to have an “ExceptionHandler” and it is given below
ExceptionHandler.java
Java
import java.util.Date;
import java.util.LinkedHashMap;
import java.util.List;
import java.util.Map;
import java.util.stream.Collectors;
import org.springframework.http.HttpHeaders;
import org.springframework.http.HttpStatus;
import org.springframework.http.ResponseEntity;
import org.springframework.web.bind.MethodArgumentNotValidException;
import org.springframework.web.bind.annotation.ControllerAdvice;
import org.springframework.web.context.request.WebRequest;
import org.springframework.web.servlet.mvc.method.annotation.ResponseEntityExceptionHandler;
@ControllerAdvice
public class ExceptionHandler
extends ResponseEntityExceptionHandler {
@Override
protected ResponseEntity<Object> handleMethodArgumentNotValid(
MethodArgumentNotValidException exception,
HttpHeaders httpHeaders, HttpStatus httpStatus,
WebRequest webRequest){
Map<String, Object> objectBody = new LinkedHashMap<>();
objectBody.put("Current Timestamp", new Date());
objectBody.put("Status", httpStatus.value());
List<String> exceptionalErrors
= exception.getBindingResult()
.getFieldErrors()
.stream()
.map(x -> x.getDefaultMessage())
.collect(Collectors.toList());
objectBody.put("Errors", exceptionalErrors);
return new ResponseEntity<>(objectBody, httpStatus);
}
}
|
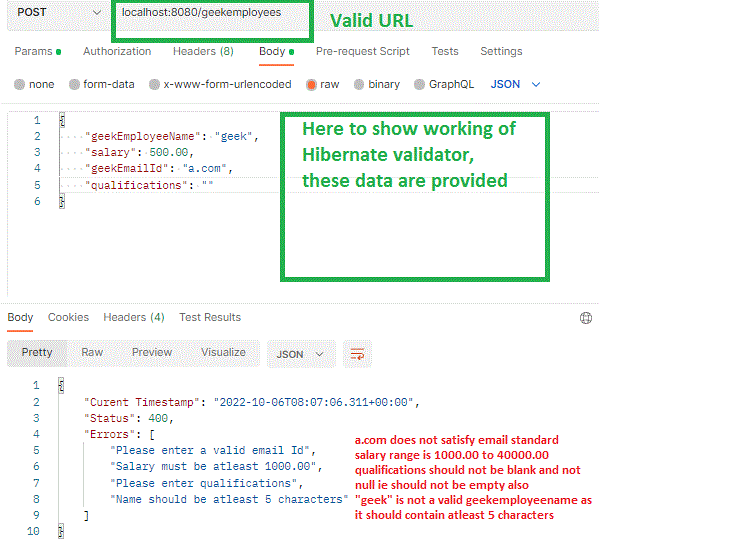
Let us try to save the geek employees by accepting the inputs like “geekEmployeeName”, “salary”, “geekEmailId”, and “qualifications”. We need a rest controller file to achieve the same.
3. Program controller
We will creating a controller layer GeekEmployeeController.java to test the employee class we have created.
Java
import javax.validation.Valid;
import org.springframework.http.HttpStatus;
import org.springframework.http.ResponseEntity;
import org.springframework.web.bind.annotation.PostMapping;
import org.springframework.web.bind.annotation.RequestBody;
import org.springframework.web.bind.annotation.RestController;
@RestController
public class GeekEmployeeController {
@PostMapping("/geekemployees")
public ResponseEntity<GeekEmployee> saveEmployeeData(
@Valid @RequestBody GeekEmployee geekEmployee) {
return new ResponseEntity<GeekEmployee>(
geekEmployee, HttpStatus.CREATED);
}
}
|
- @Valid – This annotation we check for all the validators applied to each field.
Since it is a maven application, it can be started using the following command
mvn spring-boot:run
Note: To run application using IDE goto main method in Spring Boot Application class and run the main method.
ValidationApplication.java
On running the application, in the console, we can see as following

Let’s check the working part by using the Postman client as we are using post-mapping

Conclusion
Using the Hibernate validator, front-end validations can be checked and that helps a lot in spring boot projects simply a dependency makes these kinds of validations validate a page.
Share your thoughts in the comments
Please Login to comment...