Spring Boot – Enabling Swagger2
Last Updated :
23 Oct, 2023
Swagger is a versatile tool designed for simplifying the process of documenting and testing RESTful APIs. It shines as the preferred choice due to its exceptional support for creating interactive API documentation. This feature significantly enhances developers’ ability to grasp and utilize your API services with ease.
Not only in Spring Boot, but Swagger also has support across various other programming languages and frameworks. Some of the Swagger integrations for different technology stacks.
- Node.js: swagger-ui-express and swagger-jsdoc.
- Python: flasgger
- Ruby: grape-swagger
- .NET: Swashbuckle
- PHP: swagger-php
- Go – swaggo/sag
- Django – drf-yasg
- Kotlin – ktor supports swagger
Why use Swagger2 in Spring Boot?
Due to the following reasons:
- Swagger2 generates interactive and user-friendly documentation for all the available endpoints, request/response formats, and any additional details that developers want to convey.
- Interactive Exploration for Endpoints: Developers can view and try your APIs directly by visiting the swagger default URL i.e. localhost:8080/swagger-ui.html
- Easy Configuration: Swagger2 can be easily integrated into Spring Boot applications with minimal configuration.
Example:
Easy config for Swagger2 at the main entry point of your Spring Boot application.
Java
@SpringBootApplication
@EnableSwagger2
public class WriteApplication {
public static void main(String[] args){
SpringApplication.run(WriteApplication.class, args);
}
@Bean
public Docket api(){
return new Docket(DocumentationType.SWAGGER_2)
.select()
.apis(RequestHandlerSelectors.basePackage(
"org.geeksforgeeks.write"))
.paths(PathSelectors.any())
.build();
}
}
|
Enabling Swagger2 in Spring Boot Application
In this project, we will be using the following version:
- Spring Boot – 2.4.5
- Swagger2
- Java – 17
Make sure to use at least the same Spring Boot version, as configurations may change for other versions of Spring Boot.
Adding the Springfox Swagger2 dependency to your project:
XML
<dependency>
<groupId>io.springfox</groupId>
<artifactId>springfox-swagger2</artifactId>
<version>2.4.0</version>
</dependency>
<dependency>
<groupId>io.springfox</groupId>
<artifactId>springfox-swagger-ui</artifactId>
<version>2.4.0</version>
</dependency>
|
Annotation used for Swagger:
@EnableSwagger2 is used to enable Swagger2 within the Spring Boot application. This annotation tells Spring to include Swagger’s configuration and endpoints.
Create a Docket bean to configure Swagger2:
Docket @Bean must be created inside any Spring Boot Configuration class i.e. class must be annotated with @Configuration, here we are creating a separate SwaggerConfig class inside your Spring Boot Application.
Java
package org.geeksforgeeks.write;
import org.springframework.context.annotation.Bean;
import org.springframework.context.annotation.Configuration;
import springfox.documentation.builders.ApiInfoBuilder;
import springfox.documentation.builders.PathSelectors;
import springfox.documentation.builders.RequestHandlerSelectors;
import springfox.documentation.service.ApiInfo;
import springfox.documentation.spi.DocumentationType;
import springfox.documentation.spring.web.plugins.Docket;
import springfox.documentation.swagger2.annotations.EnableSwagger2;
@Configuration
@EnableSwagger2
public class SwaggerConfig {
@Bean
public Docket api() {
return new Docket(DocumentationType.SWAGGER_2)
.select()
.apis(RequestHandlerSelectors.basePackage("org.geeksforgeeks.write"))
.paths(PathSelectors.any())
.build()
.apiInfo(apiInfo());
}
private ApiInfo apiInfo() {
return new ApiInfoBuilder()
.title("Geeks API")
.description("Demonstration of all write portal API")
.version("1.0")
.build();
}
}
|
Accessing Swagger UI
Ensure that your Spring Boot Application is Up and Running. Now navigate to http://localhost:8080/swagger-ui.html. You will find all the end-points of your project listed over here, try/exceute the end-points directly from here, once you will configure it properly.
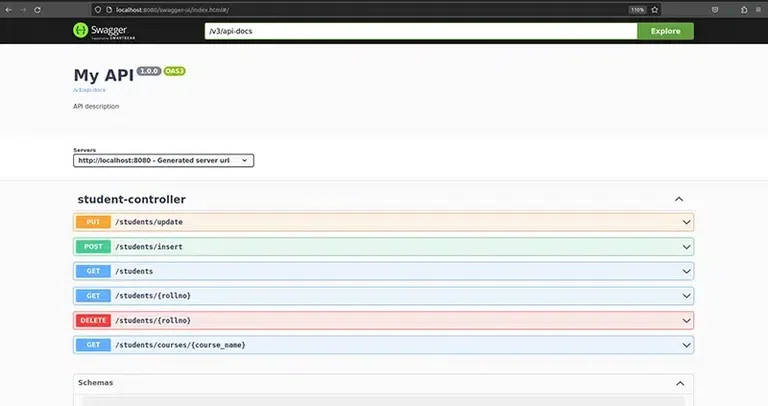
Swagger dashboard displaying all the APIs of your project.
Effortlessly navigate through available endpoints, experiment with different parameters, and get real-time responses. Valuable tool for developers looking to understand and use your API effectively.
Conclusion
In this article we have learnt about how to generate docs for your Spring Boot Application using Swagger.
- A general overview of Swagger integration into your project.
- Generation of documentation for your project endpoints.
Share your thoughts in the comments
Please Login to comment...