Spring Boot – CRUD Operations Using Redis Database
Last Updated :
26 Nov, 2023
Redis is an in-memory data structure that is used for faster access to data. It is used to store data that needs to be accessed frequently and fast. It is not used for storing large amounts of data. If you want to store and retrieve large amounts of data you need to use a traditional database such as MongoDB or MYSQL. Redis provides a variety of data structures such as sets, strings, hashes, and lists. For more detail refer to this article Introduction to Redis.
This article will look into how to perform CRUD in Spring Boot using Redis as a Database. Alternatively, Redis has many use cases some are listed.
- Database
- Cache
- Message Broker
Spring Data Redis(SDR) framework and Crud Repository make it easier to interact with the store without writing a bunch of codes. Before starting with any further make sure you have Redis installed on your device.
Note: Command to install Redis is “brew update && brew install redis”
To verify the Redis Installation open Redis-Cli in the terminal and then send a “ping”, you must receive a “PONG” as a response.
gfg0341@GFG0341-cs_mshr:~$ redis-cli
127.0.0.1:6379> ping
PONG
Step By Step Implementation
Step 1. Configuration for Redis
In this project, we will be using the following version:
- Spring Boot – 2.4.5
- Redis – 3.2.100
- Java – 17
Make sure to use the same Spring Boot version, as configurations may change for other versions of Spring Boot. You can either do project bootstrap directly through your IDE, or you can select the below method:
- Go to spring initializr website
- Select Project – Maven
- Language – Java
- Spring Boot Version – 2.4.5 (You can do this later by making changes in pom.xml)
- Packaging – Jar
- Java – 17
- Dependencies
- Spring Web
- Lombok
- Spring Data Redis ( Access+driver )
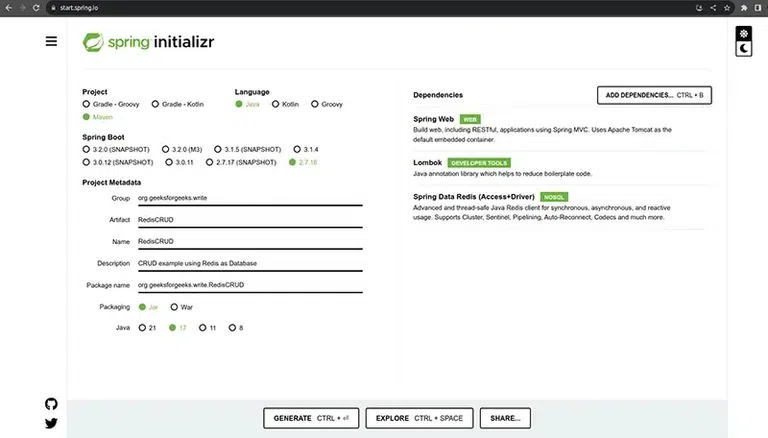
Spring initializr dashboard with the list of dependencies required for our project
Note: After project Bootstrap change Spring Boot version i.e. 2.4.5
1.1: Dependency for Redis
XML
<dependency>
<groupId>org.springframework.boot</groupId>
<artifactId>spring-boot-starter-data-redis</artifactId>
</dependency>
|
Note: You can specific the version as <version>3.3.0</version> or any latest.
1.2: Application Properties
It would be best if you do configuration for the following into the application.properties of Spring Boot Application.
- Host: The default host the for application is “localhost”
- Port: By default, the Port for Redis is 6379
spring.redis.host=localhost
spring.redis.port=6379
Step 2. Implementing CRUD APIs
We will be following the Spring MVC code structure:
- Entity Layer (Customer) – Will contain all the required data fields for our Customer.
- Repository Layer (CustomerRepo) – this will provide a bridge between the code and the Redis Store.
- Service Layer (CustomerService) – in this l,ayer we will implement all the required business logic associated with APIs.
- Controller Layer (CustomerController) – this layer will contain all definitions of APIs.
Step 2.1: Entity
Data Entity layer for Customer.java, we will be storing only following customer data only:
- Name – String
- Phone – Long
- Email – String
Java
package org.geeksforgeeks.RedisCRUD.entity;
import java.io.Serializable;
import lombok.AllArgsConstructor;
import lombok.Data;
import lombok.NoArgsConstructor;
import org.springframework.data.annotation.Id;
import org.springframework.data.redis.core.RedisHash;
import org.springframework.data.redis.core.index.Indexed;
@Data
@AllArgsConstructor
@NoArgsConstructor
@RedisHash(value = "Customer")
public class Customer {
@Id
@Indexed
private int id;
private String name;
private long phone;
private String email;
}
|
- @Data: It is the part of the Lombok library used to reduce boilerplate code for @Getter, @Setter, etc.
- @AllArgsCostructor: It creates a constructor with all the Data Members as its parameter, part of Lombok.
- @NoArgsCostructor: It creates a constructor with no parameter, part of Lombok.
- @RedisHash(value = “Customer”): It is Spring Data Redis annotation, used to denote a class as Redis Hash. Value = “Customer” means Redis Hash name.
- @Id: It denotes a field as the primary identifier for Redis Hash. i.e. field marked as @id will be used as Key in Redis Hash storage.
- @Indexed: For faster retrieval, we use this annotation, Redis will make an index out of it to optimize the queries.
Notes:
- As per your choice you can extend the number of data members.
- There is no in-built auto-increment feature provided by Redis, like we have in RDMS
Step 2.2: Repository
Next, you can create a Repository interface to make a communication of Spring Boot Application to your Redis Database as CustomerRepo.java in this interface we will extend CrudRepository<Customer, String> which already contains all the methods to perform operations on the database i.e. save, saveAll, delete, findById, findAll, etc. For each entity, you need to create one separate Repository interface to save its data into the Redis Database.
Java
package org.geeksforgeeks.RedisCRUD.repository;
import org.geeksforgeeks.RedisCRUD.entity.Customer;
import org.springframework.data.repository.CrudRepository;
@Repository
public interface CustomerRepo extends CrudRepository<Customer,String> {
}
|
- @Repository – this annotation will mark the interface as Spring Data Repository
Step 2.3: Controller
Now we need to create a Controller layer to define all the endpoints. We will be declaring all the CRUD APIs, whose method names and descriptions are listed:
- addCustomer – to insert new customer data into the Redis database.
- getListOfCustomers – to fetch All the customers from the Redis database.
- getCustomer – to fetch Customer data using ID from Redis Database.
- updateCustomer – to update an existing customer in the Redis database using ID.
- delete customer – to delete an existing customer from the Redis database using ID.
Java
package org.geeksforgeeks.RedisCRUD.controller;
import java.util.ArrayList;
import java.util.List;
import org.geeksforgeeks.RedisCRUD.entity.Customer;
import org.geeksforgeeks.RedisCRUD.repository.CustomerRepo;
import org.geeksforgeeks.RedisCRUD.service.CustomerService;
import org.springframework.beans.factory.annotation.Autowired;
import org.springframework.web.bind.annotation.*;
@RestController
@RequestMapping("/customer")
public class CustomerController {
@Autowired
private CustomerService service;
@PostMapping
public Customer addCustomer(@RequestBody Customer customer){
return service.addCustomer(customer);
}
@GetMapping
public List<Customer> getListOfCustomers(){
return service.getAllCustomers();
}
@GetMapping("/{id}")
public Customer getCustomer(@PathVariable int id){
return service.getCustomerById(id);
}
@PutMapping("/{id}")
public Customer
updateCustomer(@PathVariable int id,
@RequestBody Customer newCustomer){
return service.updateCustomerById(id, newCustomer);
}
@DeleteMapping("/{id}")
public String deleteCustomer(@PathVariable int id){
service.deleteCustomerById(id);
return "Customer Deleted Successfully";
}
}
|
Note: As per the requirement you can define more API endpoints.
Step 2.4: Service
Here we will implement all the methods described and used in the controller layer to complete the API operation with the Redis database using your Spring Boot Application. Listed below are the required methods:
- addCustomer: will be used to insert new customer data into the Redis database.
- getAllCustomers: this method will run a fetch query in the Redis Database to get a list of all the customers.
- getCustomerById: this method will perform a fetch operation using an ID from the Redis repository.
- updateCustomerById: method will update the existing customer with the latest customer data.
- deleteCustomerById: it will delete the existing customer from the Redis repository.
Java
package org.geeksforgeeks.RedisCRUD.service;
import java.util.ArrayList;
import java.util.List;
import java.util.Optional;
import lombok.RequiredArgsConstructor;
import org.geeksforgeeks.RedisCRUD.entity.Customer;
import org.geeksforgeeks.RedisCRUD.repository.CustomerRepo;
import org.springframework.beans.factory.annotation.Autowired;
import org.springframework.stereotype.Service;
@Service
public class CustomerService {
@Autowired
private CustomerRepo repo;
public Customer addCustomer(Customer customer){
return repo.save(customer);
}
public List<Customer> getAllCustomers(){
List<Customer> allCustomer = new ArrayList<>();
repo.findAll().forEach(allCustomer::add);
return allCustomer;
}
public Customer getCustomerById(int id){
Optional<Customer> optionalCustomer
= repo.findById(String.valueOf(id));
return optionalCustomer.orElse(null);
}
public Customer updateCustomerById(int id,
Customer newCustomer){
Optional<Customer> existingCustomer
= repo.findById(String.valueOf(id));
if (existingCustomer.isPresent()) {
Customer updatedCustomer
= existingCustomer.get();
updatedCustomer.setName(newCustomer.getName());
updatedCustomer.setPhone(newCustomer.getPhone());
updatedCustomer.setEmail(newCustomer.getEmail());
repo.deleteById(String.valueOf(id));
return repo.save(updatedCustomer);
}
return null;
}
public void deleteCustomerById(int id){
repo.deleteById(String.valueOf(id));
}
}
|
Step 3. Testing API using Postman
Ensure that your Spring Boot Application is Up and Running and you have Postman installed on your device. Now to test the APIs you need to follow the below step.
3.1: List of all Customer API
- Select the GET method.
- Use URL – http://localhost:8080/customer
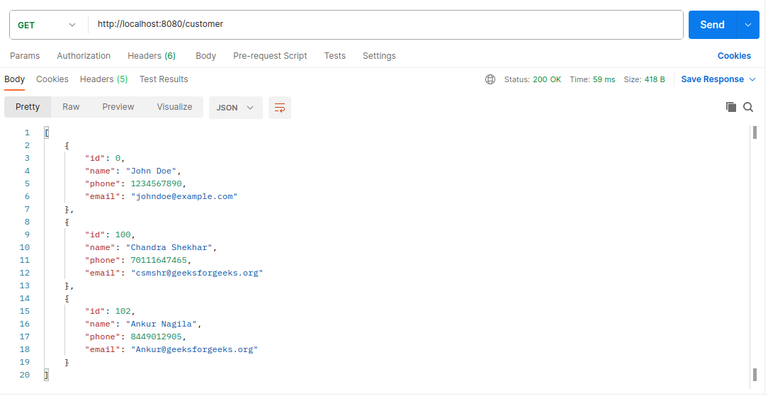
Testing – Fetch list of all customer API using Postman
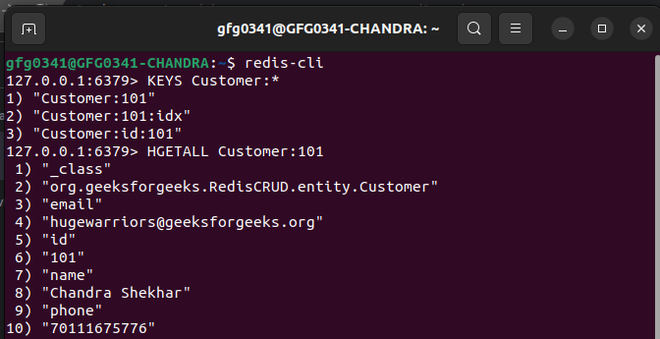
List of all Customers inside Redis Database
- redis-cli – To open the Redis interface
- KEYS Customer:* – To get all KEYS associated with Customer
- HGETALL Customer:101 – Get Customer Data associated with id-101.
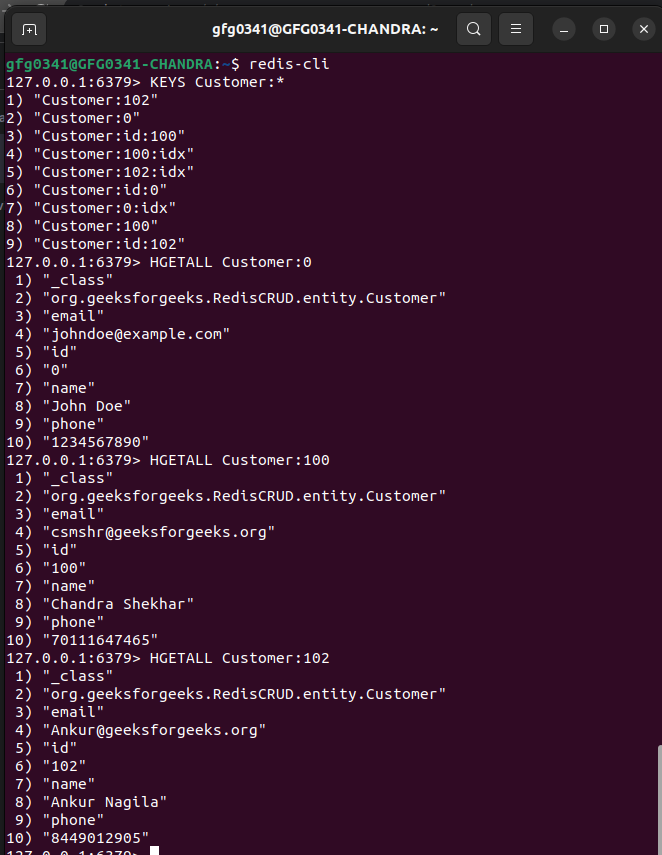
List of all Customers inside Redis Database
3.2: Add new Customer API
- Select the POST method.
- Use URL – http://localhost:8080/customer
- To insert new customer data, select Body>raw>JSON then customer data in JSON.
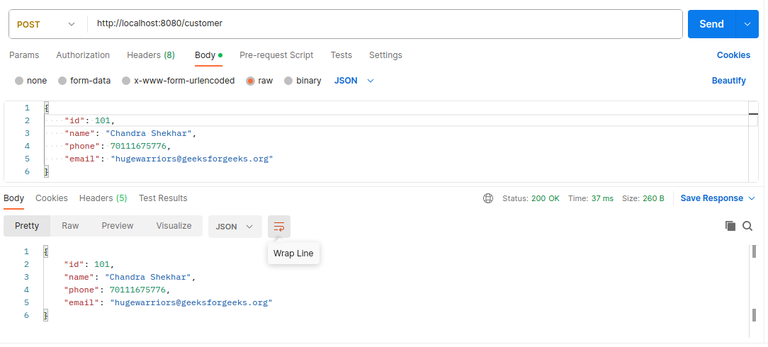
Testing – add new customer API using Postman
Database view of Customer Data into Redis Database.
- redis-cli – To open the Redis interface
- KEYS Customer:* – To get all KEYS associated with Customer
- HGETALL Customer:101 – Get Customer Data associated with id-101.
3.3: Update Existing Customer API
- Select the PUT method
- Use URL – http://localhost:8080/customer/{id}, where the customer is updated based on ID.
- To update customer data, select Body>raw>JSON then customer data in JSON.
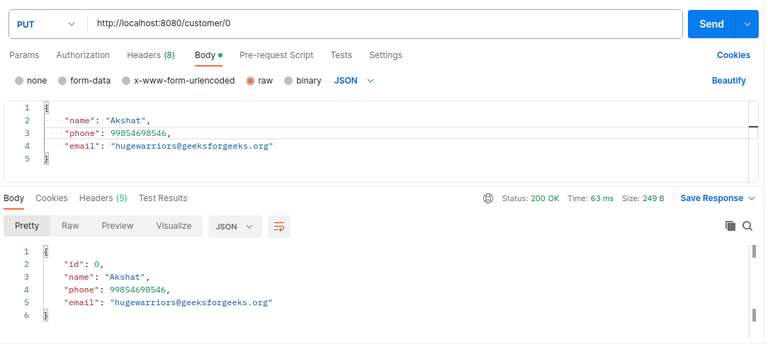
Testing – update existing customer data API using Postman
3.4: Delete Existing Customer API
- Select the DELETE method.
- Use URL – http://localhost:8080/customer/{id}, where the customer is deleted based on ID.
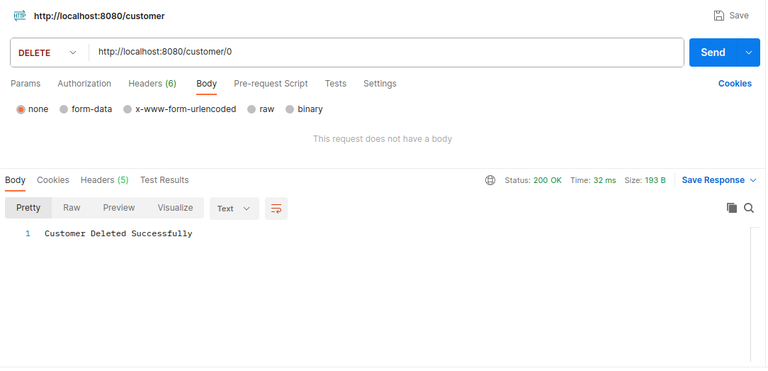
Testing – delete existing customer API using Postman
Redis Database Commands
To verify the customer data into the Redis Database. You need to know a few commands, which are listed below.
- redis-cli – To open the Redis interface
- KEYS Customer:* – To get all KEYS associated with Customer
- HGETALL Customer:101 – Get Customer Data associated with id-101
- FLUSHALL – to clear all the data
Conclusion
In the article, we have covered how you can use Redis as a Database for your Spring Boot Application, in the following steps.
- Configuration of Redis as a Database into the project.
- Implementation of all the essential layers, including the entity, controller, etc.
- Testing for each API using Postman.
Share your thoughts in the comments
Please Login to comment...