Spring Boot API Call using OkHttp
Last Updated :
17 Dec, 2023
OkHttp is pretty smart when it comes to dealing with tricky network situations. It quietly bounces back from common connection hiccups and even tries different addresses if the first attempt doesn’t work. This becomes crucial when you’re dealing with situations that use both IPv4 and IPv6 or when your services are set up in backup data centers. In this article, you are going to explore how you can use OkHttp in your Spring Boot application.
Prerequisites:
What is OkHttp?
OkHttp stands out as an HTTP client that prioritizes efficiency by default:
- HTTP/2 Support: Allows multiple requests to the same host to share a socket, enhancing performance.
- Connection Pooling: Reduces latency for requests, particularly beneficial in scenarios where HTTP/2 is not available.
- Transparent GZIP: Compresses download sizes seamlessly through GZIP, contributing to optimized data transfer.
- Response Caching: Bypasses the network for repeat requests, improving efficiency.
- Resilience: OkHttp adeptly manages challenging network conditions, silently recovering from common connection issues. It intelligently attempts alternate addresses if the initial connection fails, crucial for IPv4+IPv6 and services in redundant data centers.
- Modern TLS Support: OkHttp is equipped with contemporary TLS features, including TLS 1.3, ALPN, and certificate pinning. It offers configuration options for versatile connectivity.
Using OkHttp is straightforward. Its request/response API employs fluent builders and immutability, facilitating ease of use. Whether you prefer synchronous blocking calls or asynchronous calls with callbacks, OkHttp accommodates both styles seamlessly.
Implementation of OkHttp in an Spring Boot Application
Let’s get started with the implementation part to create a simple Spring Boot application that make API calls using OkHttp.
Step-by-step Implementation
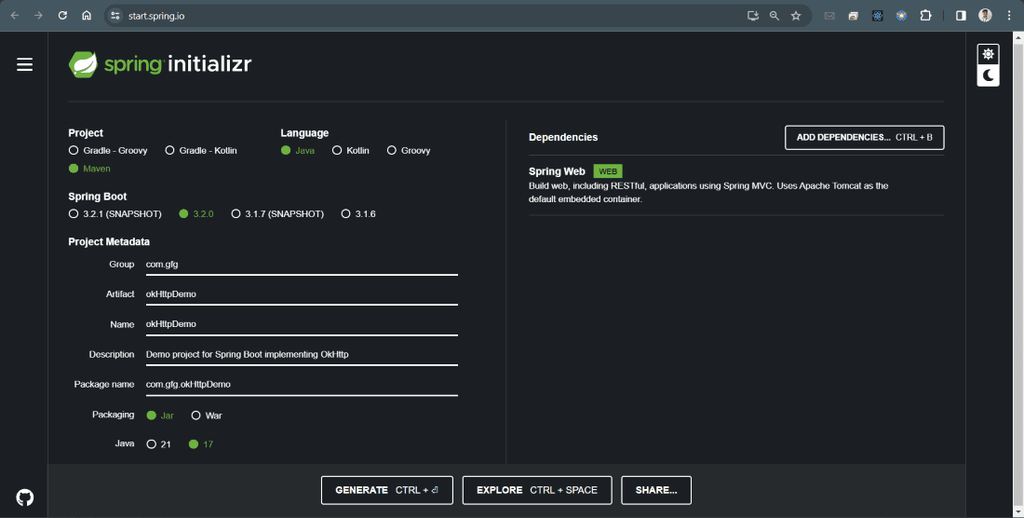
Step 1: Create a new Spring Boot Project
To create a new Spring Boot Protect, you can use Spring Initializer (https://start.spring.io/) or your preferred IDE. In the dependencies you need to select “Spring Web” dependency, as it will be useful for creating REST endpoints.
Step 2: Add OkHttp Dependency
Now we need to add OkHttps dependency in the pom.xml file, paste the below code in the pom.xml or you can use the updated version from Maven website:
<dependency>
      <groupId>com.squareup.okhttp3</groupId>
    <artifactId>okhttp</artifactId>
    <version>4.9.1</version>
</dependency>
Now you are all set to write some code to use OkHttp in your Spring Boot Project.
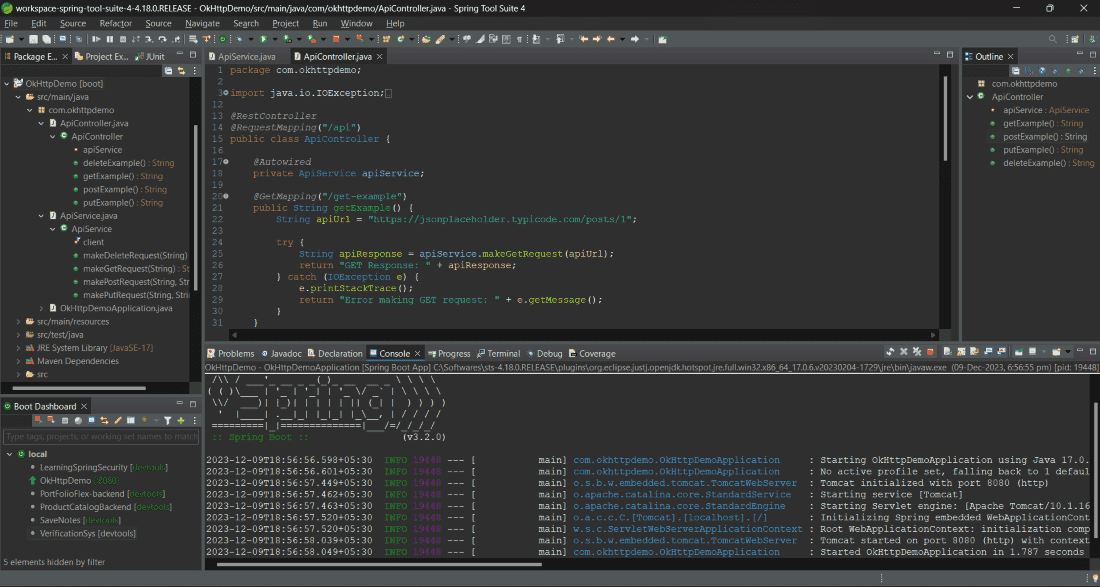
Step 3: Create a Service for API Calls
Firstly, create a service class that will be responsible to handle API calls using OkHttp. For example, create a class named ApiService and write the below code inside the class.
Java
import okhttp3.*;
import java.io.IOException;
@Service
public class ApiService {
private final OkHttpClient client = new OkHttpClient();
public String makeGetRequest(String apiUrl) throws IOException {
Request request = new Request.Builder().url(apiUrl).build();
try (Response response = client.newCall(request).execute()) {
if (response.isSuccessful()) {
return response.body().string();
} else {
throw new IOException("Unexpected response: " + response.code());
}
}
}
public String makePostRequest(String apiUrl, String requestBody) throws IOException {
RequestBody body = RequestBody.create(requestBody, MediaType.parse("application/json"));
Request request = new Request.Builder().url(apiUrl).post(body).build();
try (Response response = client.newCall(request).execute()) {
if (response.isSuccessful()) {
return response.body().string();
} else {
throw new IOException("Unexpected response: " + response.code());
}
}
}
}
|
This file consists of two service methods:
- makeGetRequest(String apiUrl) – makeGetRequest(String) method handles GET request API call with OkHttp.
- makePostRequest(String apiUrl, String requestBody) – This method handles POST request API call with OkHttp and sends the data to the server.
Step 4: Create a Controller
Create a Spring MVC controller that will expose endpoints for triggering the API call. For example, create a class named ApiController. In this article, we are using https://jsonplaceholder.typicode.com dummy API.
Java
import okhttp3.*;
import java.io.IOException;
@RestController
@RequestMapping("/api")
public class ApiController {
@Autowired
private ApiService apiService;
@GetMapping("/get-example")
public String getExample() {
try {
String apiResponse = apiService.makeGetRequest(apiUrl);
return "GET Response: " + apiResponse;
} catch (IOException e) {
e.printStackTrace();
return "While making GET request, getting Error: " + e.getMessage();
}
}
@PostMapping("/post-example")
public String postExample() {
String requestBody = "{\'title\': \'foo\',\'body\': \'bar\',\'userId\': 1}";
try {
String apiResponse = apiService.makePostRequest(apiUrl, requestBody);
return "POST Response: " + apiResponse;
} catch (IOException e) {
e.printStackTrace();
return "While making POST request, getting Error: " + e.getMessage();
}
}
}
|
In the above code, you have two methods:
- getExample() – getExample() method is invoked when a GET request is fired for /api/get-example end-point.
- postExample() – This method is invoked when a POST request is fired for /api/post-example end-point. In this method there is one variable named requestBody of String type, in this variable the request body has been defined to send with the request.
Step 5: Run the Application
To run your Spring Boot application, you can run below Maven command in the terminal, or you can also use the IDE to run the application:
mvn spring-boot:run
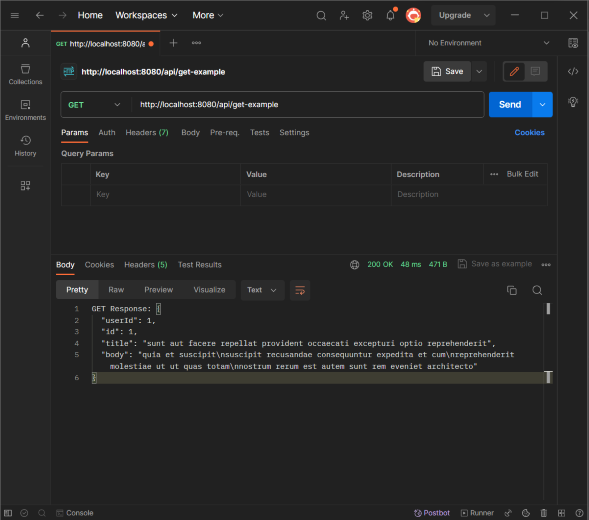
Step 6: Test the API Call
Finally, to test the API call you can use your browser, a tool like cURL, or Postman to make GET/POST and other requests to the endpoints. You should see the API response or an error message.
Let’s test the /api/get-example endpoint:
Open Postman, then enter the URL like – http://localhost:8080/api/get-example and select GET request from left dropdown, finally click on send button, now a response will be generated.
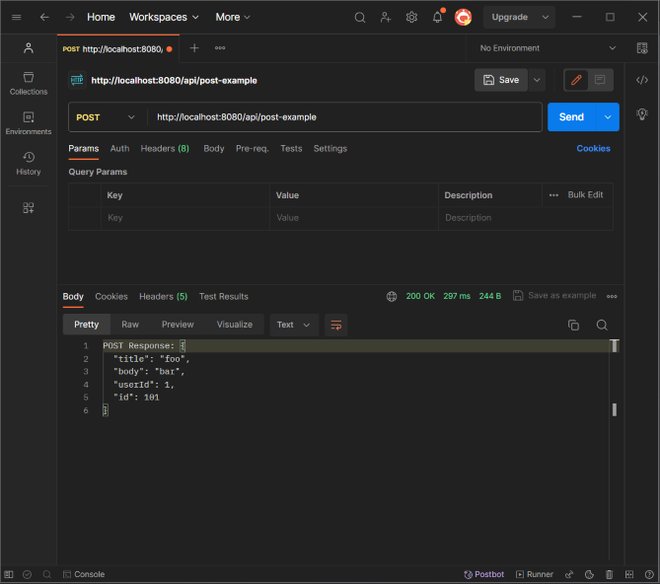
Now test the /api/post-example endpoint:
Open Postman, then enter the URL like – http://localhost:8080/api/post-example and select POST request from left dropdown, finally click on send button, now a response will be generated.
Remember to replace the example URLs with the actual URLs of the APIs you want to call.
Share your thoughts in the comments
Please Login to comment...