Server – Sent Events in Spring
Last Updated :
03 Mar, 2024
When we design web applications, we generally have a client and a server model, where the client is always the initiator of the transaction or a request to the server. The server responds to these requests. However, in certain scenarios, there arises a need for the server to respond much more frequently or give additional information to the client. This requirement leads us to techniques such as long polling, WebSockets, and Server-Sent Events (SSE).
In this article, we are going to look at Server-Sent Events (SSE) using Spring Boot and how we can implement them.
Server-Sent Events (SSE)
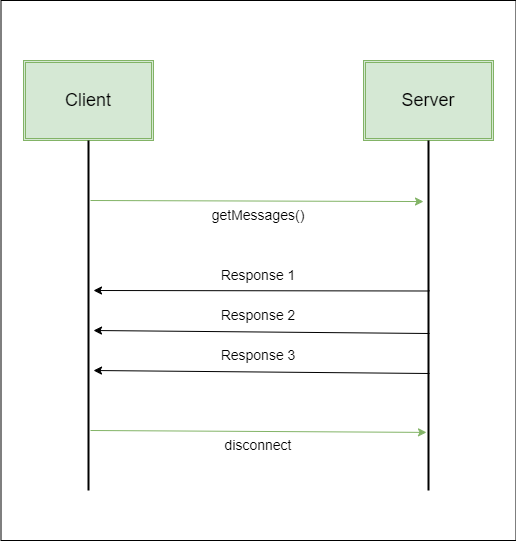
It is not a new technique. However, it is a technique when we want to have a unidirectional flow of data. Let’s consider a scenario where we have a client-server architecture. The client initiates a request to the server, e.g., fetching messages with a function called getMessages(). The server responds with various messages over time within that particular stream. So, we are creating a channel from the client to the server, and the server responds within that particular channel. Once the client has received all the data it needs, it can close the connection.
Use Cases Server-Sent Events
- Live Stream: Websites or applications that provide live stream. Examples include, watching a live stream which could be a cricket match e.g.: IPL, YouTube streaming/videos, blogging live blogs, and conferences.
- Show client progress: Application can provide users with real time updates on the status on the client side. Examples include, file upload, form submissions, real time analytics, etc.
- Logging: Used in monitoring, handling events on the server side, capturing errors and exceptions that occurs, etc.
Implementation of Server-Sent Events Using Spring Boot
Below is the step-by-step implementation of Server-Sent Events in Spring.
Step 1: Setting up a Spring Boot Project in Spring Initializer
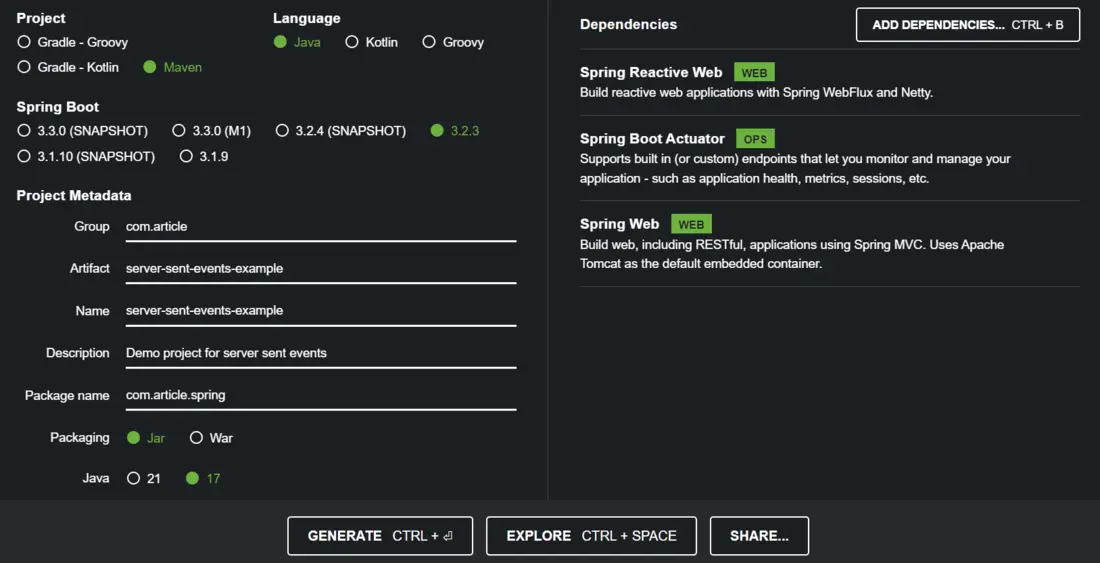
Go to this link and create a Spring Boot project by pre-filling some information such as:
- Specify the project metadata:
- Group: Project group ID
- Artifact: Project’s artifact ID
- Name: Name of your project
- Choosing the appropriate version of Spring Boot.
- Select the language (Java)
- Adding necessary dependencies:
- Spring Reactive Web (for building reactive, non-blocking web applications).
- Spring boot actuator (for monitoring and managing web applications).
- Spring web (for building web applications).
- At last, click on GENERATE button.
- Download your Spring Boot project in zip format.
- Now extract the folder into your local machine.
Step 2: Adding Dependencies in pom.xml
All dependencies are specified in pom.xml file.
XML
<?xml version="1.0" encoding="UTF-8"?>
<modelVersion>4.0.0</modelVersion>
<parent>
<groupId>org.springframework.boot</groupId>
<artifactId>spring-boot-starter-parent</artifactId>
<version>3.2.3</version>
<relativePath/>
</parent>
<groupId>com.article</groupId>
<artifactId>server-sent-events-example</artifactId>
<version>0.0.1-SNAPSHOT</version>
<name>server-sent-events-example</name>
<description>Demo project for server sent events</description>
<properties>
<java.version>17</java.version>
</properties>
<dependencies>
<dependency>
<groupId>org.springframework.boot</groupId>
<artifactId>spring-boot-starter-actuator</artifactId>
</dependency>
<dependency>
<groupId>org.springframework.boot</groupId>
<artifactId>spring-boot-starter-web</artifactId>
</dependency>
<dependency>
<groupId>org.springframework.boot</groupId>
<artifactId>spring-boot-starter-webflux</artifactId>
</dependency>
<dependency>
<groupId>org.springframework.boot</groupId>
<artifactId>spring-boot-starter-test</artifactId>
<scope>test</scope>
</dependency>
<dependency>
<groupId>io.projectreactor</groupId>
<artifactId>reactor-test</artifactId>
<scope>test</scope>
</dependency>
</dependencies>
<build>
<plugins>
<plugin>
<groupId>org.springframework.boot</groupId>
<artifactId>spring-boot-maven-plugin</artifactId>
</plugin>
</plugins>
</build>
</project>
|
Step 3: Creating a Server-Sent Events Controller
Here is the ServerEventsController class.
Java
package com.article.spring;
import org.springframework.http.MediaType;
import org.springframework.http.codec.ServerSentEvent;
import org.springframework.web.bind.annotation.GetMapping;
import org.springframework.web.bind.annotation.RequestMapping;
import org.springframework.web.bind.annotation.RestController;
import reactor.core.publisher.Flux;
import java.io.IOException;
import java.nio.file.Files;
import java.nio.file.Path;
import java.time.Duration;
import java.util.concurrent.atomic.AtomicInteger;
import java.util.stream.Stream;
@RestController
@RequestMapping("/server-events")
public class ServerEventsController {
@GetMapping(produces = MediaType.TEXT_EVENT_STREAM_VALUE)
public Flux<ServerSentEvent<String>>getEvents() throws IOException {
Stream<String> lines=Files.lines(Path.of(
"C:\\Users\\prade\\Downloads\\server-sent-events-example\\server-sent-events-example\\pom.xml"));
AtomicInteger counter=new AtomicInteger(1);
return Flux.fromStream(lines)
.filter(line -> !line.isBlank())
.map(line -> ServerSentEvent.<String>builder()
.id(String.valueOf(counter.getAndIncrement()))
.data(line)
.event("lineEvent")
.retry(Duration.ofMillis(1000))
.build())
.delayElements(Duration.ofMillis(300));
}
}
|
The ServerEventsController is responsible for handling HTTP requests related to Server-Sent Events (SSE). It reads lines from a file and converts them into SSEs.
- Endpoint Mapping: The controller is mapped to “/server-events” endpoint which will handle requests made to this URL.
- Reading from file: It reads lines from a file specified by the file path.
- Event Creation: Each line from the file is converted into a Server-Sent Events (SSE) using a builder method. The ID is assigned sequentially using an “AtomicInteger” and the line content becomes the data of the event.
- Retry Duration: The Server-Sent Events are given a retry duration of 1 second.
- Streaming and Delay: The Server-Sent Events are streamed to clients with a delay of 300 milliseconds between each event.
Step 4: Run the Application.
To run the Spring Boot application, simply run this ServerSentEventsExampleApplication class .
Java
package com.article.spring;
import org.springframework.boot.SpringApplication;
import org.springframework.boot.autoconfigure.SpringBootApplication;
@SpringBootApplication
public class ServerSentEventsExampleApplication {
public static void main(String[] args) {
SpringApplication.run(ServerSentEventsExampleApplication.class, args);
}
}
|
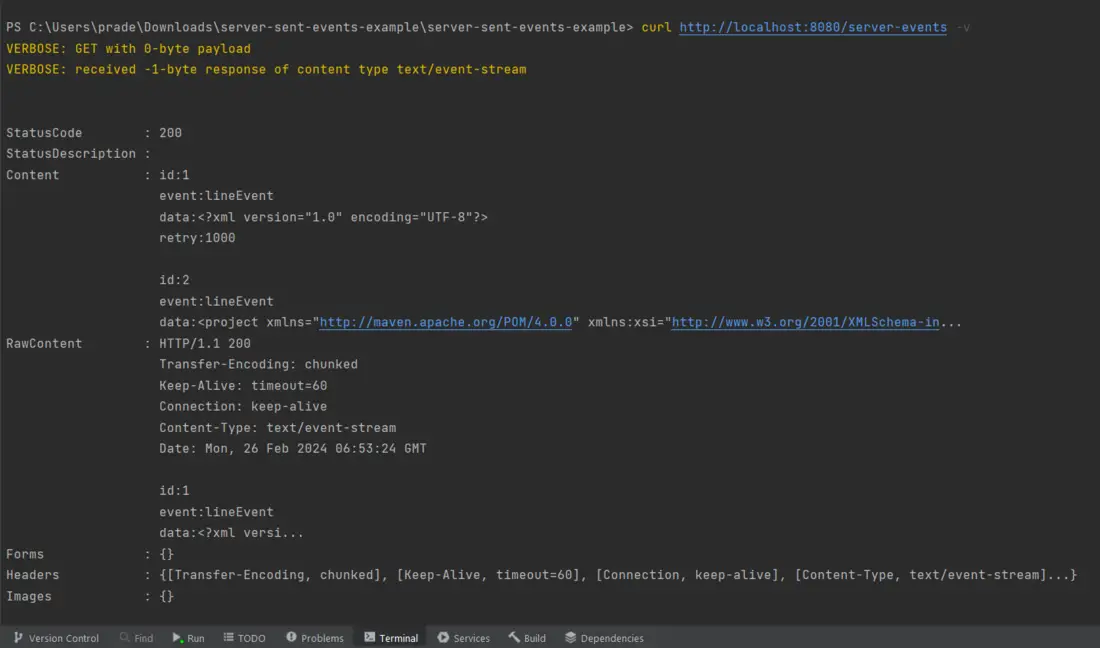
Output Using CURL:
In the terminal execute the following command,
curl http://localhost:8080/server-events -v
After executing the above command, we will see the below output in terminal.
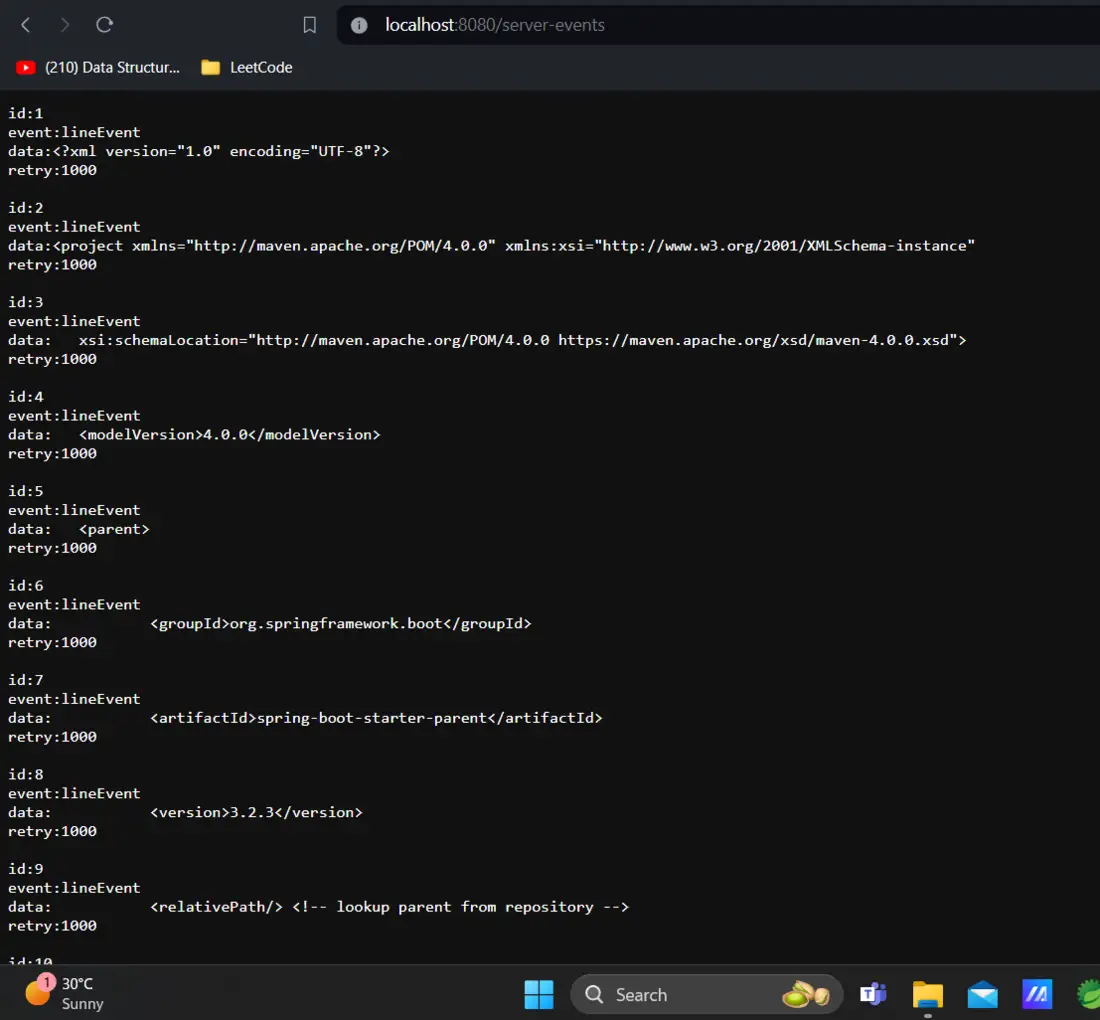
Output Using Browser:
To see the Server-Sent Events in action, open browser and go to the following URL:
http://localhost:8080/server-events
After hitting the above link in browser, we will get the below output.
Share your thoughts in the comments
Please Login to comment...