ReactJS Calculator App ( Structure )
Last Updated :
27 Sep, 2023
In our previous article, we have talked about a Calculator app we are going to develop and also have seen a glimpse of our final project. In this article, we will get our hands ready to start the development of our first application. We have told this earlier also that every application we will develop in React will be made up of pieces called components. We can see a UI broken down into multiple individual pieces called components and work on them independently and merge them all in a parent component which will be your final UI. So let’s now try to break down the UI of calculator App into smaller pieces. We will get the following elements after breaking the UI into small pieces:
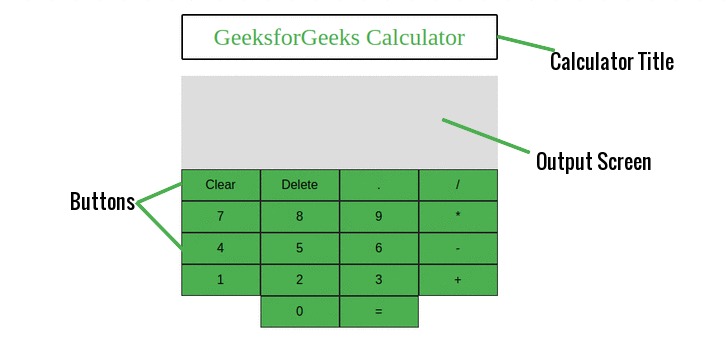
- Calculator Title: This is the title at the top of our application, “GeeksforGeeks Calculator”.
- Output Screen: This will be our output screen, where all text will be shown. Like the input that the user will type and the answer calculated from the user input. So, we can again break down this into two smaller pieces as shown below:
- Question Output: This will be the input given by the user.
- Answer Output: This will be the result calculated from user input.
- Buttons: As you have seen in the image of our calculator app, we had used a lot of buttons for the input numbers from ‘0-9’, operators, to clear the screen, for backspace etc.
So, the above-shown elements are the smallest elements in which we can break our complete calculator app. So we will create Components for each of these elements. So, as we have seen the structure of our app let’s take the first step towards the developing it. We will do things in this project from the very beginning, i.e. by creating a react app, building individual components etc. Let us now create our app using the create-react-app command. Open your terminal and type the below command:
create-react-app firstapp
Here firstapp, is the name of our react application. You can choose whatever name you want for your application but make sure that the name of your application should be in lowercase letters only. After successful execution of the above command, React will create a directory named ‘firstapp’. This directory will contain all of the files of our application. Below image shows the default files created by React for our application firstapp.
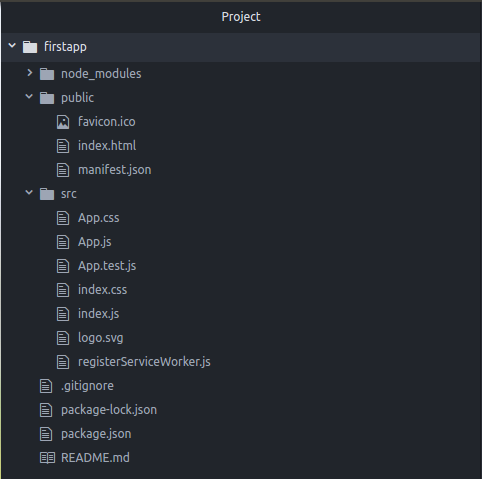
Now, as you can see in the above image that React had created a number of files for us. But we do not actually need all of them. We will create and work with our own files. So, open the src directory and delete all of the files and create two new files with the names ‘index.js’ and ‘index.css’. Also, go to the public directory and delete all pre-written code from the index.html file and add the below code to it. Below is our /public/index.html file:
html
<!DOCTYPE html>
<html lang="en">
<head>
<meta charset="utf-8">
<meta name="viewport" content="width=device-width,
initial-scale=1, shrink-to-fit=no">
<title>GeeksforGeeks Calculator</title>
</head>
<body>
<div id="root"></div>
</body>
</html>
|
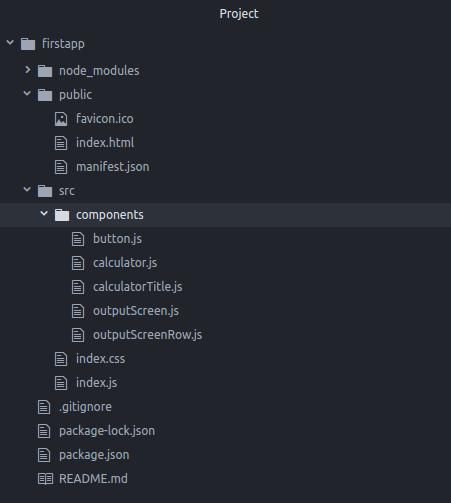
So, we are done setting our App, let us now start creating our Components. As we have discussed above. We will need a total of four components as shown below:
- Calculator: This will be the parent component and will represent the entire Calculator application as a whole.
- CalculatorTitle: This component will be used to render the title at the top of our application, “GeeksforGeeks Calculator”.
- OutputScreen: This Component will be for all of the text shown on the screen.
- OutputScreenRow: This component will be for the type of output, i.e. input text and calculated result.
- Button: This component will be for all of the buttons that we have in our application.
Let us now create a new folder named components inside our src folder and create five files inside this folder for the components mentioned above. The names of these files will be same as that of component’s name with the first letter as lowercase. Our project directory will look like as shown in the below image after creating all files:
So, we have so far created the basic structure of our Calculator application. But till now we have not written any piece of code or have not designed anything. In our next article, we will start writing codes for our components and will create the design of our Calculator application. ReactJS | Calculator App ( Building UI )
Share your thoughts in the comments
Please Login to comment...