PYGLET – Drawing Multiple Sprites
Last Updated :
26 May, 2022
In this article, we will see how we can draw multiple sprites on the window in PYGLET module in python. Pyglet is easy to use but powerful library for developing visually rich GUI applications like games, multimedia, etc. A window is a “heavyweight” object occupying operating system resources. Windows may appear as floating regions or can be set to fill an entire screen (fullscreen). A sprite is an instance of an image displayed on-screen. Multiple sprites can display the same image at different positions on the screen. Sprites can also be scaled larger or smaller, rotated at any angle and drawn at a fractional opacity. Image is loaded with the help of image module of pyglet.
Sprites can be batched together and drawn at once more quickly than if each of their draw methods were called individually. The following example creates one hundred ball sprites and adds each of them to a Batch. The entire batch of sprites is then drawn in one call
We can create a window, batch and sprite with the help of commands given below
# creating a window
window = pyglet.window.Window(width, height, title)

# creating a batch
batch = pyglet.graphics.Batch()

# creating a sprite object
pyglet.sprite.Sprite(img, x, y)
Below is the implementation
Python3
import pyglet
import pyglet.window.key as key
width = 500
height = 500
title = "Geeksforgeeks"
window = pyglet.window.Window(width, height, title)
text = "Welcome to GeeksforGeeks"
label = pyglet.text.Label(text,
font_name ='Cooper',
font_size = 16,
x = 250,
y = 150,
anchor_x ='center',
anchor_y ='center')
batch = pyglet.graphics.Batch()
image = pyglet.image.load('gfg.png')
sprites = []
pos_x = 10
pos_y = 230
for i in range(5):
temp = pyglet.sprite.Sprite(image, pos_x, pos_y, batch = batch)
sprites.append(temp)
pos_x = pos_x + 100
@window.event
def on_draw():
window.clear()
label.draw()
batch.draw()
@window.event
def on_key_press(symbol, modifier):
if symbol == key.C:
print("Key : C is pressed")
img = image = pyglet.resource.image("gfg.png")
value = pyglet.window.mouse.buttons_string(2 | 5)
window.set_icon(img)
pyglet.app.run()
|
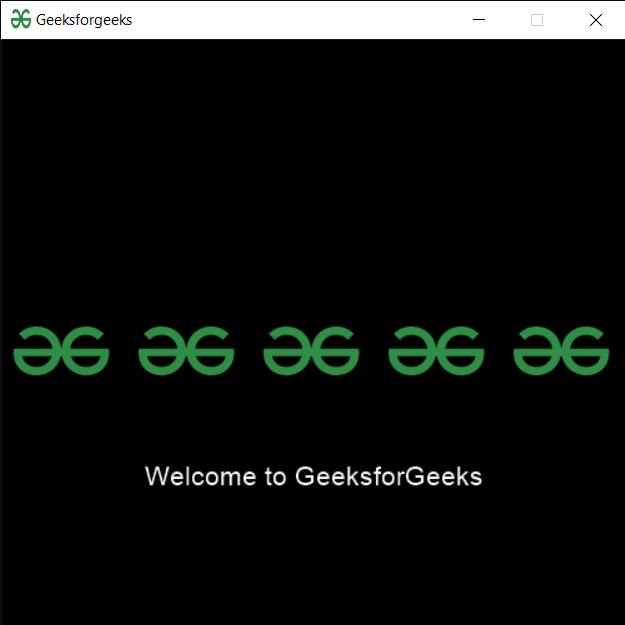
Output :
Share your thoughts in the comments
Please Login to comment...