Manual Scheduling In Kubernetes
Last Updated :
15 Mar, 2024
Kubernetes is a container orchestration tool that scales, deploys, and manages containerized applications. Here is the scheduler of the master node schedules on which the node pod is going to run. In this guide, I will first discuss Kubernetes and some of its important features. Then I will discuss why manual scheduling in Kubernetes is important. After this, I will walk you through the different steps to schedule a pod to run on a particular node in a Kubernetes cluster.
What is Kubernetes?
Kubernetes is a container orchestration tool that helps in scaling, deploying, and managing any containerized application. Kubernetes follows a master-slave architecture. Here, the master node manages all the cluster operations, while worker nodes help in deploying and executing the containers. The master node consists of 4 main components, the API Server, which helps in interacting with the Kubernetes cluster; the Scheduler schedules on which node the pod will run, etcd to store all the Kubernetes cluster data; and control managers, which help in managing different controllers like deployment, replicasets, and many more. On the other hand, in the worker node, there is kubelet present, which helps in managing the pod lifecycle on a node; container runtime, which helps in running the containers; and kube-proxy, which manages all the networking rules in the pods.
Kubernetes provides a variety of features, such as:
- Autohealing: Kubernetes automatically starts a new pod if there is any pod failure or pod deletion.
- Autoscaling: Kubernetes uses a horizontal pod autoscaler to automatically scale up or scale down the number of pods, on the amount of traffic the application receives.
- High availability: Kubernetes provides a replica set controller that maintains the desired number of pods running on the cluster.
- Monitoring: Kubernetes allows the integration of monitoring tools like Grafana and Prometheus to monitor the cluster.
- Roll Back: It allows you to roll back with zero downtime to the previous version of the application if any issues persist in the current version of the application.
- Deployment process: It helps in automating the deployment process by rolling out the new updates of an application with zero downtime.
Why is manual scheduling in Kubernetes important?
In a Kubernetes cluster, there are many nodes present. The scheduler of the master node schedules the running of a pod on a particular node. Here, manual scheduling means running a pod on a particular node by manually mentioning the nodeName field in the pod YAML configuration file. Manual scheduling is important because:
- Suppose you have a pod that requires a lot of resources to run. Then here you need to manually schedule the pod on a larger node for smooth running of the pod.
- Scheduling pods on different nodes will ensure high availability. Even if there is a node failure, the other nodes in the cluster will still be running their pods.
- Some pods require communication with particular services on a node , manual scheduling helps run pods on those nodes for better performance.
Pre-requisites
Before moving to next section make sure that you have a Kubernetes tool to create cluster . If you have not installed any tool then follow this detailed geeksforgeeks article How To Use Kind To Deploy Kubernetes Clusters? to install Kind on your system.
Steps To Schedule Pods Manually In Kubernetes
Step 1: First create a config file for kind to create a cluster . Here mention the number of worker nodes you want to create in the cluster.
config.yml
kind: Cluster
apiVersion: kind.x-k8s.io/v1alpha4
nodes:
- role: control-plane
- role: worker
- role: worker

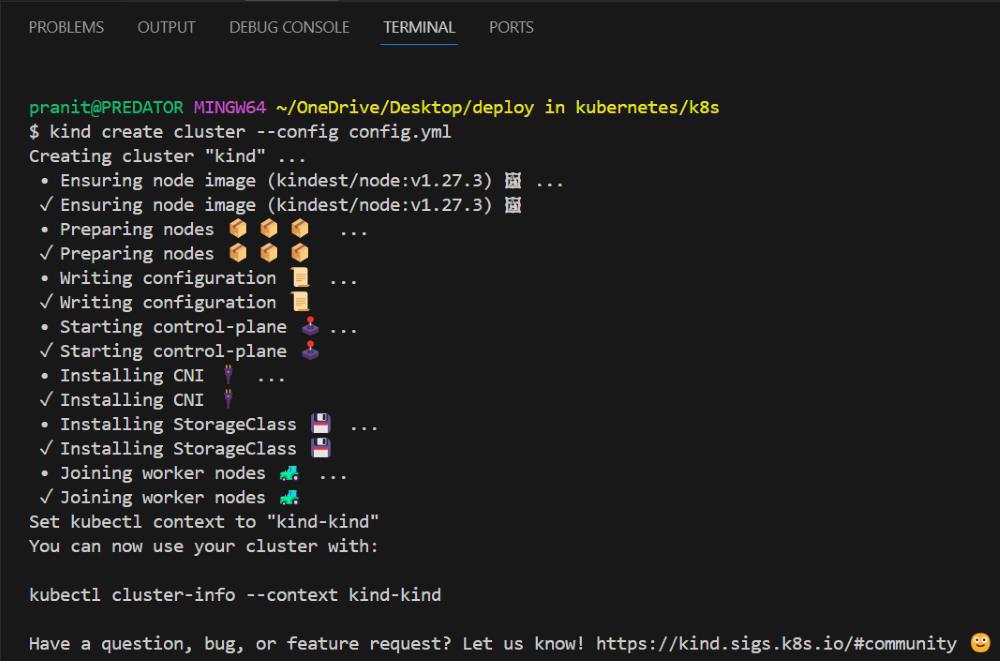
Step 2: Create a cluster using the config file.
kind create cluster --config config.yml
Step 3: Now check the nodes in the cluster using the command below .
kubectl get nodes

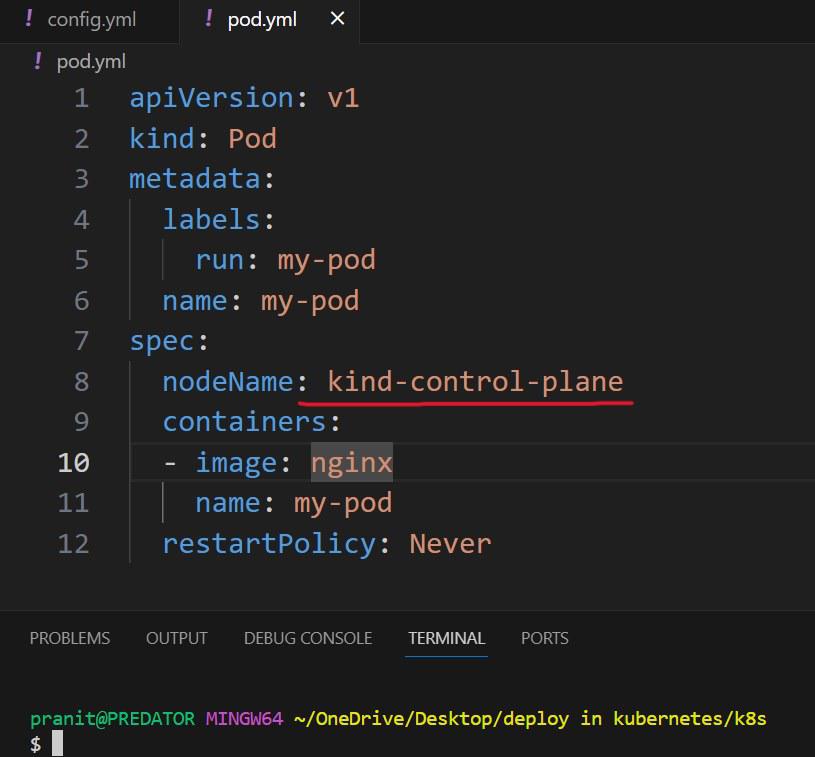
Step 4: Now write a YAML file to create a pod and run in one of the nodes on the cluster . Here in the nodeName field mention the name of node on which you want to schedule the pod for running.
pod.yml
apiVersion: v1
kind: Pod
metadata:
  labels:
    run: my-pod
  name: my-pod
spec:
  nodeName: kind-control-plane
  containers:
  - image: nginx
    name: my-pod
  restartPolicy: Never
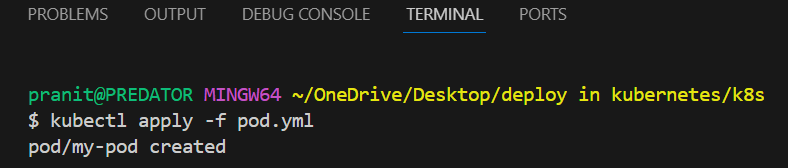
Step 5: Now create a pod on the cluster using the command below.
kubectl apply -f pod.yml
Step 6: After this check in which node pod is running , using the command below . Here you will see the same node as we have mentioned in the nodeName field in pod.yml.
kubectl get pods -o wide
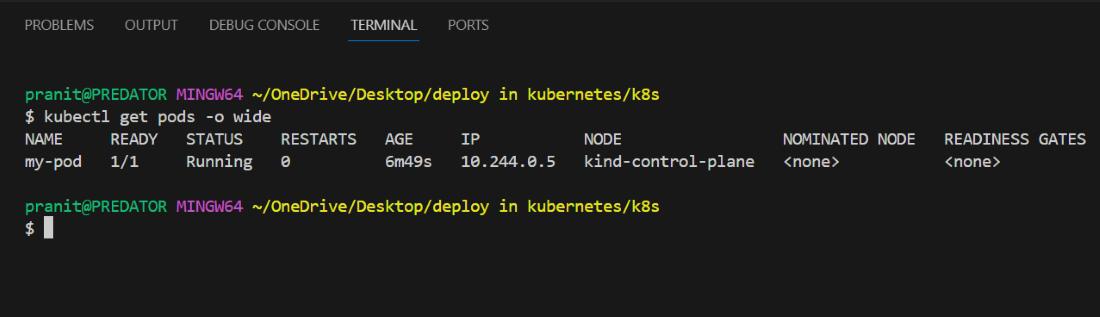
Like this you can change the node name and can manually schedule the running of a pod on any node.
Conclusion
Here in this article you have first learned what is Kubernetes and what are its important features. Then you have learned why manual scheduling in Kubernetes is important. After this you have created a config file for a kind Kubernetes cluster and used the config file to create a Kubernetes cluster. Then finally you have created pod and scheduled it on a particular node by using the nodeName field in the pod YAML configuration file.
Manual Scheduling In Kubernetes – FAQ’s
What is manual scheduling ?
Manual scheduling means to schedule a pod to run on a particular node by mentioning the node name in the pod configurational file .
Which field of pod YAML configuration file is used to define node name ?
nodeName field of pod configurational file is used to define node name .
What are the advantages of manual scheduling ?
Manual scheduling helps to run a pod on a particular node that requires high resources .
How to know on which node a pod is scheduled for running ?
Use the command kubectl get pods -o wide to see on which node a pod is scheduled to run .
How can manual scheduling affect high availability ?
Even though manual scheduling is mostly used to ensure high availability in a Kubernetes cluster but if manual scheduling is not properly managed then there is a chance that it may lead to uneven distribution of pods on the nodes .
Share your thoughts in the comments
Please Login to comment...