JUnit 5 – Test LifeCycle
Last Updated :
04 Jan, 2024
In the Java testing framework, JUnit 5 is the latest testing framework that introduces a robust test lifecycle that is managed through four primary annotations that are @BeforeAll, @BeforeEach, @AfterEach, and @AfterAll. We need to annotate each method with @Test annotation from the org.junit.jupiter.api package. In this article, we will explore the different phases, and annotations of the JUnit 5 Test Lifecycle.
Prerequisite
Annotations and Phases in Test Lifecycle
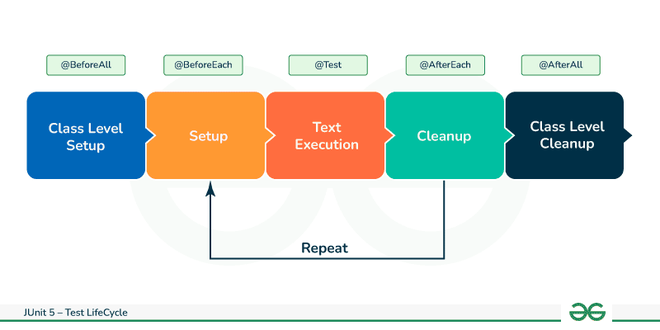
In JUnit 5, the test lifecycle is managed through various annotations that dictate the setup, execution, and cleanup phases of your test methods. Let us break down each of these annotations:
1. Class Level Setup (@BeforeAll):
- Purpose: If a method is annotated with @BeforeAll then it is executed only once before any test methods in the test class.
- Use Case: Methods are suitable for operations that need to be executed as soon as for the whole take a look at class, including setting up a database connection or initializing sources which can be shared among all test methods.
Syntax:
@BeforeAll
static void setupClass()
{
// Code for class-level setup
}
2. Setup (@BeforeEach):
- Purpose: If a method is annotated with @BeforeEach then it is done before every test technique in the test elegance.
- Use Case: These methods with @BeforeEach annotation are ideal for preparing the test surroundings, resetting kingdom, or initializing objects wanted for individual test methods.
Syntax:
@BeforeEach
void setupMethod()
{
// Code for method-level setup
}
3. Test Execution (@Test):
- Purpose: If a technique is annotated with @Test then it marks a technique as a test method.
- Use Case: In these methods actual execution of the take a look at good judgment is written, wherein you perform moves and make assertions to validate the anticipated behavior.
Syntax:
@Test
void testMethod()
{
 // Test logic and assertions
}
4. Cleanup (@AfterEach):
- Purpose: If a technique is annotated with @AfterEach then it is carried out after each test approach within the take a look at magnificence.
- Use Case: These strategies are useful for cleansing up resources, resetting nation, or performing movements after the execution of every individual test technique.
Syntax:
@AfterEach
void cleanupMethod()
{
 // Code for method-level cleanup
}
5. Class Level Cleanup (@AfterAll):
- Purpose: If a technique is annotated with @AfterAll then it is achieved as soon as in any case check methods within the check class.
- Use Case: These strategies with @AfterAll annotation are appropriate for acting cleanup obligations that must arise handiest as soon as for the whole take a look at elegance, inclusive of last database connections or releasing shared sources.
Syntax:
@AfterAll
static void cleanupClass()
{
    // Code for class-level cleanup
}
6. Parameterized Tests (@ParameterizedTest):
- Purpose: If a technique is annotated with @ParameterizedTest then it allows you to run a test multiple times with different sets of parameters.
- Use Case: These strategies with @ParameterizedTest annotation are useful for testing the equal capability with specific inputs.
Syntax:
@ParameterizedTest
@ValueSource(ints = { 1, 2, 3 })
void testWithParameter(int value)
{
    // Test logic with parameter
}
7. Assertions (Assertions class):
- Purpose: These techniques incorporates a set of static techniques for making assertions to your check techniques.
- Use Case: These strategies are typically used for validating anticipated outcomes.
Syntax:
@Test
void testAssertions()
{
    Assertions.assertEquals(4, Calculator.add(2, 2));
    Assertions.assertTrue(result > 0, "Result should be positive");
    // Other assertions...
}
8. Timeout (@Timeout):
- Purpose: If a technique is annotated with @Timeout then it specifies a maximum time in which the check method is allowed to run.
- Use Case: These techniques with @Timeout annotation are beneficial for stopping exams from going for walks indefinitely.
Syntax:
@Test
@Timeout(5) // 5 seconds timeout
void testWithTimeout()
{
    // Test logic
}
Example of JUnit Tests
Step 1: Firstly, you want to add a dependency inside the pom.xml document of your assignment.
<dependency>
        <groupId>org.junit.jupiter</groupId>
        <artifactId>junit-jupiter-api</artifactId>
        <version>5.10.1</version>
        <scope>test</scope>
</dependency>
Step 2: Create a file named Calculator.Java in src/main/java and write below code:
Java
public class Calculator {
public static int add(int a, int b) {
return a + b;
}
}
|
Step 3: Create a document named ExampleTest.Java in src/test/java and write below code:
This is an example demonstrating the use of above annotations in a JUnit 5 check magnificence:
Java
import org.junit.jupiter.api.*;
public class ExampleTest {
private static int result = 0;
@BeforeAll static void setupClass()
{
System.out.println("Class-level setup");
}
@BeforeEach void setupMethod()
{
System.out.println("Method-level setup");
}
@Test void testMethodOne()
{
System.out.println("Test method one executed");
}
@Test void testMethodTwo()
{
System.out.println("Test method two executed");
}
@AfterEach void cleanupMethod()
{
System.out.println("Method-level cleanup");
}
@AfterAll static void cleanupClass()
{
System.out.println("Class-level cleanup");
}
@ParameterizedTest
@ValueSource(ints = { 1, 2, 3 })
void testWithParameter(int value)
{
System.out.println("Parameterized test with value: "
+ value);
}
@Test void testAssertions()
{
Assertions.assertEquals(4, Calculator.add(2, 2));
Assertions.assertTrue(result > 0,
"Result should be positive");
}
@Test
@Timeout(5)
void testWithTimeout()
{
System.out.println("Test with timeout");
}
}
|
In this example, you could have a look at the sequence of setup, take a look at execution, and cleanup levels as indicated by the annotations.
Output:
Class-level setup
Method-level setup
Test method one executed
Method-level cleanup
Method-level setup
Test method two executed
Method-level cleanup
Parameterized test with value: 1
Parameterized test with value: 2
Parameterized test with value: 3
Test assertions executed
Test with timeout
Method-level cleanup
Class-level cleanup
This output reflects the execution order of the setup, test, and cleanup phases as defined by the @BeforeAll, @BeforeEach, @Test, @AfterEach, @ParameterizedTest, @Test, @Timeout, and @AfterAll annotations in the JUnit 5 test lifecycle.
Conclusion
In this article, we have learned about some basic but important annotations in JUnit5 Test LifeCycle like @Test, @BeforeEach, @AfterEach, @BeforeAll, @AfterAll @ParameterizedTest and @Timeout. By using these annotations, we can test our code very efficiently and effectively.
Share your thoughts in the comments
Please Login to comment...