JSON (JavaScript Object Notation) is a lightweight data exchange format. We can interchange data from one application to another from client to server. We have many data interchange formats available in the market. Like properties files, XML files, YAML files, JSON files, etc. But when compared to others JSON has some special advantages for java related frameworks. In this article, we will learn about How to use JSON Parameters with Spring MVC.
JSON Parameters with Spring MVC
JSON parameters in Spring MVC facilitate standardized, flexible, and readable communication between clients and servers, especially in the context of building RESTful APIs and modern web applications. It simplifies data exchange, enhances interoperability, and aligns with industry best practices.
- JSON is the recommended format for data exchange in development.
- JSON params play a key role as part of Spring MVC flow.
In this tutorial, we are going to understand how we can use JSON in Spring MVC. We are using the Spring Boot project to demonstrate the JSON Param with Spring MVC
JSON Parameters with Spring Boot
In Spring Boot, we can handle JSON parameters in various ways. Here, we will understand a simple example using the @RequestBody annotation to map JSON data to a Java object. Let’s take the below sample JSON format acts as an input for Spring Boot Rest Controller.
{
  "name": "John Doe",
  "age": 25,
  "email": "john@example.com"
}
Now, we need to create a Java bean to represent the above JSON structure.
public class Person {
    private String name;
    private int age;
    private String email;
    // Getters and setters
}
Then we need to create a Spring MVC Controller And take one POST API. Which can take the Person java class as input.
Java
import org.springframework.http.HttpStatus;
import org.springframework.http.ResponseEntity;
import org.springframework.web.bind.annotation.PostMapping;
import org.springframework.web.bind.annotation.RequestBody;
import org.springframework.web.bind.annotation.RequestMapping;
import org.springframework.web.bind.annotation.RestController;
@RestController
@RequestMapping("/api/person")
public class PersonController {
@PostMapping("/add")
public ResponseEntity<String> addPerson(@RequestBody Person person) {
return new ResponseEntity<>("Person added successfully", HttpStatus.CREATED);
}
}
|
In this example, the @RequestBody annotation is used to bind the incoming JSON data to the Person object. The addPerson method receives a Person object as a parameter, and Spring automatically converts the incoming JSON data to this object.
In the above sample example, we are using Spring Boot. And this is the industry-recommended framework. Will see the same in the below example in detail.
Example JSON as Parameter
As mentioned above, we will create one sample spring boot app with a POST endpoint. Which takes the Person JSON file as input.
We can create a spring boot application by using the below-
- Spring initializer (spring.io)
- Using IDE (Eclipse / STS)
- Spring Cli console and so on.
Here I am using the simplest way to create a Spring Boot app using Spring Initializer.
Go to https://start.spring.io website, then it will display in build form with many options. See the below screenshot.
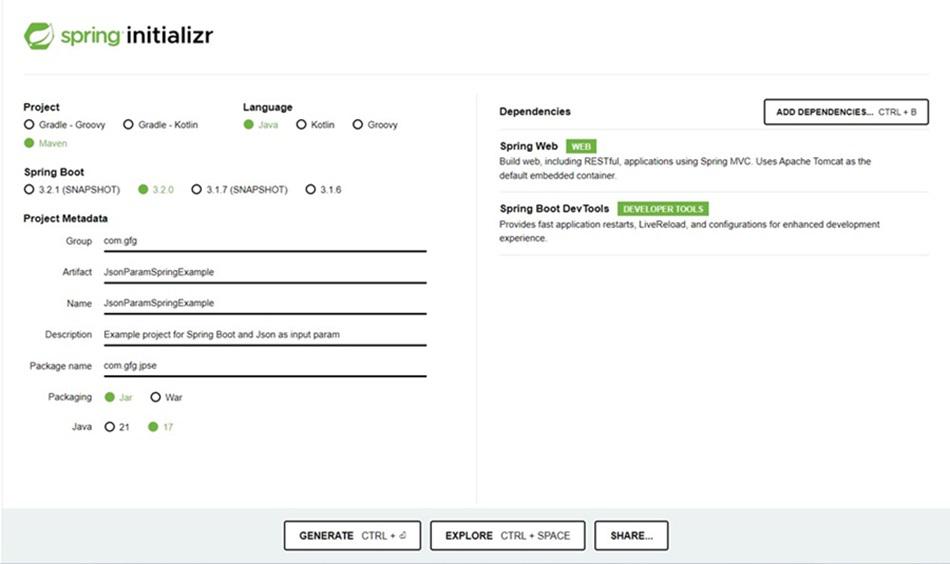
Spring Initializer Image
- Here I am using JDK 17 in my system. So I chose Java version 17. And add Spring Web dependency which downloads all libraries related to the Rest controller and JSON parsers.
- Then Click the Generate button at the bottom of the page. It will create a maven project and download it to your local as a .zip file. Extract the zip and import it into your IDE.
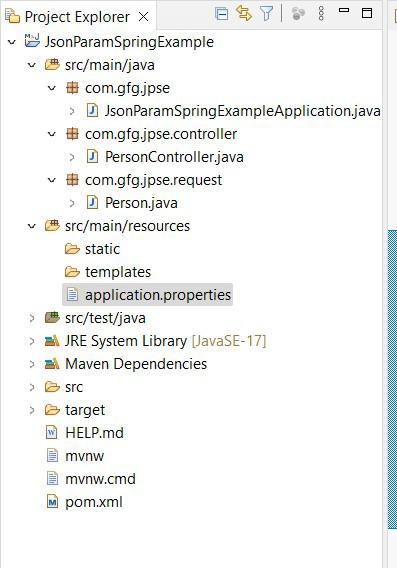
- It will take a couple of minutes to download all dependencies which are there in pom.xml. Once downloading is done, your project structure looks like this.
Project Structure
Check the following code as a pom.xml file.
XML
<?xml version="1.0" encoding="UTF-8"?>
<modelVersion>4.0.0</modelVersion>
<parent>
<groupId>org.springframework.boot</groupId>
<artifactId>spring-boot-starter-parent</artifactId>
<version>3.2.0</version>
<relativePath/>
</parent>
<groupId>com.gfg</groupId>
<artifactId>JsonParamSpringExample</artifactId>
<version>0.0.1-SNAPSHOT</version>
<name>JsonParamSpringExample</name>
<description>Example project for Spring Boot and Json as input param - Geeks For Geeks </description>
<properties>
<java.version>17</java.version>
</properties>
<dependencies>
<dependency>
<groupId>org.springframework.boot</groupId>
<artifactId>spring-boot-starter-web</artifactId>
</dependency>
<dependency>
<groupId>org.springframework.boot</groupId>
<artifactId>spring-boot-devtools</artifactId>
<scope>runtime</scope>
<optional>true</optional>
</dependency>
<dependency>
<groupId>org.springframework.boot</groupId>
<artifactId>spring-boot-starter-test</artifactId>
<scope>test</scope>
</dependency>
</dependencies>
<build>
<plugins>
<plugin>
<groupId>org.springframework.boot</groupId>
<artifactId>spring-boot-maven-plugin</artifactId>
</plugin>
</plugins>
</build>
</project>
|
Check the following code in the PersonController.java file
Java
package com.gfg.jpse.controller;
import org.springframework.http.HttpStatus;
import org.springframework.http.ResponseEntity;
import org.springframework.web.bind.annotation.PostMapping;
import org.springframework.web.bind.annotation.RequestBody;
import org.springframework.web.bind.annotation.RequestMapping;
import org.springframework.web.bind.annotation.RestController;
import com.gfg.jpse.request.Person;
@RestController
@RequestMapping("/api/person")
public class PersonController {
@PostMapping("/add")
public ResponseEntity<String> addPerson(@RequestBody Person person) {
System.out.println(person);
return new ResponseEntity<>("Person added successfully", HttpStatus.CREATED);
}
}
|
Explanation of the Above Code:
- In the above example, we are taking POST API with path URL as /add this method taking Person class as an object and returning ResponseEntity<String>.
- The @RequestBody annotation is used to bind the incoming JSON data to the Person object.
- The addPerson method receives a Person object as a parameter, and Spring automatically converts the incoming JSON data to this object.
- Check the following code in the Person.java file
Java
package com.gfg.jpse.request;
public class Person {
private String name;
private int age;
private String email;
public String getName() {
return name;
}
public void setName(String name) {
this.name = name;
}
public int getAge() {
return age;
}
public void setAge(int age) {
this.age = age;
}
public String getEmail() {
return email;
}
public void setEmail(String email) {
this.email = email;
}
@Override
public String toString() {
return "Person [name=" + name + ", age=" + age + ", email=" + email + "]";
}
}
|
Here Person.java class is a Java class that is the same as our JSON file. This class has three variables name, age, and email same as JSON keys. This class just holds the values of JSON keys.
Check the following code in JsonParamSpringExampleApplication.java file
Java
package com.gfg.jpse;
import org.springframework.boot.SpringApplication;
import org.springframework.boot.autoconfigure.SpringBootApplication;
@SpringBootApplication
public class JsonParamSpringExampleApplication {
public static void main(String[] args) {
SpringApplication.run(JsonParamSpringExampleApplication.class, args);
}
}
|
Check the following code in the application.properties file
server.port=8081
Note:
1. property server.port=8081 has changed the tomcat port to 8081. By default it will run in 8080.
2. If nothing run on 8080 port then no need to add this in application.properties file. Automatically app will take 8080 port to run.
3. If you already run any app in 8080 then you have to modify your port as below.
Testing and Output
Since we created the POST API, we need to test it by using the Postman tool. You can download the Postman tool and install it on your system. Or you can test the API by using curl. I will provide both here.
1. Curl Command
curl --location 'http://localhost:8081/api/person/add' \
--header 'Content-Type: application/json' \
--data-raw '{
  "name": "John Doe",
  "age": 25,
  "email": "john@example.com"
}'
2. POSTMAN
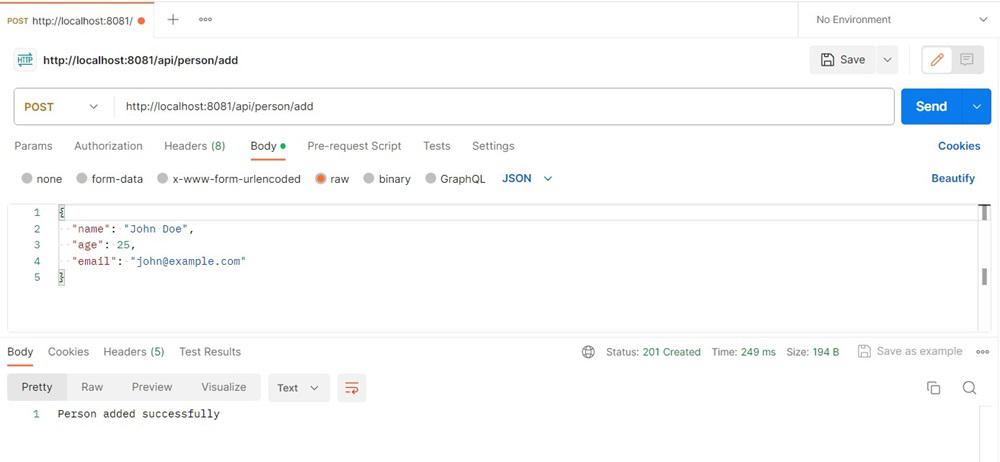
Postman Testing
In IDE open the console and you will be able to see the printing Person object.
Person [name=John Doe, age=25, email=john@example.com]
Example: JSON parameter input as @RequestBody
Now in this example, we will change the input JSON format and add more types. And will return the same Person JSON object as a response.
We will send this JSON as @RequestBody. Let’s assume the below changed JSON request as input.
{
    "name": "John Doe",
    "age": 25,
    "email": "john@example.com",
    "address": {
        "street": "XYZ Main St",
        "city": "Test City",
        "zip": "12345"
    },
    "hobbies": [
        "reading",
        "coding",
        "traveling"
    ]
}
Let us modify PersonController.java File
Java
package com.gfg.jpse.controller;
import com.gfg.jpse.request.Person;
import org.springframework.http.HttpStatus;
import org.springframework.http.ResponseEntity;
import org.springframework.web.bind.annotation.PostMapping;
import org.springframework.web.bind.annotation.RequestBody;
import org.springframework.web.bind.annotation.RequestMapping;
import org.springframework.web.bind.annotation.RestController;
@RestController
@RequestMapping("/api/person")
public class PersonController {
@PostMapping("/add")
public ResponseEntity<Person>
addPerson(@RequestBody Person person){
System.out.println(person);
return new ResponseEntity<>(person,
HttpStatus.CREATED);
}
}
|
In the above, we are using the same API, but instead of returning a String, we are returning a Person object. So we mentioned the return type as ResponseEntity<Person>
Lets add Address.java file under com.gfg.jpse.request package.
Java
package com.gfg.jpse.request;
public class Address {
private String street;
private String city;
private String zip;
public String getStreet() {
return street;
}
public void setStreet(String street) {
this.street = street;
}
public String getCity() {
return city;
}
public void setCity(String city) {
this.city = city;
}
public String getZip() {
return zip;
}
public void setZip(String zip) {
this.zip = zip;
}
@Override
public String toString() {
return "Address [street=" + street + ", city=" + city + ", zip=" + zip + "]";
}
}
|
As above new JSON, we had an address block. So we need to create a separate class as Address with three variables street, city, and zip. This will incorporate with the Person class.
Let’s modify the Person.java file
Java
package com.gfg.jpse.request;
import java.util.List;
public class Person {
private String name;
private int age;
private String email;
private Address address;
private List<String> hobbies;
public String getName() { return name; }
public void setName(String name) { this.name = name; }
public int getAge() { return age; }
public void setAge(int age) { this.age = age; }
public String getEmail() { return email; }
public void setEmail(String email)
{
this.email = email;
}
public Address getAddress() { return address; }
public void setAddress(Address address)
{
this.address = address;
}
public List<String> getHobbies() { return hobbies; }
public void setHobbies(List<String> hobbies)
{
this.hobbies = hobbies;
}
@Override public String toString()
{
return "Person [name=" + name + ", age=" + age
+ ", email=" + email + ", address=" + address
+ ", hobbies=" + hobbies + "]";
}
}
|
Now Person class has been updated with name, age, email, Address class object, and hobbies collection. That’s all, remaining as it is. Then test your code using the Postman tool or as a curl command.
Testing and Output
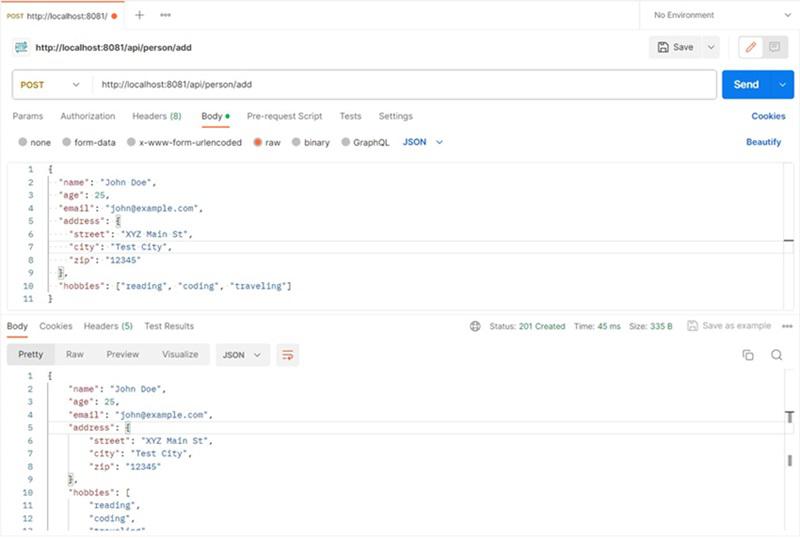
1. Curl Command
You can test API by using the below curl.
curl --location 'http://localhost:8081/api/person/add' \
--header 'Content-Type: application/json' \
--data-raw '{
  "name": "John Doe",
  "age": 25,
  "email": "john@example.com",
  "address": {
    "street": "XYZ Main St",
    "city": "Test City",
    "zip": "12345"
  },
  "hobbies": ["reading", "coding", "traveling"]
}'
2. POSTMAN
You can use the Postman tool to test the above example. Follow the below steps to test the above example.
- Click on the “New” button in the Postman app.
- Select “Request.”
- Give your request a name.
- Choose the HTTP method (e.g., POST) based on the API endpoint you want to test.
- In the URL field, enter the endpoint URL of the API you want to test. (eg., http://localhost:8081/api/person/add)
- This request requires a request body, So go to the “Body” tab.
- Choose the appropriate body type (e.g., raw, form-data, x-www-form-urlencoded). In our case ‘raw’.
- Enter the request payload like
 {
    "name": "John Doe",
    "age": 25,
    "email": "john@example.com",
    "address": {
        "street": "XYZ Main St",
        "city": "Test City",
        "zip": "12345"
    },
    "hobbies": [
        "reading",
        "coding",
        "traveling"
    ]
}
- Click on the Send button to send the request to the API.
- Check the response in the Body tab.
- Verify the status code, headers, and response content.
- Look for any error messages or unexpected behavior.
Postman Testing 2
If you can observe your IDE console. The person’s object will print like below.
Person [
                name=John Doe,
                age=25,
                email=john@example.com,
                address=Address [street=XYZ Main St,
                                                city=Test City,
                                                zip=12345],
                hobbies=[reading, coding, traveling]
            ]
3. Parsing JSON data as String into Spring Application
In the above examples, parsing will be taken care of by Spring @RequestBody annotation. Now will take another scenario. If you want to take JSON data as a String input using @RequestParam and then parse it into an entity for both GET and POST requests, you can follow the examples below.
Note: 1. @RequestParam for larger JSON payloads might not be suitable due to URL length limitations.
2. JSON data has confidential data like usernames and passwords or any secret keys, better use @RequestBody
Let’s take the same JSON we are going to pass as part of the request param to the GET and POST APIs.
{
  "name": "John Doe",
  "age": 25,
  "email": "john@example.com"
}
Example for GET and POST Request: Add GET and POST API methods in PersonController.java
Java
package com.gfg.jpse.controller;
import org.springframework.web.bind.annotation.GetMapping;
import org.springframework.web.bind.annotation.PostMapping;
import org.springframework.web.bind.annotation.RequestMapping;
import org.springframework.web.bind.annotation.RequestParam;
import org.springframework.web.bind.annotation.RestController;
import com.fasterxml.jackson.core.JsonProcessingException;
import com.fasterxml.jackson.databind.ObjectMapper;
import com.gfg.jpse.request.Person;
@RestController
@RequestMapping("/api/person")
public class PersonController {
@GetMapping("/get-person")
public String getPerson(@RequestParam("person-data") String personData){
Person person = parseJsonStringToEntity(personData);
System.out.println("person object: "+person);
return "Received GET request with person: " + person.toString();
}
@PostMapping("/add-person")
public String addPerson(@RequestParam("person-data") String personData) {
Person person = parseJsonStringToEntity(personData);
return "Received POST request with person: " + person.toString();
}
private Person parseJsonStringToEntity(String jsonString) {
ObjectMapper objectMapper = new ObjectMapper();
try {
return objectMapper.readValue(jsonString, Person.class);
} catch (JsonProcessingException e) {
throw new RuntimeException("Error parsing JSON string to entity", e);
}
}
}
|
Testing and Output:
We will test the above scenario by using the Postman tool. Follow the below steps.
- Open the Postman application or navigate to the Postman web version.
- Create a new request by clicking on the New button in the Postman app and selecting Request then name it.
- Select the appropriate HTTP method for your request, such as GET or POST.
- In the request details, navigate to the Body tab. Under the Body section, select form-data as the body type.
- Add a key-value pair where the key is the parameter name, and the value is the JSON string. For example:
- Click on the Send button to send the request to the server.
Key: person-data
Value: {
                  "name": "John Doe",
                  "age": 25,
                  "email": "john@example.com"
            }
- GET request for JSON Parse Testing
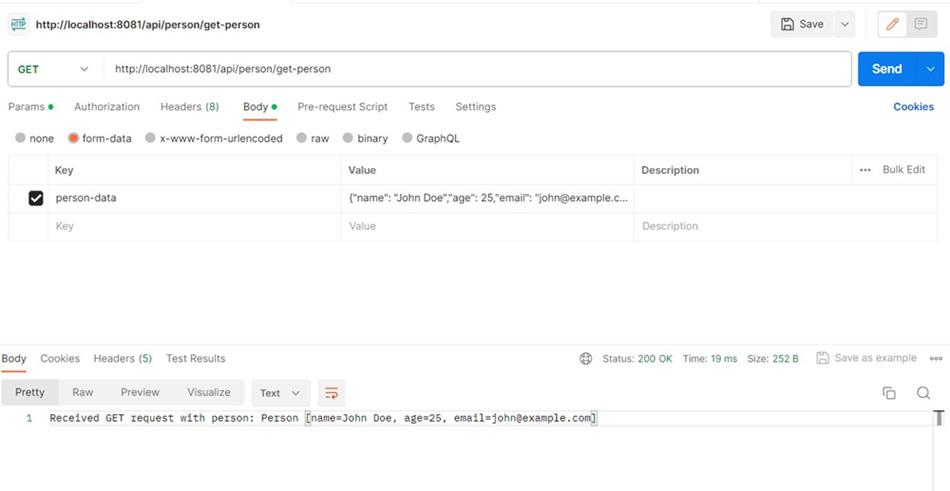
Passing JSON String as Request Param to GET API
- POST request for JSON Parse Testing
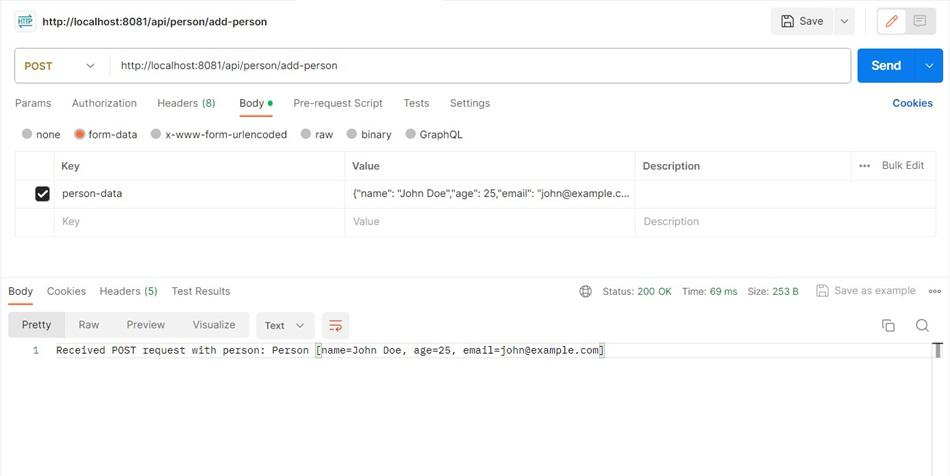
Passing JSON String as Request Param to POST API
Explanation of the above Program:
- In the controller class, we have taken two methods mapped with GET and POST.
- It will take a person’s JSON as string like this {“name”: “John Doe”, “age”: 25, “email”: “john@example.com”}
- Then convert JSON string to Person object using Jackson parser.
- So conversion will be taken care of by Jackson API’s ObjectMapper.
- We have implemented a separate method parseJsonStringToEntity.
4. Accessing the value associated with various Keys
In this example, we will learn about how to access address and street fields directly from passed JSON string as Request Param.
Java
package com.gfg.jpse.controller;
import org.springframework.web.bind.annotation.GetMapping;
import org.springframework.web.bind.annotation.RequestMapping;
import org.springframework.web.bind.annotation.RequestParam;
import org.springframework.web.bind.annotation.RestController;
import com.fasterxml.jackson.core.JsonProcessingException;
import com.fasterxml.jackson.databind.ObjectMapper;
import com.gfg.jpse.request.Address;
import com.gfg.jpse.request.Person;
@RestController
@RequestMapping("/api/person")
public class PersonController {
@GetMapping("/get-address")
public String getAddress(@RequestParam("person-data") String personData) {
Person person = parseJsonStringToEntity(personData);
Address address = person.getAddress();
System.out.println("Address: " + address);
String street = address.getStreet();
System.out.println("Street: " + street);
return "Accessed Address object: " + address.toString();
}
private Person parseJsonStringToEntity(String jsonString) {
ObjectMapper objectMapper = new ObjectMapper();
try {
return objectMapper.readValue(jsonString, Person.class);
} catch (JsonProcessingException e) {
throw new RuntimeException("Error parsing JSON string to entity", e);
}
}
}
|
Testing and Output:
Follow the below steps to test the above code from the Postman tool.
- Open the Postman application or navigate to the Postman web version.
- Create a new request by clicking on the New button in the Postman app and selecting Request name it
- Select the appropriate HTTP method for your request, such as GET or POST. For this case, it is GET.
- In the request details, navigate to the Body tab. Under the Body section, select form-data as the body type.
- Add a key-value pair where the key is the parameter name, and the value is the JSON string.
- Click on the Send button to send the request to the server.
    Key: person-data
    Value: {
                      "name": "John Doe",
                      "age": 25,
                      "email": "john@example.com",
                      "address": {
                        "street": "XYZ Main St",
                        "city": "Test City",
                        "zip": "12345"
                      },
                      "hobbies": [
                        "reading",
                        "coding",
                        "traveling"
                      ]
                }
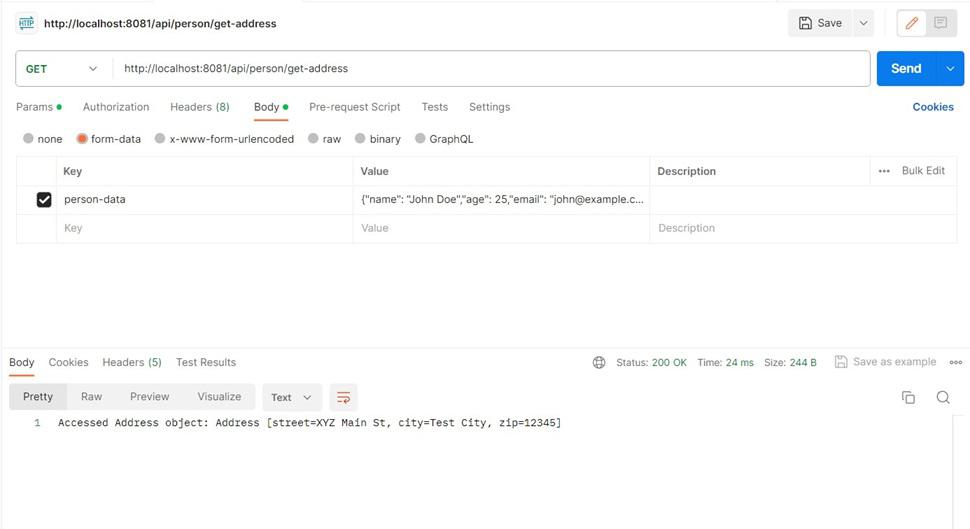
Passing JSON as String and accessing Address data
This is about JSON Parameters with Spring MVC. This example assumes that you are using Spring Boot. If you are using a traditional Spring MVC setup, you might need to configure a MappingJackson2HttpMessageConverter in your XML configuration file.
Explanation of the Above Code:
- The above example uses Jackson’s ObjectMapper to deserialize the JSON string into a Person object.
- Once you have the Person object, you can access the address field directly, and from there, you can access the street field directly.
- Adjust this example based on your specific use case and where you want to perform the JSON parsing and access the values.
Share your thoughts in the comments
Please Login to comment...