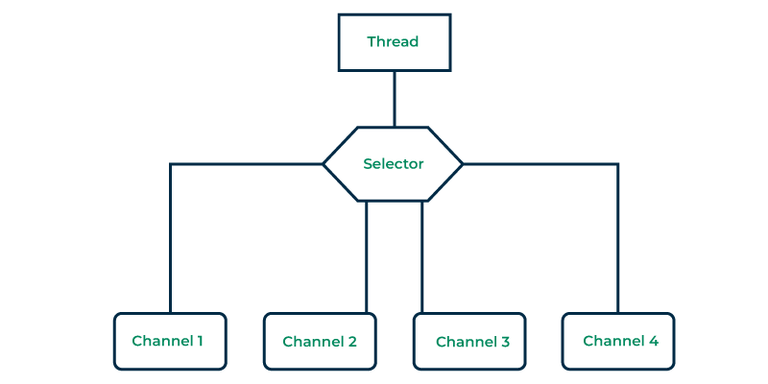
A selector is a tool that helps you keep an eye on one or more NIO channels and figure out when they’re ready to transfer data. In Java NIO, the Selector is a key player that looks at multiple Java NIO Channel instances and figures out which ones are good to go for actions like reading or writing.
This allows a single thread to handle many channels, making it easy to manage multiple network connections.
Why Selector?
Using a selector helps us do more with fewer threads, just one instead of many. Frequent thread switching can burden the operating system and use up memory.
- The fewer threads we use, the more efficient our system gets.
- It’s important to note that modern operating systems and CPUs are getting better at handling multiple tasks.
- helps reduce the resource needs of using many threads over time.
Selectors can do more than just read data, they can also keep an eye on incoming network connections and make sending data through slower channels easier.
How to Create a Selector?
You can create a selector by simply using the open method of the Selector class. This method makes use of the system’s default selector provider to generate a fresh selector
Selector selector = Selector.open();
Registering Channel with the Selector
For a selector to monitor any channels, we must register these channels with the selector.
This is done by calling the register method of the SelectableChannel. However, the channel must be in non-blocking mode before registering it with the selector:
channel.configureBlocking(false);
SelectionKey selectionKey = channel.register(selector, SelectionKey.OP_READ);
The second parameter defines an interest set, meaning what events we are interested in listening for in the monitored channel, via the selector.
There are four different events you can listen for:
- Connect: when a client attempts to connect to the server(SelectionKey.OP_CONNECT).
- Accept: when the server accepts a connection from a client(SelectionKey.OP_ACCEPT).
- Read: when the server is ready to read from the channel(SelectionKey.OP_READ).
- Write: when the server is ready to write to the channel(SelectionKey.OP_WRITE).
Selection Key
As you saw in the above section, when we register a Channel with a Selector the register() method returns a SelectionKey object. This SelectionKey object contains a few interesting properties:
- The interest set
- The ready set
- The channel
- The selector
- Attaching Objects
The Interest set
An interest set specifies the events that the selector should monitor on a channel. This interest set is represented as an integer value, and we can retrieve this information as below.
int set = selectionKey.interestOps();
boolean isAccept  = set & SelectionKey.OP_ACCEPT;
boolean isConnect = set & SelectionKey.OP_CONNECT;
boolean isRead = set & SelectionKey.OP_READ;
boolean isWrite = set & SelectionKey.OP_WRITE;
Initially, we obtain the interest set using the interestOps method of SelectionKey.
When we use a bitwise AND operation on these two values, it yields a boolean value that indicates whether the event is being monitored or not.
The ready set
The ready set is the set of operations the channel is ready for. We can access the ready set like below.
int readySet = selectionKey.readyOps();
We can also use below four methods below instead, which all return a boolean.
- selectionKey.isAcceptable();
- selectionKey.isConnectable();
- selectionKey.isReadable();
- selectionKey.isWritable();
The Channel
We can access the channel from selectionKey as below:
Channel channel = selectionKey.channel();
The Selector
We can obtain the selector object from selectionKey object as below:
Selector selector = selectionKey.selector();
Attaching Objects
We can attach an object to a SelectionKey. Here is how we can attach and get objects from a SelectionKey:
selectionKey.attach(object);
Object attachedObject = selectionKey.attachment();
Channel Key Selection
Once we have registered one or more channels with a Selector, we can use one of the select() methods. These methods provide us with the channels that are “ready” for the events we care about (such as connect, accept, read, or write).
int channels = selector.select();
int channels = selector.select(long timeout);
int channels = selector.selectNow();
- select() blocks unless one channel is ready for the events we registered for.
- select(long timeout) does the same as above except it blocks for a maximum of timeout milliseconds.
- selectNow() does not block at all. It returns immediately with whatever channels are ready.
Once we have called the select() methods and its return value has indicated that one or more channels are ready, you can access the ready channels via the selected key set, by calling the selectedKeys() method as below:
Set<SelectionKey> selectedKeys = selector.selectedKeys();
Other Selector Methods
We have some more selector methods available mentioned with proper description and usage.
|
selector.wakeup();
|
The wakeup() method is used to interrupt the blocking select() call. It’s typically called from another thread to wake up the select() method.
|
When you need to modify the Selector or stop it from blocking, you can use wakeup() to wake up the select() call and make it return.
|
|
selector.close();
|
The close() method is used to close the Selector. Once a Selector is closed, it can no longer be used to monitor channels.
|
It’s important to close the Selector when you are done with it to release system resources.
|
Practical Examples
Let’s explore a couple of practical examples to see the Selector class in action.
Example 1: Simple Selector Usage
In this example, we are going to use Java NIO Selector to monitor a single non-blocking SocketChannel for read operations. The steps are as follows:
- Create a Selector to efficiently manage I/O readiness monitoring.
- Configure a non-blocking SocketChannel for reading data from a remote server.
- Register the SocketChannel with the Selector, specifying that you’re interested in the OP_READ operation.
- Use the selector.select() to wait for at least one registered channel to be ready for reading.
// Create a Selector
Selector selector = Selector.open();
// Configure and register a non-blocking SocketChannel for read operationsSocketChannel
socketChannel = SocketChannel.open(new InetSocketAddress("example.com", 80));
socketChannel.configureBlocking(false);
socketChannel.register(selector, SelectionKey.OP_READ);
// Wait for a ready channelint
readyChannels = selector.select();
Example 2: Using Multiple Channels
In this example, we have extended the usage of the Java NIO Selector to manage multiple channels, each with different I/O operations. The steps are as follows:
- Create a Selector to efficiently manage I/O readiness monitoring.
- Create and configure multiple channels according to your application needs.
- Register each channel with the Selector, specifying the specific I/O operation you’re interested in for each channel.
- Use selector.select() to efficiently wait for at least one of the registered channels to be ready for its specified operation (e.g., read or write).
// Create a Selector
Selector selector = Selector.open();
// Create and configure multiple channels
SocketChannel channel1 = /* Create and configure your channel */;
SocketChannel channel2 = /* Create and configure another channel */;
// Register channels for specific operations
channel1.register(selector, SelectionKey.OP_READ);
channel2.register(selector, SelectionKey.OP_WRITE);
// Wait for ready channelsint ready
Channels = selector.select();
Complete Example
To practice the knowledge we have learned in the previous sections, let’s see a complete client-server example
- We’ll build an echo server and an echo client.
- In this kind of setup, the client connects to the server and starts sending messages to it.
- The server echoes messages sent by each client.
When the server encounters a specific message, such as the end, it interprets it as the end of the communication and closes the connection with the client
Create a server: NIOServer.java
Java
import java.io.IOException;
import java.net.InetSocketAddress;
import java.nio.ByteBuffer;
import java.nio.channels.SelectionKey;
import java.nio.channels.Selector;
import java.nio.channels.ServerSocketChannel;
import java.nio.channels.SocketChannel;
import java.util.Iterator;
import java.util.Set;
public class NIOServer {
public static void main(String[] args) throws IOException {
Selector selector = Selector.open();
ServerSocketChannel serverChannel = ServerSocketChannel.open();
serverChannel.bind(new InetSocketAddress("localhost", 5454));
serverChannel.configureBlocking(false);
serverChannel.register(selector, SelectionKey.OP_ACCEPT);
ByteBuffer buffer = ByteBuffer.allocate(256);
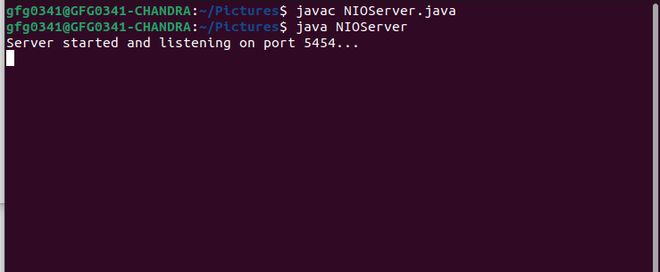
System.out.println("Server started and listening on port 5454...");
while (true) {
selector.select();
Set<SelectionKey> selectedKeys = selector.selectedKeys();
Iterator<SelectionKey> keyIterator = selectedKeys.iterator();
while (keyIterator.hasNext()) {
SelectionKey key = keyIterator.next();
if (key.isAcceptable()) {
ServerSocketChannel server = (ServerSocketChannel) key.channel();
SocketChannel clientChannel = server.accept();
clientChannel.configureBlocking(false);
clientChannel.register(selector, SelectionKey.OP_READ);
}
if (key.isReadable()) {
SocketChannel client = (SocketChannel) key.channel();
buffer.clear();
int bytesRead = client.read(buffer);
if (bytesRead == -1) {
key.cancel();
client.close();
continue;
}
buffer.flip();
String receivedMessage = new String(buffer.array(), 0, bytesRead);
System.out.println("Received: " + receivedMessage);
buffer.rewind();
client.write(buffer);
}
keyIterator.remove();
}
}
}
}
|
Output of NIO Server:
Explanation
- The code is a Java NIO implementation of an echo server.
- It uses a Selector for efficient I/O handling.
- Listens on port 5454, accepts connections, and echoes received data.
- Non-blocking I/O allows handling multiple connections simultaneously.
- The server loop monitors events on registered channels.
- Accepted connections are registered for reading, and data is echoed back to clients.
Create a client: NIOClient.java
In this example we will create a NIOClient, using SocketChannel.
Java
import java.io.IOException;
import java.net.InetSocketAddress;
import java.nio.ByteBuffer;
import java.nio.channels.SocketChannel;
public class NIOClient {
public static void main(String[] args) throws IOException {
SocketChannel clientChannel = SocketChannel.open();
clientChannel.connect(new InetSocketAddress("localhost", 5454));
ByteBuffer buffer = ByteBuffer.allocate(256);
String message = "Hello, NIO Server!";
buffer.clear();
buffer.put(message.getBytes());
buffer.flip();
while (buffer.hasRemaining()) {
clientChannel.write(buffer);
}
buffer.clear();
clientChannel.read(buffer);
buffer.flip();
String response = new String(buffer.array(), 0, buffer.limit());
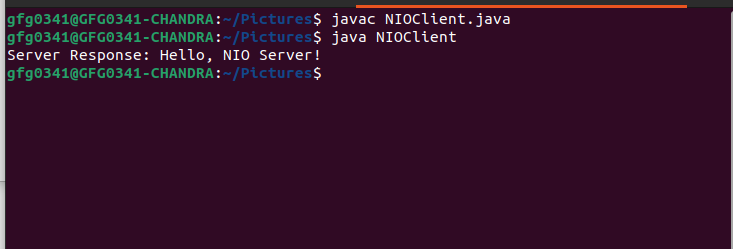
System.out.println("Server Response: " + response);
clientChannel.close();
}
}
|
Output of NIO Client:
Explanation of the above program:
- Creates a
SocketChannel and connects to a server at localhost on port 5454.
- Prepares a message (“Hello, NIO Server!”) and sends it to the server.
- Reads the server’s response into a buffer and converts it to a String.
- Prints the server’s response.
- Closes the client channel after communication.
Conclusion
The java.nio.channels.Selector class is an important component for mastering non-blocking I/O in Java. By understanding how to create a Selector, work with SelectionKey objects, and leverage the select() method, we can significantly enhance the efficiency and responsiveness of our Java applications.
Share your thoughts in the comments
Please Login to comment...