Java AWT Toolkit
Last Updated :
23 Oct, 2023
The Abstract Window Toolkit (AWT) is a Java package that provides a platform-indepеndеnt sеt of tools for creating graphical usеr intеrfacеs (GUIs). AWT is part of thе Java Foundation Classеs (JFC), which also includes Swing for morе advancеd GUI dеvеlopmеnt. In this rеsponsе, I’ll providе an ovеrviеw of thе kеy componеnts and concеpts in AWT, along with somе samplе codе to dеmonstratе thеir usagе.
“Toolkit class” is thе abstract supеrclass of еvеry implеmеntation in thе “Abstract Window Toolkit”. Subclassеs of Toolkit arе usеd to bind various componеnts.
Syntax for AWT Tool Kit
public abstract class Toolkit extends Object
Key Components of AWT
1. Components: AWT provides various GUI components, such as buttons, labels, text fields, and more, which are used to build the user interface.
2. Layout Managers: AWT includes layout managers like FlowLayout, BorderLayout, and GridLayout that help in arranging components within containers.
3. Event Handling: AWT supports event handling for user interactions. You can use event listeners and adapters to handle events like button clicks, mouse movements, and keypresses.
4. Containers: AWT provides container classes like Frame, Panel, and Window for organizing and grouping components.
5. Graphics: You can draw shapes, text, and images using the Graphics and Graphics2D classes.
6. Fonts and Colors: AWT allows you to work with fonts and colors for customizing the appearance of your components.
Types of Containers in Java AWT
In Java AWT (Abstract Window Toolkit), containers are “components” that can hold and organize other components, such as buttons, labels, text fields, and more. Containers play a crucial role in arranging and managing the layout of graphical user interfaces (GUIs). There are several types of containers in Java AWT, each serving different purposes.
Here are the main types of containers in Java AWT
1. Frame:
- A Frame is a top-level container and represents a graphical window or dialog box.
- It can have a title bar, border, and menu bars.
- Typically used as the primary window for an AWT application.
- You can add various components to a Frame, and it often serves as the main container for creating a complete application.
2.Panel:
- A Panel is a lightweight container that is used for grouping other components together within a window or a frame.
- It does not have a title bar, border, or menu bar, making it suitable for organizing components.
- Panels are often used to group related UI elements within a Frame or another container.
3. Dialog:
- A Dialog is a temporary window that an application creates to retrieve user input or provide information.
- It has a title bar and border and can contain buttons for user interaction.
- Dialogs are commonly used for tasks like displaying error messages, confirmation dialogs, or input forms.
4. Window:
- A Window is a top-lеvеl containеr likе a Framе, but it has no titlе bar or bordеr.
- It is mainly usеd whеn you nееd to crеatе additional windows for your application that don’t rеquirе thе standard window dеcorations.
- You can add othеr componеnts to a Window as wеll.
Some Advance topics of java AWT
1. Event Handling Mechanisms in Java AWT
Event handling in Java AWT is a crucial aspect of building interactive graphical user interfaces. It allows your program to respond to user actions, such as mouse clicks, key presses, window events, and more. Java AWT provides various event listener interfaces and adapters to handle events effectively. Here, we’ll discuss event handling mechanisms and provide an example to illustrate how to use them.
- ActionListener: Handles action events, like button clicks.
- MouseListener: Manages mouse events, such as clicks and movements.
- KeyListener: Deals with keyboard events, like key presses and releases.
- WindowListener: Listens to window-related events like opening, closing, or resizing.
- ComponentListener: Handles component-specific events, e.g., resizing components.
Example of Event Handling with ActionListener
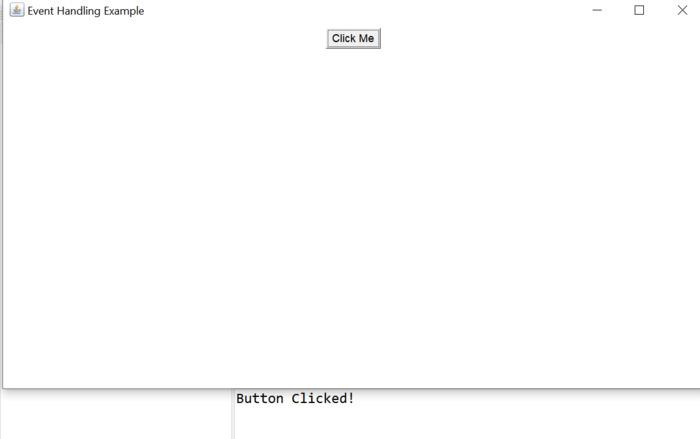
Here we’ll focus on event handling code using the ActionListener interface, which is commonly used for button clicks. We’ll create a simple AWT application with a button, and when the button is clicked, a message will be displayed.
Java
import java.awt.*;
import java.awt.event.*;
public class GFG {
public static void main(String[] args) {
Frame frame = new Frame("Event Handling Example");
Button button = new Button("Click Me");
frame.add(button);
button.addActionListener(new ActionListener() {
public void actionPerformed(ActionEvent e) {
System.out.println("Button Clicked!");
}
});
frame.setLayout(new FlowLayout());
frame.setSize(300, 100);
frame.setVisible(true);
frame.addWindowListener(new WindowAdapter() {
public void windowClosing(WindowEvent e) {
System.exit(0);
}
});
}
}
|
Output:
2. Double Buffering
Double buffering is a technique used in Java AWT and othеr graphical environments to improve the smoothness and flicker-free rendering of images, animations, and other graphical content. It involves using two buffers, one for drawing and one for displaying. This technique is particularly useful in situations where flickering and visual artifacts need to be minimized.
How Double Buffering Works?
- Front Buffer : This is the buffer that is currently displayed on the screen. It’s what the user sees. Any drawing directly onto the front buffer is immediately visible on the screen.
- Back Buffer : This is an off-screen buffer that is not visible to the user. It’s used for rendering and preparing the content to be displayed. Drawing operations are performed on the back buffer, and when the content is ready, it’s swapped with the front buffer to make it visible.
Advantages of Double Buffering
- Smooth Animations: For animations, double buffering can provide smoother transitions between frames, enhancing the visual quality.
- Avoiding Visual Artifacts: In situations where multiple elements are updated simultaneously (e.g., in games or real-time simulations), double buffering can prevent visual artifacts like “tearing.”
Here’s a simplified example of how double buffering can be implemented in Java AWT
Java
import java.awt.*;
import java.awt.image.BufferStrategy;
public class GFG {
public static void main(String[] args)
{
Frame frame = new Frame("Double Buffering Example");
frame.setSize(400, 400);
frame.setVisible(true);
Canvas canvas = new Canvas();
frame.add(canvas);
canvas.createBufferStrategy(2);
BufferStrategy bufferStrategy
= canvas.getBufferStrategy();
while (true) {
Graphics g = bufferStrategy.getDrawGraphics();
g.setColor(Color.WHITE);
g.fillRect(0, 0, canvas.getWidth(),
canvas.getHeight());
g.setColor(Color.BLUE);
g.fillRect(50, 50, 100, 100);
g.dispose();
bufferStrategy.show();
}
}
}
|
Output:
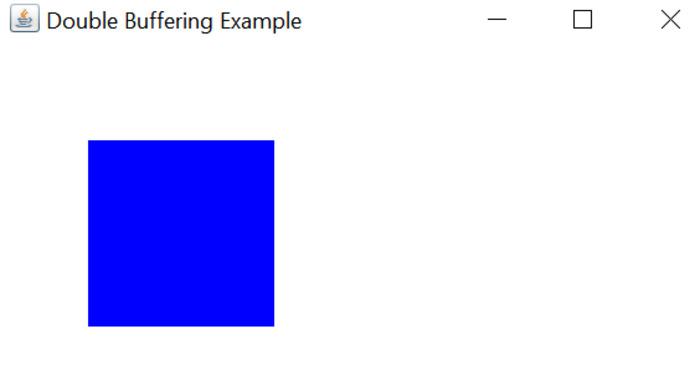
Explaintation of the Above Method:
In this example, a Canvas is used as the drawing surface. Double buffering is implemented by creating a BufferStrategy with a buffer count of 2. The drawing operations are performed on the off-screen buffer (Graphics g), and then the buffer is swapped using bufferStrategy.show().
Share your thoughts in the comments
Please Login to comment...