Sockets.IO :
Earlier, websites used to reload every-time a resource was requested. This introduced unnecessary delays which increased average wait time. Often users had to wait for minutes to fetch a particular page or file. Real-time applications(Instant messenger, Online gaming, push notification etc), on the other hand, are those applications which run within a given time-slot such that user is presented with immediate and up-to-date copy of the resource. Latency in these applications is kept as low as possible to give smooth and consistent user experience. Socket.IO is one such JavaScript library that programmers use in developing real-time “Web Applications”.
Why Sockets.IO :
Most of the applications on Internet today are based on Client-Server architecture. A client is someone who requests something from a Server. A Server, based on the request, responds with appropriate results. These two entities are completely different from each other because of the nature of tasks they perform. A browser is a perfect example of client application. Clients on browsers usually communicate to Servers via HTTP requests and responses. The problem with this communication is that either a request or a response can be sent at a time. For understanding, think of it as a half-duplex link. Also, HTTP headers contain lots and lots of redundant information which is useless once a connection between client and server is made. Sockets on the other hand work on transport layer of Network Stack. There are not many redundant fields thus increase the efficiency of information transfer over web.
Socket.IO works on the same concept and enables bi-directional communication between web clients and servers. For handling them separately and efficiently, it consists of two parts;
- a JavaScript client library that runs on browsers.
- a Node.js server
Socket.IO relies on Engine.IO, which is the implementation of the transport-based cross-browser/cross-device bi-directional communication layer. It brings in the following features to Socket.IO;
- Reliability: It can establishes connection even in the presence of proxies, load-balancers, personal firewalls, and antivirus softwares.
- Auto-reconnect Support: Unless mentioned explicitly in the code, the client library will try to reconnect forever, until the server is available again.
- Disconnection detection: It allows both the server and the client to know when the other one is not responding anymore.
- Multiplexing support: It allows to have several communication channels on a same underlying connection.
- Binary Streaming support: It also allows emitting any serializable binary data like ArrayBuffer, Blobs, etc.
Installing:
Required for Installation of Sockets.IO
- Node Installed
- npm (node package manager) installed
As mentioned earlier, there are two different libraries to include in a project.
- Server:
To install it in the Node.js project, run the following command,
$ npm install --save socket.io
- JavaScript Client:
A standalone build of the client is exposed by default by the server at /socket.io/socket.io.js. Otherwise, it can also be served from any of the CDN providers.
To use it from Node.js, install it via this command,
$ npm install --save socket.io-client
Example:
This example is about implementing a basic Upvote button in Socket.IO. It will show real-time server and client communication. To start, go to the required project directory and initialize it either with npm init command or manually create a package.json file.
{
“name”: “upvote-example”,
“version”: “0.1”,
“description”: “the very first socket.io app”,
“main”: “index.js”,
“dependencies”: {}
}
Now install the express js using the following command,
$ npm install --save express@4.15.2
After installing, create index.js file that will setup the application.
var app = require( ‘express’ )();
var http = require( ‘http’ ).createServer( app );
const PORT = 3000;
app.get( ‘/’, function( req, res ) {
res.send( ‘
Hello World
‘ );
});
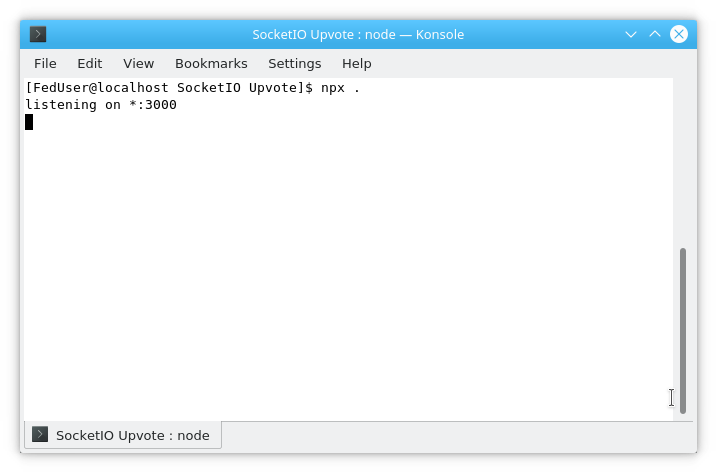
http.listen( PORT, function() {
console.log( ‘listening on *:’ + PORT );
});
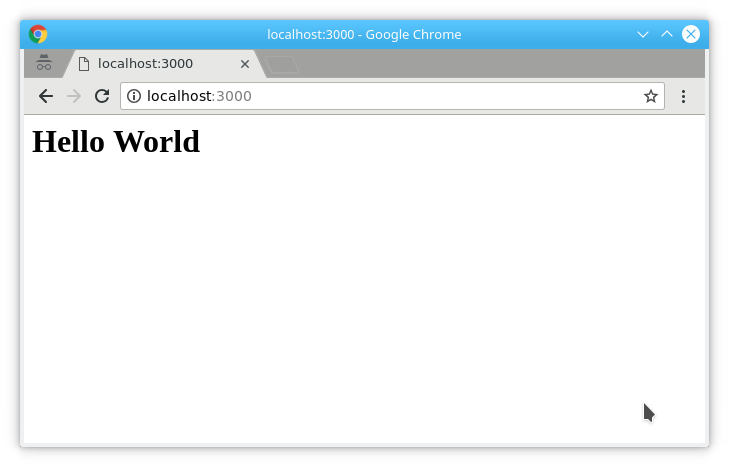
What this code does, is it creates a function handler for Express which then gets supplied to an HTTP server. This handler responds with “Hello World” to the client when / page is requested. Finally, the HTTP server starts listening on to the port 3000.
Running it would look something like this,
Serving HTML:
Previously, only a single HTML line was being sent as a response to the GET request. This time, attach an HTML file using sendFile method.
app.get( ‘/’, function( req, res ) {
res.sendFile( __dirname + ‘/public/index.html’ );
});
Now create the index.html file and paste the following code.
<!DOCTYPE html>
<html>
<head>
<title>SocketIO Upvote</title>
<style>
.container {
width: 80%;
margin: 1rem auto;
}
.text-justify {
text-align: justify;
}
</style>
</head>
<body>
<div class="container">
<p class="text-justify">Lorem ipsum dolor sit amet, consectetur adipiscing elit.
Aliquam sed turpis sit amet tellus convallis tincidunt quis ut massa. Phasellus maximus
orci quis mauris tincidunt, ut tempor turpis tincidunt. Curabitur vestibulum nunc consequat
venenatis ultrices. Aliquam eget congue risus, in imperdiet urna. Vestibulum varius velit
risus, non luctus arcu placerat vel. In hac habitasse platea dictumst. Pellentesque vitae
justo volutpat, euismod ligula quis, posuere nibh.</p>
</div>
<div class="container">
<center>
<button id="upvote-btn"> Upvote </button>
<p id="upvote-count">0 Upvotes</p>
</center>
</div>
</body>
</html>
|
Restart the project and refresh the page, it should look something like this,

Integrating Socket.IO:
For installing server side module, run the following command,
$ npm install --save socket.io
Now make changes to the index.js as follows,
var app = require( ‘express’ )();
var http = require( ‘http’ ).createServer( app );
var io = require( ‘socket.io’ )( http );
const PORT = 3000;
app.get( ‘/’, function( req, res ) {
res.sendFile( __dirname + ‘/public/index.html’ );
});
http.listen( PORT, function() {
console.log( ‘listening on *:’ + PORT );
});
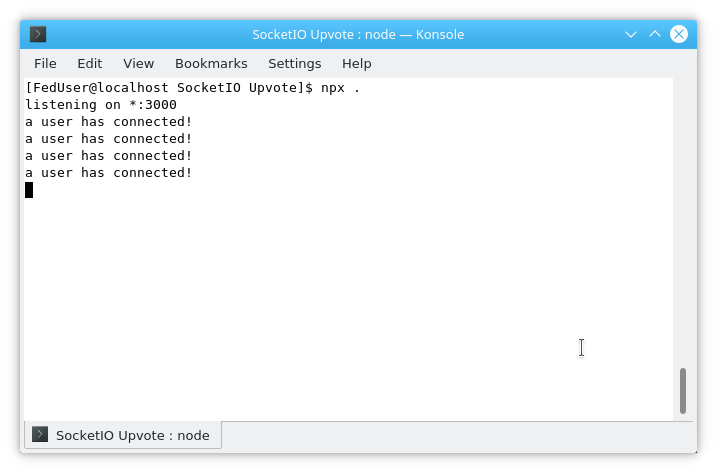
io.on( ‘connection’, function( socket ) {
console.log( “a user has connected!” );
});
The additional changes initialise the Socket.IO handler. A logging action is attached to this handler when it emits a ‘connection’ signal.
On the client side, all it takes is just the following code snippet before closing tag. This exposes an io global which is used by a particular client.
<script src=”/socket.io/socket.io.js”></script>
<script>
var socket = io();
</script>
Restart the project again from the console and try opening the localhost on multiple tabs and browsers. Each of them will act as a unique client connection. The log message will print every time a connection is established between the client and the server.
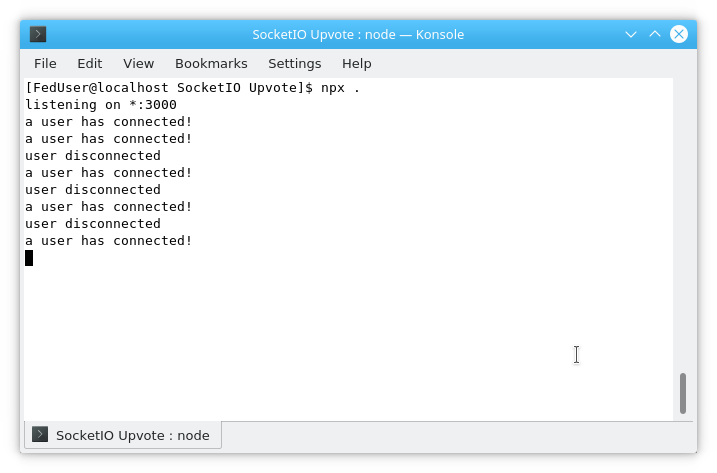
Each socket also fires a special disconnect event when a client closes or refreshes a tab:
io.on( ‘connection’, function( socket ) {
console.log( ‘a user has connected!’ );
socket.on( ‘disconnect’, function() {
console.log( ‘user disconnected’ );
});
});
Emitting events:
The main idea behind Socket.IO is that one can send and receive any events of choice, with or without any data. Any objects that can be encoded as JSON will do, and binary data is supported too.
Let’s assume that when a user clicks the upvote button, an event named upvote-event is emitted. So in index.html file, insert the following script.
<script src=”/socket.io/socket.io.js”></script>
<script>
var socket = io();
var btn = document.getElementById( ‘upvote-btn’ );
var upvote_val = false;
btn.addEventListener( ‘click’, function( e ) {
e.preventDefault(); // prevent page reloading
upvote_val = upvote_val ? false: true;
socket.emit( ‘upvote-event’, upvote_val );
});
</script>
And in index.js, following code snippet to log the event data.
io.on( ‘connection’, function( socket ) {
console.log( ‘a user has connected!’ );
socket.on( ‘disconnect’, function() {
console.log( ‘user disconnected’ );
});
socket.on( ‘upvote-event’, function( upvote_flag ) {
console.log( ‘upvote: ‘ + upvote_flag );
});
});
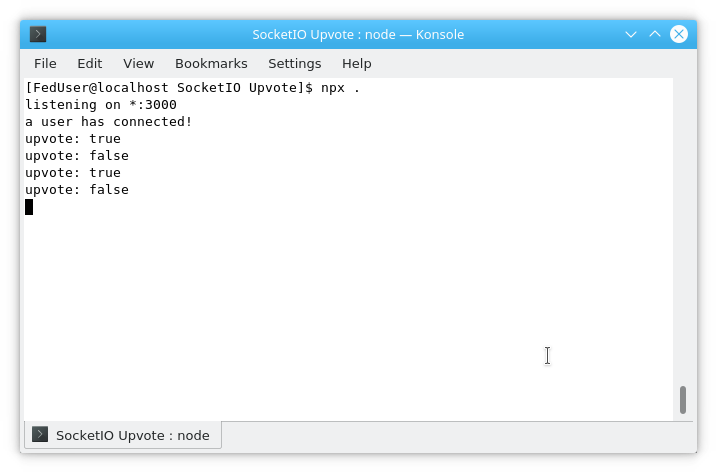
The result should look something like this,
Broadcasting:
The next goal is to emit an event from the server to the rest of the users. This time, upvote count based on the clicks will be broadcasted to each and every client connected to the server. Let’s call this event update-upvotes. For counting number of upvotes, let’s create a variable upvote-count. Update the index.js like this,
var upvote_count = 0;
io.on( ‘connection’, function( socket ) {
console.log( ‘a user has connected!’ );
socket.on( ‘disconnect’, function() {
console.log( ‘user disconnected’ );
});
socket.on( ‘upvote-event’, function( upvote_flag ) {
upvote_count += upvote_flag ? 1: -1;
var f_str = upvote_count + ( upvote_count == 1 ? ‘ upvote’: ‘ upvotes’);
io.emit( ‘update-upvotes’, f_str );
});
});
Here, upvote_count is initialized with zero(0) and updated based on the value of the upvote_flag. The updated value is then emitted to all the clients, including the one on which ‘update-event’ took place.
On the client side, update index.html like this,
<script>
var socket = io();
var btn = document.getElementById( ‘upvote-btn’ );
var upvote_val = false;
btn.addEventListener( ‘click’, function( e ) {
e.preventDefault(); // prevent page reloading
upvote_val = upvote_val ? false: true;
socket.emit( ‘upvote-event’, upvote_val );
});
socket.on( ‘update-upvotes’, function( f_str ) {
document.getElementById( ‘upvote-count’ ).innerHTML = f_str;
});
</script>
It will be updating the DOM element with the current value of the upvote count. The results would look like this,


There are a lot of things to take into account to make this example robust and usable in actual development. One should consider the fact that this example will encounter a problem of race condition when multiple users click on the upvote button at the same time. Proper locking mechanisms should be used to make it work in real world applications.
Getting this example:
Find complete code for this example on Github here.
Git repo:
https://github.com/CherryGot/SocketIO-Upvote.git
Share your thoughts in the comments
Please Login to comment...