ModelMapper is an intelligent, refactoring safe object mapping library that automatically maps objects to each other. The goal of ModelMapper is to make object mapping easy, by automatically determining how one object model maps to another, based on conventions. Some of the cool features of ModelMapper are:
- Intelligent
- Refactoring Safe
- Convention Based
- Extensible
What is DTO?
DTO stands for Data Transfer Object, these are the objects that move from one layer to another layer. DTO can be also used to hide the implementation detail of database layer objects. ModelMapper is a maven library that is used for the conversion of entity objects to DTO and vice-versa.
How to Use ModelMapper in Maven?
If you are using Maven then just add the modelmapper library as a dependency
<dependency>
    <groupId>org.modelmapper</groupId>
    <artifactId>modelmapper</artifactId>
    <version>3.1.1</version>
</dependency>
How to Map?
Basic Syntax of ModelMapper.map() Method:
public <D> D map(Object source, Class<D> destinationType) {
        Assert.notNull(source, "source");
        Assert.notNull(destinationType, "destinationType");
        return this.mapInternal(source, (Object)null, destinationType, (String)null);
}
Let’s understand this map() with a simple example.
Example: Let’s say we have two object models one is the source and the other is the destination.
Source Model:
Java
class Employee {
String name;
String gender
Address homeAddress;
}
class Address {
String city;
int pin;
}
|
Destination Model:
Java
class EmployeeDTO {
String name;
String gender;
String homeCity;
int homePin;
}
|
By using ModelMapper.map() method we can implicitly map an Employee instance to a new EmployeeDTO
ModelMapper modelMapper = new ModelMapper();
EmployeeDTO employeeDTO = modelMapper.map(employee, EmployeeDTO.class);
If you are using Spring then you can also write the code in this way
@Autowired
private ModelMapper modelMapper;

EmployeeDTO employeeDTO = modelMapper.map(employee, EmployeeDTO.class);
Note: Reference article Spring @Autowired Annotation
Example Spring Boot Project Step by Step
Step 1: Create a New Spring Boot Project in Spring Initializr
To create a new Spring Boot project, please refer to How to Create a Spring Boot Project in Spring Initializr and Run it in IntelliJ IDEA. For this project choose the following things
- Project: Maven
- Language: Java
- Packaging: Jar
- Java: 17
Please choose the following dependencies while creating the project.
- Spring Boot DevTools
- Spring Data JPA
- MySQL Driver
- Spring Web
Generate the project and run it in IntelliJ IDEA by referring to the above article.
Note: We have used the MySQL database in this project.
Step 2: Create Schema in MySQL Workbench and Put Some Sample Data
Go to your MySQL Workbench and create a schema named gfgmicroservicesdemo and inside that create a table called employee and put some sample data as shown in the below image. Here we have created 4 columns and put some sample data.
- id
- name
- email
- age
.png)
Now we are going to fetch Employee Data from Employee Table in our Spring Boot project. To do it refer to the following steps.
Step 3: Make Changes in Your application.properties File
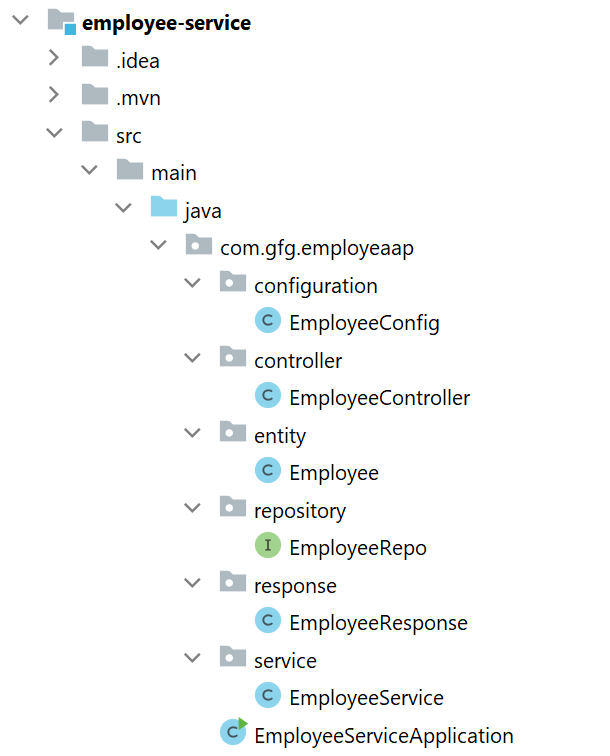
Before moving to IntelliJ IDEA let’s have a look at the complete project structure for our Microservices.
Now make the following changes in your application.properties file.
spring.datasource.url=jdbc:mysql://localhost:3306/gfgmicroservicesdemo
spring.datasource.username=put your username here
spring.datasource.password=put your password here
You may also refer to the below image

Step 4: Create Your Entity/Model Class
Go to the src > main > java > entity and create a class Employee and put the below code. This is our model class.
Java
package com.gfg.employeaap.entity;
import jakarta.persistence.*;
@Entity
@Table(name = "employee")
public class Employee {
@Id
@GeneratedValue(strategy = GenerationType.IDENTITY)
@Column(name = "id")
private int id;
@Column(name = "name")
private String name;
@Column(name = "email")
private String email;
@Column(name = "age")
private String age;
public int getId() {
return id;
}
public void setId(int id) {
this.id = id;
}
public String getName() {
return name;
}
public void setName(String name) {
this.name = name;
}
public String getEmail() {
return email;
}
public void setEmail(String email) {
this.email = email;
}
public String getAge() {
return age;
}
public void setAge(String age) {
this.age = age;
}
}
|
Step 5: Create Your Repository Interface
Go to the src > main > java > repository and create an interface EmployeeRepo and put the below code. This is our repository where we write code for all the database-related stuff.
Java
package com.gfg.employeaap.repository;
import com.gfg.employeaap.entity.Employee;
import org.springframework.data.jpa.repository.JpaRepository;
public interface EmployeeRepo extends JpaRepository<Employee, Integer> {
}
|
Note: Please refer to this article to know more about JpaRepository.
Step 6: Create Your Service Class
Go to the src > main > java > service and create a class EmployeeService and put the below code. This is our service class where we write our business logic.
Java
package com.gfg.employeaap.service;
import com.gfg.employeaap.entity.Employee;
import com.gfg.employeaap.repository.EmployeeRepo;
import com.gfg.employeaap.response.EmployeeResponse;
import org.modelmapper.ModelMapper;
import org.springframework.beans.factory.annotation.Autowired;
import java.util.Optional;
public class EmployeeService {
@Autowired
private EmployeeRepo employeeRepo;
@Autowired
private ModelMapper mapper;
public EmployeeResponse getEmployeeById(int id) {
Optional<Employee> employee = employeeRepo.findById(id);
EmployeeResponse employeeResponse = mapper.map(employee, EmployeeResponse.class);
return employeeResponse;
}
}
|
Step 7: Create an EmployeeResponse Class
Go to the src > main > java > response and create a class EmployeeResponse and put the below code.
Java
package com.gfg.employeaap.response;
public class EmployeeResponse {
private int id;
private String name;
private String email;
private String age;
public int getId() {
return id;
}
public void setId(int id) {
this.id = id;
}
public String getName() {
return name;
}
public void setName(String name) {
this.name = name;
}
public String getEmail() {
return email;
}
public void setEmail(String email) {
this.email = email;
}
public String getAge() {
return age;
}
public void setAge(String age) {
this.age = age;
}
}
|
Step 8: Create an Employee Controller
Go to the src > main > java > controller and create a class EmployeeController and put the below code. Here we are going to create an endpoint “/employees/{id}” to find an employee using id.
Java
package com.gfg.employeaap.controller;
import com.gfg.employeaap.response.EmployeeResponse;
import com.gfg.employeaap.service.EmployeeService;
import org.springframework.beans.factory.annotation.Autowired;
import org.springframework.http.HttpStatus;
import org.springframework.http.ResponseEntity;
import org.springframework.web.bind.annotation.GetMapping;
import org.springframework.web.bind.annotation.PathVariable;
import org.springframework.web.bind.annotation.RestController;
@RestController
public class EmployeeController {
@Autowired
private EmployeeService employeeService;
@GetMapping("/employees/{id}")
private ResponseEntity<EmployeeResponse> getEmployeeDetails(@PathVariable("id") int id) {
EmployeeResponse employee = employeeService.getEmployeeById(id);
return ResponseEntity.status(HttpStatus.OK).body(employee);
}
}
|
Step 9: Create a Configuration Class
Go to the src > main > java > configuration and create a class EmployeeConfig and put the below code.
Java
package com.gfg.employeaap.configuration;
import com.gfg.employeaap.service.EmployeeService;
import org.modelmapper.ModelMapper;
import org.springframework.context.annotation.Bean;
import org.springframework.context.annotation.Configuration;
@Configuration
public class EmployeeConfig {
@Bean
public EmployeeService employeeBean() {
return new EmployeeService();
}
@Bean
public ModelMapper modelMapperBean() {
return new ModelMapper();
}
}
|
Note: You may refer to these two articles
Before running the Microservice below is the complete pom.xml file. Please cross-verify if you have missed some dependencies
XML
<?xml version="1.0" encoding="UTF-8"?>
<modelVersion>4.0.0</modelVersion>
<parent>
<groupId>org.springframework.boot</groupId>
<artifactId>spring-boot-starter-parent</artifactId>
<version>3.0.2</version>
<relativePath/>
</parent>
<groupId>com.gfg.employeaap</groupId>
<artifactId>employee-service</artifactId>
<version>0.0.1-SNAPSHOT</version>
<name>employee-service</name>
<description>Employee Service</description>
<properties>
<java.version>17</java.version>
</properties>
<dependencies>
<dependency>
<groupId>org.springframework.boot</groupId>
<artifactId>spring-boot-starter-data-jpa</artifactId>
</dependency>
<dependency>
<groupId>org.springframework.boot</groupId>
<artifactId>spring-boot-starter-web</artifactId>
</dependency>
<dependency>
<groupId>org.springframework.boot</groupId>
<artifactId>spring-boot-devtools</artifactId>
<scope>runtime</scope>
<optional>true</optional>
</dependency>
<dependency>
<groupId>com.mysql</groupId>
<artifactId>mysql-connector-j</artifactId>
<scope>runtime</scope>
</dependency>
<dependency>
<groupId>org.springframework.boot</groupId>
<artifactId>spring-boot-starter-test</artifactId>
<scope>test</scope>
</dependency>
<dependency>
<groupId>org.modelmapper</groupId>
<artifactId>modelmapper</artifactId>
<version>3.1.1</version>
</dependency>
</dependencies>
<build>
<plugins>
<plugin>
<groupId>org.springframework.boot</groupId>
<artifactId>spring-boot-maven-plugin</artifactId>
</plugin>
</plugins>
</build>
</project>
|
Step 10: Run Your Employee Microservice
To run your Employee Microservice src > main > java > EmployeeServiceApplication and click on the Run button. If everything goes well then you may see the following screen in your console. Please refer to the below image.

Step 11: Test Your Endpoint in Postman
Now open Postman and hit the following URL
GET: http://localhost:8080/employees/1
And you can see the following response
{
    "id": 1,
    "name": "Amiya",
    "email": "ar@gmail",
    "age": "25"
}
Please refer to the below image.

Share your thoughts in the comments
Please Login to comment...