NextJS simplifies server-side logic with its API routes, reducing the need for separate server maintenance. CORS, usually configured on the server, can be handled within NextJS API routes directly. These routes, integrated into the application codebase, allow control over request origins. By implementing CORS in API routes, NextJS ensures secure and controlled access to server resources. This approach aligns with NextJS’s server-side rendering capabilities. Developers benefit from reduced complexity and streamlined maintenance.
NextJS emerges as a favorable framework for building applications with server-side rendering needs. Its integration of CORS management within API routes enhances security and flexibility. This model offers a unified solution for both client and server-side needs, promoting efficient development practices.
We Will discuss the different approaches to handling cross-origin requests using NextJS:
What is CORS?
CORS, short for Cross-Origin Resource Sharing, is a security feature found in web browsers. Its job is to stop scripts on one webpage from asking for things from another domain. It sets up rules to decide if a web app on one site (like domain.com) can get stuff from a different site (like api.domain.com). This keeps users safe from bad scripts that might try to steal their info or do things they shouldn’t on other websites.
Why you need CORS with NextJS?
In NextJS, CORS (Cross-Origin Resource Sharing) is handy for a few reasons. Firstly, if your NextJS app needs to grab data from an API on a different domain, CORS steps in to make sure the browser gives the green light for these requests. Secondly, if you’re crafting an API using NextJS that sends out data to various domains, setting up CORS lets you specify which domains can tap into that API. Basically, CORS acts as a mediator between different domains, making sure communication is secure while still allowing data to flow smoothly. It’s a must-have for creating strong and safe web apps with NextJS that connect with external APIs or share data across multiple domains.
Steps to Create NextJS App
Step 1: Create a NextJS application using the following command.
npx create-next-app@latest gfg
Step 2: It will ask you some questions, so choose the following.
√ Would you like to use TypeScript? ... No
√ Would you like to use ESLint? ... Yes
√ Would you like to use Tailwind CSS? ... No
√ Would you like to use `src/` directory? ... Yes
√ Would you like to use App Router?  ... Yes
√ Would you like to customize the default import alias (@/*)? ... No
Step 3: After creating your project folder i.e. gfg, move to it using the following command.
cd gfg
Step 4: Install the required dependencies using the following command:
npm install cors micro-cors
The updated dependencies in your package.json file is:
"dependencies": {
    "@next/font": "^14.2.3",
    "cors": "^2.8.5",
    "micro-cors": "^0.1.1",
    "next": "14.2.3",
    "prop-types": "^15.8.1",
    "react": "^18",
    "react-dom": "^18"
 },
Using Server-side configuration
Normally, CORS is configured at the server level. This involves setting headers to control which origins are allowed to access resources on the server. While this approach is common in traditional server setups, it requires separate server maintenance and configurations.
In the server-side configuration approach, CORS middleware is applied globally to the server instance, ensuring that all requests are subject to CORS policy. The Cors middleware allows requests only from the specified origin.
Install the Cors package with the following command in your server folder.
npm i cors
JavaScript
// express.js ----> index.js

const express = require("express");
const cors = require("cors");

const app = express();

// Enable CORS for requests from localhost:3000
app.use(
    cors({
        origin: "http://localhost:3000",
        optionsSuccessStatus: 200,
        // Some legacy browsers choke on 204
    })
);

app.get("/", (req, res) => {
    res.send("Hello from Express server!");
});

const PORT = 3001;
app.listen(PORT, () => {
    console.log(`Server is running on port ${PORT}`);
});
lets make a request to our server from the index.js of the NextJs application and check the cors is working fine or not.
JavaScript
//next.js ---> index.js

import Head from "next/head";
import axios from "axios";
import { useEffect, useState } from "react";

function Home() {
    const [msg, setMsg] = useState("");

    useEffect(() => {
        const fetchData = async () => {
            try {
                const response = await axios.get("http://localhost:3001/sendamsessage");
                setMsg(response.data);
            } catch (error) {
                console.log(error);
            }
        };

        fetchData();
    }, []);

    return (
        <>
            <Head>
                <title>Create Next App</title>
            </Head>
            <main style={{ height: "100vh" }}>
                <h2>{msg}</h2>
            </main>
        </>
    );
}

export default Home;
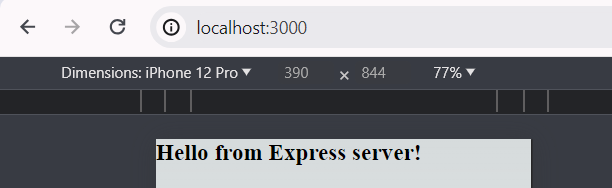
cors setup successful.
To cross-verify, let’s change the allowed origin in the CORS configuration in index.js on the server to “http://localhost:3004”. After making this change, the expected behavior is that the CORS policy will only allow requests from “http://localhost:3004” and reject requests from “http://localhost:3000”.

cors error
Enabling CORS for all API routes
With NextJS API routes, CORS can be handled directly within the application codebase. By implementing CORS logic within API route handlers, developers can control access to these routes based on origin. This approach streamlines maintenance by integrating CORS management into the application itself, reducing the need for separate server configurations.
In the API routes integration approach, CORS headers are set directly within the API route handler. This allows fine-grained control over CORS policy for specific routes. Preflight requests (OPTIONS) are also handled to support CORS preflight requests.
Install micro-cors package with following command in your sever forlder.
npm i micro-cors
We will implement CORS middleware to apply CORS across all API routes effectively.
JavaScript
// pages/api/middlware/cors.js

import Cors from 'micro-cors';

// Initialize CORS middleware
const cors = Cors({
    origin: '*', // Allow requests from any origin
    methods: ['GET', 'POST', 'PUT', 'DELETE'],
    // Allow specific HTTP methods
});

export default cors;
Import the CORS middleware into the API routes and apply it to each route as middleware.
JavaScript
// pages/api/sendmessage.js

import cors from "./middlware/cors";

// Handle the API route
export default async function handler(req, res) {
    // Run the cors middleware
    await cors(req, res);

    // Handle the GET request to /api/sendmessage
    if (req.method === "GET") {
        res.status(200).json({ message: "Hello from the API route!" });
    } else {
        // If the request method is not GET, return a 405 Method Not Allowed status
        res.setHeader("Allow", ["GET"]);
        res.status(405).end(`Method ${req.method} Not Allowed`);
    }
}
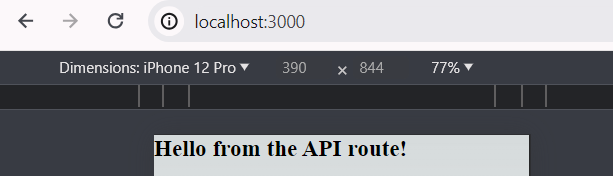
cors api route
If we modify the allowed origin in our API route, we will encounter CORS errors due to a mismatch between the origin specified in the request and the origin allowed by the server’s CORS policy.
cors error if the origin allowed changed.
When a web app wants to fetch data from an API on a different domain, CORS headers step in to manage the communication between them. their working is as follows:-
- Request with CORS Headers: The web app sends a request to the API, and the browser tags along with CORS headers, like “Origin”, saying where the request came from, such as “https://example.com”.
- Response with CORS Headers: The API gets the request and checks its CORS policy. If it’s okay with requests from the origin mentioned in the “Origin” header, it adds CORS headers like “Access-Control-Allow-Origin” in its response, giving permission to that domain (like “https://localhost.3001”).
- Handling Preflight Requests (Optional): Sometimes, for complex requests, the browser first sends an “OPTIONS” request (a preflight) to check if the actual request is safe. The API then responds with CORS headers indicating if it’s allowed.
- Access Control: If the CORS headers in the response say it’s okay, the browser lets the web app access the response data. If not, it stops the request, and the web app might see an error. This system helps keep things secure while allowing different domains to talk to each other.
General tips for using CORS in NextJS:
- Understand CORS: Familiarize yourself with CORS concepts, including how it works and its security implications.
- Configure CORS: Implement CORS configuration based on your application’s needs, allowing only trusted origins to access your API.
- Use Middleware: Apply CORS middleware to your API routes to control access and handle CORS headers consistently.
- Test Thoroughly: Test API requests from different origins to ensure CORS policies are correctly enforced and allow desired interactions.
Conclusion
With NextJS API Routes, one can directly manage CORS policies within their application’s codebase, bypassing the need for separate server configurations. By incorporating middleware like cors into API routes, developers can specify rules for resource access based on origin directly in their code. This approach not only offers more control over who can access resources but also simplifies maintenance without the need for separate server setups. Overall, NextJS provides flexible options for ensuring server resources are accessed securely and aligned with the needs of various projects.
Share your thoughts in the comments
Please Login to comment...