How to Implement Android Slice?
Last Updated :
27 Sep, 2021
Google introduced a new API called Slices in Android Pie. Slices are a component of the Android Jetpack Support library. Slices are a smaller UI template used to present your app’s content in the Google Search App. It enables users to do tasks faster outside of your app. In this article, we’ll go through how to use Slices in your app. Slices support various LiveData, Deeplink, Scrollable layouts, and so forth. Let’s commence this article.
GeekTip: Before you can construct your own slice, you’ll need Android Studio 3.1 and above, as well as a Kotlin version of 1.2.30 or above.
Start with your first Slice
Include the dependency in the build of your app:
dependencies {
    implementation "androidx.slice:slice-builders-ktx:(latest version)"
}
We must now construct a file that extends the SliceProvider. It’s similar to giving a slice to an app. A slice is a portion of an app’s information and activities that may be displayed outside of the app in Android system surfaces or within another app. A Uri identifies a slice, and a SliceProvider enables your app to offer a slice based on a uri. To add a new provider, go to NEW -> OTHERS -> SLICEPROVIDER, and it will be added to the Manifest as it is generated.
<manifest xmlns:android="http://schemas.android.com/apk/res/android"
    package="com.geeksforgeeks.android.sampleapp">
    ...
    <application>
        ...
        <provider android:name="GfGProviderSlice"
            android:authorities="com.geeksforgeeks.android.sampleapp"
            android:exported="true" >
            <intent-filter>
                <action android:name="android.intent.action.VIEW" />
                <category android:name="android.app.slice.category.SLICE" />
            </intent-filter>
        </provider>
        ...
    </application>
</manifest>
A URI has been assigned to each Slice. So, when the app wants to show the slice, it sends the binding request with the associated URI to the app. The program then constructs the Slice using onBindSlice. The sliceAttached method appears to be,
Kotlin
override fun sliceAttached(sliceUri: Uri): Slice? {
val gfgAction = doSomething()
return if (sliceUri.path == "/gfg") {
list(context, sliceUri, ListBuilder.INFINITY) {
row {
primaryAction = activityAction
title = "Hello Geeks for Geeks."
}
}
} else {
list(context, sliceUri, ListBuilder.INFINITY) {
row {
primaryAction = activityAction
title = "Not a valid URI"
}
}
}
}
|
Begin by downloading the tutorial materials by clicking the Download Materials button at the top or bottom of this page. Launch Android Studio and add the basic project. You will, for the most part, design your own classes. To add code, you’ll need to find AndroidManifest.xml, so make sure you can find it. If you haven’t already downloaded the SDK for Android API Level 28, you’ll need to do so in order to launch the app. If you already have Android API 28 installed, you may skip the next four stages and proceed directly to developing and launching the app.
Slice Viewer
To show its material, slices require a viewer or presenter. The Google Search app is one of the appropriate presenters for displaying your Slice template. When a user puts a term into the search field, the Slice you’ve developed may display information relating to the user’s search phrase.
For example, if the user enters terms like “ride” or “ride vehicle,” Slices from installed applications like Careem or Uber may appear, allowing the user to order a car without having to open the relevant app; this entire experience may be provided using App Actions and Slices.
Using Slice Viewers to Display Your Slice
Keep in aware that presenters may make minor changes to your Slices to meet their design needs, such as font style, font size, and/or colors. Icons in your Slice, for example, will be colored with the presenter app’s accent color.
To show the Slice from your Article app, you will require a Slice Viewer app. The Slice Viewer app utilizes your slice Uri to see it on what is known as its surface, and on the first request of your Slice, the user will be prompted to allow the viewer access.
Using the SliceProvider Class
The SliceProvider class is the sole method to expose your Slice to other applications, and it determines which Slice is shown to the viewer. The SliceProvider class extends the ContentProvider class. One of the fundamental building elements of Android apps is the content provider. They encapsulate data and deliver it to apps via the ContentResolver interface. If you need to communicate data between apps, you may utilize content providers. Contacts data, for example, is utilized by numerous apps and is kept in a content provider. Learn more about content suppliers by clicking here.
In this case, we:
- On startup, use onCreateSliceProvider() to initialise your Slice provider.
- If you place long-running processes here, your app’s start will be delayed, as will the first Slice that bonds with the viewer.
- If the provider was successfully loaded, return true; otherwise, return false.
- Make your Slice within the body of onBindSlice ().
- You should try to produce and return your Slice as soon as feasible.
- To keep your Slice UI responsive, conduct network queries or I/O activities in the background. When your background activity is complete, contact contentResolver to update your Slice with the new data.
- With the Slice URI in notifyChange(uri), Android will call onBindSlice() for you.
- The route may be obtained from the URI.
- If that path matches the path of your Slice, return the article Slice.
Kotlin
private fun postSomething(sliceUri: Uri): Slice {
return ListBuilder(context, postUri, ListBuilder.INFINITY)
.setHeader {
it.apply {
articleTitle = "GeeksforGeeks"
titleOfTheArticle = "geeksforgeeks.org"
summaryOfTheArticle = "A great Android article"
primaryAction = postArticle()
}
}
.build()
}
|
At the time of writing, Android has five distinct Slice builders for creating various sorts of rows with varying styles and functionalities: HeaderBuilder, RowBuilder, GridRowBuilder, RangeBuilder, and InputRangeBuilder.
- You will use the following tools to build your “article Slice” design:
- ListBuilder will be the primary builder of your Slice.
- HeaderBuilder is used to create a header with a title and a subtitle.
- GridRowBuilder is used to create a row of cells.
- To add a cell, use CellBuilder; each cell contains an image, title, and text
Kotlin
override fun postOnGeeksforGeeks(): Boolean {
return true
}
override fun onPostShared(sometShot: Uri): Slice? {
val path = sometShot.path
when (path) {
"/$ARTICLE_PATH" -> return createAPost(sometShot)
}
return null
}
|
Launch the Slice Viewer
- Select Run -> Edit Configuration from the menu.
- Click + in the upper left corner and then pick Android App.
- Enter Slice in the name field and app in the module.
- Under launch, provide a URL such as slice-content:/com.app’s-package name/gfg.
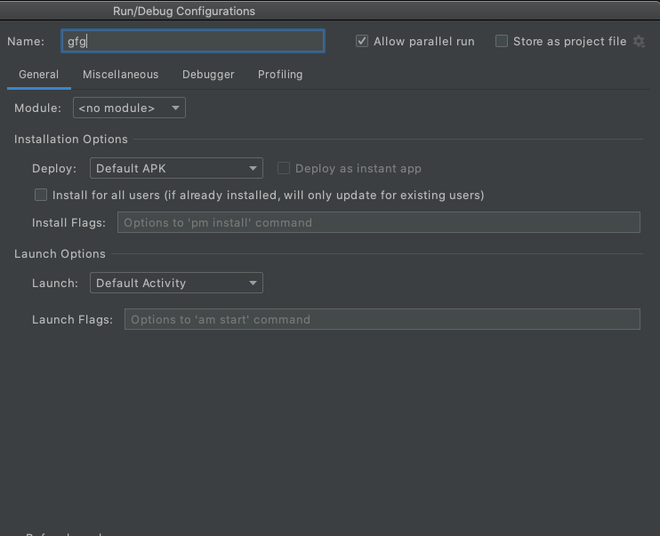
Image #1. The Slice Runner
Conclusion
Slices may also be inserted, similar to interactions such as clicks, to show toast, log, or move to a new activity. Now, launch the app from the top right corner by picking the slice module, and you’ll see the app’s module.
Share your thoughts in the comments
Please Login to comment...