How to get cell value on React-Table ?
Last Updated :
14 Dec, 2023
React-Table is a powerful library that allows you to create flexible and feature-rich tables in your React applications. It provides various functionalities to manipulate and interact with table data. One common requirement is to retrieve the value of a specific cell in React-Table. In this article, we will explore React Table.
Prerequisites
Steps to create React Application And Installing Module:
Step 1: Create a React application using the following command.
npx create-react-app foldername
Step 2: After creating your project folder i.e. foldername, move to it using the following command.
cd foldername
Step 3: After creating the ReactJS application, Install the react-table using the following command.
npm i react-table
Project Structure:
Project Structure
The updated dependencies in package.json file will look like:
"dependencies": {
    "@testing-library/jest-dom": "^5.17.0",
    "@testing-library/react": "^13.4.0",
    "@testing-library/user-event": "^13.5.0",
    "react": "^18.2.0",
    "react-dom": "^18.2.0",
    "react-table": "^7.8.0",
    "react-scripts": "5.0.1",
    "web-vitals": "^2.1.4"
  }
Example: Now write down the following code in the App.js file. Here, App is our default component where we have written our code.
Javascript
import React, { useState } from 'react';
import { useTable } from 'react-table';
const App = () => {
const [cellValue, setCellValue] = useState('');
const data = React.useMemo(
() => [
{
reactCol1: 'Hey',
reactCol2: 'World',
},
{
reactCol1: 'Here',
reactCol2: 'is the',
},
{
reactCol1: 'Example',
reactCol2: 'of react-table',
},
],
[]
)
const columns = React.useMemo(
() => [
{
Header: 'React',
accessor: 'reactCol1',
},
{
Header: 'Table',
accessor: 'reactCol2',
},
],
[]
)
const getCellValue = (cell) => {
setCellValue(cell.value)
}
const {
getTableProps,
getTableBodyProps,
headerGroups,
rows,
prepareRow,
} = useTable({ columns, data })
return (
<>
{}
<h3>Selected Cell Value: {cellValue}</h3>
<table {...getTableProps()}
style={{ border: 'solid 1px blue' }}>
<thead>
{headerGroups.map(headerGroup => (
<tr {...headerGroup.getHeaderGroupProps()}>
{headerGroup.headers.map(column => (
<th
{...column.getHeaderProps()}
style={{
borderBottom: 'solid 3px red',
background: 'aliceblue',
color: 'black',
fontWeight: 'bold',
}}
>
{column.render('Header')}
</th>
))}
</tr>
))}
</thead>
<tbody {...getTableBodyProps()}>
{rows.map(row => {
prepareRow(row)
return (
<tr {...row.getRowProps()}>
{row.cells.map(cell => {
return (
<>
{
}
<td
onClick={() => getCellValue(cell)}
{...cell.getCellProps()}
style={{
padding: '10px',
border: 'solid 1px gray',
background: 'papayawhip',
}}
>
{cell.render('Cell')}
</td>
</>
)
})}
</tr>
)
})}
</tbody>
</table>
</>
)
}
export default App;
|
Step to Run Application: Run the application using the following command from the root directory of the project.
npm start
Output: Now open your browser and go to http://localhost:3000/, you will see the following output by clicking the of react-table cell.
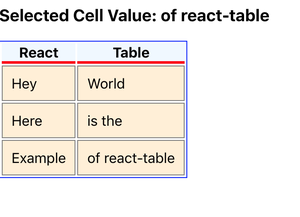
Output
Share your thoughts in the comments
Please Login to comment...