How to Fix Access Denied for User ‘root’@’localhost’ in MySQL
Last Updated :
08 Apr, 2024
In MySQL, encountering the “Access Denied for User ‘root’@’localhost’ “ error typically occurs when there is an issue with the user privileges or incorrect credentials. This article explores the step-by-step process to troubleshoot and fix this error.
To solve the “Access Denied for User ‘root’@’localhost’ “ error, try resetting the root password or granting certain privileges to the user. The step-by-step guide to try these solutions is explained further in the article.
What is Access Denied for User ‘root’@’localhost‘ error?
The “Access Denied for User ‘root’@’localhost‘” error occurs when MySQL denies access to the ‘root’ user from the ‘localhost’ host. This can happen due to various reasons, including missing user privileges, incorrect login credentials, or hostname mismatches.
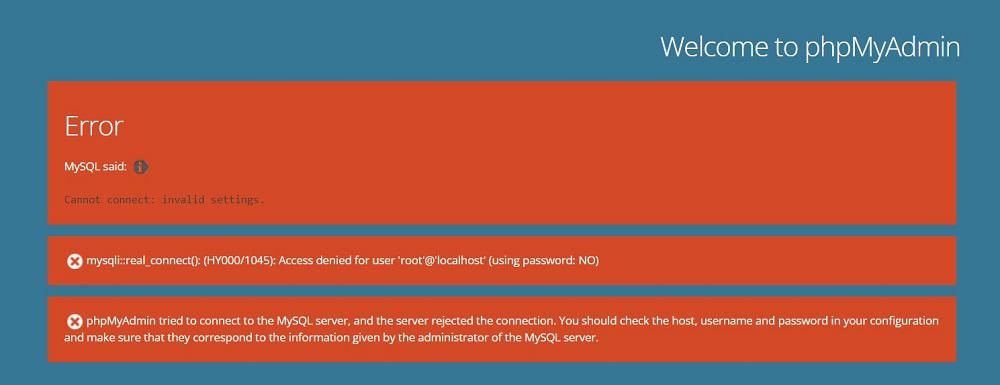
The Error: “Access Denied for User ‘root’@’localhost’
Cause of this Error
The error message can occur due to follows reasons –
- The user ‘root’ does not have the necessary privileges to access the MySQL server from localhost.
- Incorrect Username or Password
- Hostname Mismatch
Fix “Access Denied for User ‘root’@’localhost’ “Error
You can use the following methods to fix this error
- By Resetting Root Password
- By Granting Privileges
Let’s look at each of these methods, with a step-by-step guide to implement them.
Reset Root Password
Ensure that you are using the correct username and password combination. In XAMPP, default credentials are often ‘root’ with a blank password.
Steps to Reset Root Password:
Step 1: Locate the config.inc.php file:
Navigate to the directory where XAMPP is installed on your system. Inside the XAMPP directory, find the phpMyAdmin folder( by default C:/xampp/phpMyAdmin).
Step 2: Open config.inc.php in a text editor:
Right-click on config.inc.php and choose to open it with a text editor like Notepad or Visual Studio Code.
Step 3: Find the line with $cfg[‘Servers’][$i][‘password’]:
Use the search function of your text editor to locate the line that sets the password for the MySQL server. The line should look something like this:
$cfg['Servers'][$i]['password'] = 'your_password';
Replace ‘your_password’ with your desired new password enclosed within single quotes.
Step 4: Save the changes:
After updating the password, save the config.inc.php file.
Step 5: Restart Apache server:
To apply the changes, you’ll need to restart the Apache server. this will Fix your error.
Grant Privileges to User
Granting privileges in MySQL allows you to control access levels and permissions for database users. This feature is crucial for ensuring that users have the necessary permissions to perform specific actions on databases, tables, or even entire servers. Here’s a detailed description of how to granti privileges to users in MySQL:
Syntax
To grant privileges to a user in MySQL, you use the GRANT statement followed by the privileges you want to grant and the objects (e.g., databases, tables) on which you want to grant those privileges. The syntax generally follows this structure:
GRANT privileges ON object TO user@host IDENTIFIED BY ‘password’;
Parameters
- privileges: this specifies the privileges you want to grant. These can include ALL PRIVILEGES, specific privileges like SELECT, INSERT, UPDATE, DELETE, etc., or even a combination of privileges.
- object: this is refers to the object (e.g., database, table) on which you want to grant privileges. You can specify a specific object or use wildcard characters like *.* to grant privileges on all objects.
- user@host: its specifies the user account and host to which you want to grant privileges. The user is the username, and the host is the hostname or IP address from which the user can connect. Use ‘%’ as the host to allow connections from any host.
- IDENTIFIED BY ‘password’: this specifies the password for the user. This part is optional and only required if you’re creating a new user.
Note: After executing the GRANT statement, don’t forget to run the FLUSH PRIVILEGES command to reload the grant tables in the MySQL server
Granting Priveleges to Users in MySQL Examples
Granting all privileges on a specific database to a user:
GRANT ALL PRIVILEGES ON database_name.* TO 'username'@'localhost' IDENTIFIED BY 'password';
Granting specific privileges on a specific table to a user:
GRANT SELECT, INSERT, UPDATE ON database_name.table_name TO 'username'@'localhost';
Granting all privileges on all databases to a user from any host:
GRANT ALL PRIVILEGES ON *.* TO 'username'@'%' IDENTIFIED BY 'password';
Conclusion
In conclusion, resolving the “Access Denied for User ‘root’@’localhost'” error involves addressing issues related to credentials, privileges, and hostname configurations. Users of XAMPP can successfully troubleshoot and overcome this common MySQL authentication error either by resetting the root user password or by providing certain privileges to users.
Share your thoughts in the comments
Please Login to comment...