How to create a gradient Video Progress Bar?
Last Updated :
09 Jun, 2022
Dynamic Progress Bars in videos are quite visually attractive in themselves. Here, we’ll be creating a progress bar that changes its color gradient using simple HTML, CSS, and some JavaScript. The gradient here refers to changes in color from one to another quite smoothly. Here we will be changing the gradient color from green to cyan.
Pre-built function used: Mainly we will just need the setInterval() method.
Syntax:
setInterval(function_reference, time interval)
Let us start by creating the HTML code:
html
<!DOCTYPE html>
<html>
<head>
<title>Gradient Progress Bar</title>
</head>
<body>
<h2>Welcome To GFG</h2>
<figure>
<video id="video"
src="GFG.mp4">
</video>
<figcaption>
<button id="play" aria-label="Play" role="button">
Play
</button>
<progress id="progress" max="100" value="0">
Progress
</progress>
</figcaption>
</figure>
</body>
</html>
|
The main line here is:
<progress id="progress" max="100" value="0">Progress</progress>
Here, the max attribute tells us that the maximum value in the video here will be 100 and the value attribute tells that we are starting from 0.
We chose this as it is quite simple to understand in terms of percentage of the video played with 100 being completely played and 0 is not started yet.
Next, we add the CSS of our choice:
css
progress[value] {
appearance: none;
border: none;
color: green;
}
progress[value]::-webkit-progress-value {
background-image: linear-gradient(
to right,
#00ff00, #014f01
);
transition: width 1s linear;
}
|
Now, begins the JavaScript coding for the progress bar. We’ll be doing this step by step so that you could understand quite easily.
Getting Progress Values from the video:
Let’s do this in steps:
- Get the current time of the video.
- Get the total duration of the video.
- Calculate the progress value using the basic math formula of percentages: (currentTime/duration = progressValue)
- The Math.round() function will then update the results to nearest whole integers.
The basic task is done, You will have a gradient progress bar using the above steps.
Further, we’ll be adding some extra features listed below:
- Showing the current time.
- Adding a play button.
Showing the current time:
This is quite easy to do! We can just count the seconds as the video plays and show them in a timer next to the progress bar.
Add a timer label in the HTML file:
html
<figure>
<video controls id="video"
src="GFG.mp4">
</video>
<figcaption>
<label id="timer" for="progress" role="timer"></label>
<progress id="progress" max="100" value="0">
Progress
</progress>
</figcaption>
</figure>
|
Now we just need to assign it a variable and use the innerHTML to print the current value inside it:
javascript
const progress = document.getElementById("progress");
const timer = document.getElementById( "timer" );
function progressLoop() {
setInterval(function () {
progress.value =
Math.round((video.currentTime / video.duration) * 100);
timer.innerHTML =
Math.round(video.currentTime) + " seconds";
});
}
progressLoop();
|
Adding the Play Button:
A video tag has a control attribute which when called comes with the play, progress, volume, skip video features. Let us drop this attribute and create a Play/Pause button:
Add a button to the HTML:
html
<figure>
<video id="video" src="GFG.mp4">
</video>
<figcaption>
<label id="timer" for="progress" role="timer"></label>
<button id="play" aria-label="Play" role="button">
Play
</button>
<progress id="progress" max="100" value="0">
Progress
</progress>
</figcaption>
</figure>
|
Now connect it with a JavaScript function that toggles the video between Play and Pause:
javascript
button = document.getElementById( "play" );
function playPause() {
if ( video.paused ) {
video.play();
button.innerHTML = "Pause";
}
else {
video.pause();
button.innerHTML = "Play";
}
}
button.addEventListener( "click", playPause );
video.addEventListener("play", progressLoop);
|
Complete code:
html
<!DOCTYPE html>
<html>
<head>
<title>Gradient Video Progress Bar</title>
<style>
body {
background-image:
radial-gradient(circle at top right, green, cyan);
display: grid;
height: 100vh;
place-items: center;
width: 100%;
}
figure {
width: 50%;
}
video {
display: block;
width: 100%;
}
figcaption {
align-items: center;
background: #eaeaea;
display: grid;
grid-gap: 1rem;
grid-template-columns: 50px auto min(115px);
padding: 0.5rem;
}
button {
border: 0;
background: green;
display: inline;
color: white;
order: 1;
padding: 0.5rem;
transition: opacity 0.25s ease-out;
width: 100%;
}
button:hover {
cursor: pointer;
opacity: 0.8;
}
label {
order: 2;
text-align: center;
}
/* Fallback stuff */
progress[value] {
appearance: none;
border: none;
border-radius: 3px;
box-shadow: 0 2px 3px rgba(0, 0, 0, 0.25) inset;
color: dodgerblue;
display: inline;
height: 15px;
order: 1;
position: relative;
width: 100%;
}
/* WebKit styles */
progress[value]::-webkit-progress-bar {
background-color: white;
border-radius: 3px;
box-shadow: 0 2px 3px rgba(0, 0, 0, 0.25) inset;
}
progress[value]::-webkit-progress-value {
background-image:
linear-gradient(to right, green, cyan);
border-radius: 3px;
position: relative;
transition: width 1s linear;
}
</style>
</head>
<body>
<h2 style="color: black; font-size: 70px;">
Welcome To GFG
</h2>
<figure>
<video id="video"
src=
</video>
<figcaption>
<label id="timer"
for="progress"
role="timer">
</label>
<button id="play"
aria-label="Play"
role="button">
Play
</button>
<progress id="progress"
max="100"
value="0">
Progress
</progress>
</figcaption>
</figure>
<script>
const progress = document.getElementById("progress");
const timer = document.getElementById("timer");
button = document.getElementById("play");
function progressLoop() {
setInterval(function () {
progress.value =
Math.round((video.currentTime / video.duration) * 100);
timer.innerHTML =
Math.round(video.currentTime) + " seconds";
});
}
function playPause() {
if (video.paused) {
video.play();
button.innerHTML = "Pause";
} else {
video.pause();
button.innerHTML = "Play";
}
}
button.addEventListener("click", playPause);
video.addEventListener("play", progressLoop);
</script>
</body>
</html>
|
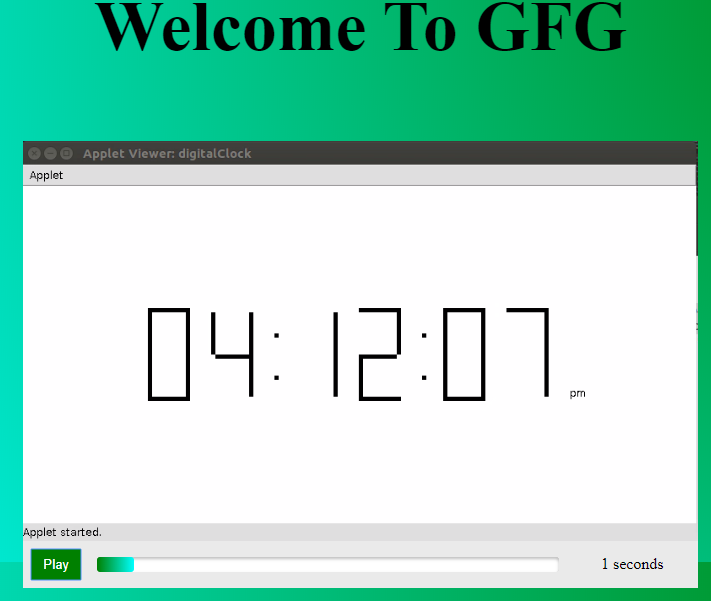
Output:
Share your thoughts in the comments
Please Login to comment...