In this article, we will discuss how to customize Object Level Permissions in Django REST Framework. To customize permission classes in Django REST Framework, we should inherit the rest_framework.permissions.BasePermission class and implement either or both of the following methods:
- .has_permission(self, request, view)
- .has_object_permission(self, request, view, obj)
If we look at our robot model mentioned in Browsable API in Django REST Framework, we can notice that any authenticated user can delete the robots even after setting the permission policies in our RESTFul web service. Here comes the importance of customizing the object-level permission so that only a robot owner can update or delete an existing robot.
Creating customized permission class
Go to the robots folder that has the views.py file and create a new file named custompermission.py. You can write the below code in the new file.
Python3
from rest_framework import permissions
class IsCurrentUserOwnerOrReadOnly(permissions.BasePermission):
def has_object_permission(self, request, view, obj):
if request.method in permissions.SAFE_METHODS:
return True
else:
return obj.owner == request.user
|
The IsCurrentUserOwnerOrReadOnly inherits from the BasePermission class and overrides the has_object_permission method. The method returns a bool value, which indicates whether the permission should be granted or not. The has_object_permission differentiates the safe and unsafe methods, and only owners are granted permission for unsafe methods.
Let’s add the owner field to the robots/models.py file.
owner = models.ForeignKey(
        'auth.User',
        related_name= 'robots',
        on_delete=models.CASCADE
    )
The Robot class looks as follows:
Python3
class Robot(models.Model):
CURRENCY_CHOICES = (
('INR', 'Indian Rupee'),
('USD', 'US Dollar'),
('EUR', 'Euro'),
)
name = models.CharField(max_length=150, unique=True)
robot_category = models.ForeignKey(
RobotCategory,
related_name='robots',
on_delete=models.CASCADE)
manufacturer = models.ForeignKey(
Manufacturer,
related_name='robots',
on_delete=models.CASCADE)
currency = models.CharField(
max_length=3,
choices=CURRENCY_CHOICES,
default='INR')
price = models.IntegerField()
manufacturing_date = models.DateTimeField()
owner = models.ForeignKey(
'auth.User',
related_name='robots',
on_delete=models.CASCADE
)
class Meta:
ordering = ('name',)
def __str__(self):
return self.name
|
In the above code, we specified the models.CASCADE value so that whenever we delete a user, the robots associated with this user will be deleted too.
Now let’s add the owner field to the RobotSerializer class mentioned in the robots/serializers.py file. You can add the below code
owner = serializers.ReadOnlyField(source='owner.username')
The RobotSerializer class looks as follows:
Python3
class RobotSerializer(serializers.HyperlinkedModelSerializer):
robot_category = serializers.SlugRelatedField(
queryset=RobotCategory.objects.all(), slug_field='name')
manufacturer = serializers.SlugRelatedField(
queryset=Manufacturer.objects.all(), slug_field='name')
currency = serializers.ChoiceField(
choices=Robot.CURRENCY_CHOICES)
currency_name = serializers.CharField(
source='get_currency_display',
read_only=True)
owner = serializers.ReadOnlyField(source='owner.username')
class Meta:
model = Robot
fields = '__all__'
|
Let’s create two new serializer classes named UserRobotSerializer class and UserSerializer class. You can add the below-mentioned code:
Python3
class UserRobotSerializer(serializers.HyperlinkedModelSerializer):
class Meta:
model = Robot
fields = (
'url',
'name')
class UserSerializer(serializers.HyperlinkedModelSerializer):
robots = UserRobotSerializer(
many=True,
read_only=True)
class Meta:
model = User
fields = (
'url',
'pk',
'username',
'robots')
|
The UserRobotSerializer class serializes the drones related to a user. Here we haven’t used RobotSerializer because we only need to serialize fewer fields. The UserSerializer class declares a ‘robots’ attribute as an instance of UserRobotSerializer class.
Next, we need to save information about users that make requests. To achieve this we need to override the perform_create method in the RobotList class declared in the views.py file. The new RobotList class looks as follows
Python3
class RobotList(generics.ListCreateAPIView):
queryset = Robot.objects.all()
serializer_class = RobotSerializer
name = 'robot-list'
def perform_create(self, serializer):
serializer.save(owner=self.request.user)
|
The perform_create method passes the owner information to the create method using the serializer.save method.
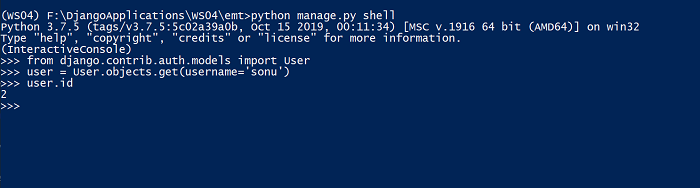
Here, we have added a new owner field to the robot table. You can execute the migrations to reflect the changes to the database. Remember, we need to assign a default owner to our existing robots in the table. Let’s note the id of an existing user and provide it during the migration process. You can get the id using the Django shell. Sharing the screenshot for reference:
Now let’s do the migration process. Here, the Django will display the following message:
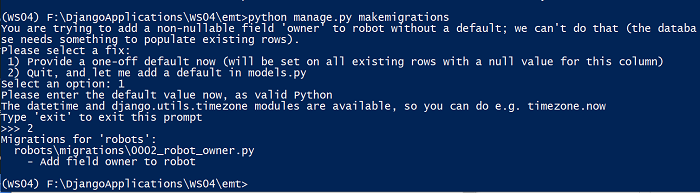
Now run the “python manage.py migrate” command to apply the generated migrations.
Setting permission policies
You can mention the BasicAuthentication class in the settings.py file.
REST_FRAMEWORK = {

    'DEFAULT_AUTHENTICATION_CLASSES':(
        'rest_framework.authentication.BasicAuthentication',

        )
}
Now, let’s configure permission policies for RobotList and RobotDetail class-based views. You should import the permissions and custom permission.
from rest_framework import permissions
from robots import custompermission
The new code is as follows:
Python3
class RobotList(generics.ListCreateAPIView):
permission_classes = (
permissions.IsAuthenticatedOrReadOnly,
custompermission.IsCurrentUserOwnerOrReadOnly,
)
queryset = Robot.objects.all()
serializer_class = RobotSerializer
name = 'robot-list'
def perform_create(self, serializer):
serializer.save(owner=self.request.user)
class RobotDetail(generics.RetrieveUpdateDestroyAPIView):
permission_classes = (
permissions.IsAuthenticatedOrReadOnly,
custompermission.IsCurrentUserOwnerOrReadOnly,
)
queryset = Robot.objects.all()
serializer_class = RobotSerializer
name = 'robot-detail'
|
Making HTTP Requests
Let’s try to get the robot details. Since it’s a safe method, our custom permission will provide the robot details without any user credentials. The HTTPie command is as follows:
http :8000/robot/
The output is as follows:
HTTP/1.1 200 OK
Allow: GET, POST, HEAD, OPTIONS
Content-Language: en
Content-Length: 2116
Content-Type: application/json
Date: Sun, 29 Aug 2021 07:11:39 GMT
Referrer-Policy: same-origin
Server: WSGIServer/0.2 CPython/3.7.5
Vary: Accept, Accept-Language
X-Content-Type-Options: nosniff
X-Frame-Options: DENY

[
    {
        "currency": "USD",
        "currency_name": "US Dollar",
        "manufacturer": "Fanuc",
        "manufacturing_date": "2019-10-12T00:00:00Z",
        "name": "FANUC M-710ic/50",
        "owner": "sonu",
        "price": 37000,
        "robot_category": "Articulated Robots",
        "url": "http://localhost:8000/robot/1/"
    },
    {
        "currency": "USD",
        "currency_name": "US Dollar",
        "manufacturer": "ABB",
        "manufacturing_date": "2020-05-10T00:00:00Z",
        "name": "IRB 1100",
        "owner": "sonu",
        "price": 25000,
        "robot_category": "Articulated Robots",
        "url": "http://localhost:8000/robot/7/"
    },
]
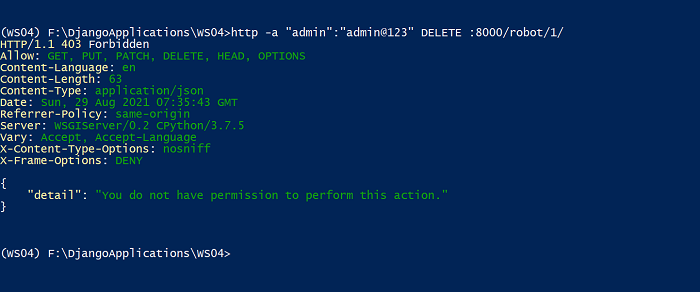
Now let’s try to delete a robot. According to the custom permission class, only the robot owner can perform the delete operation. Let’s try to delete the robot by providing the superuser credential. The HTTPie command is as follows:
http -a “admin”:”admin@123″ DELETE :8000/robot/1/
Output:
Let’s try the delete operation by providing the owner credentials. The command is as follows:
http -a “sonu”:”sn@pswrd” DELETE :8000/robot/1/
Output:
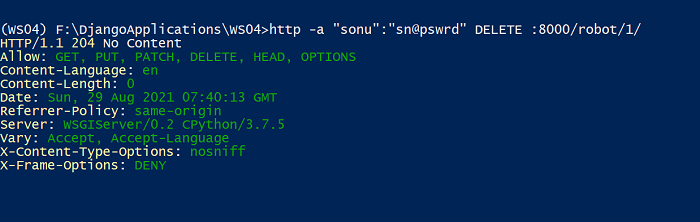
You can notice that the robot has been removed successfully from the database.
Share your thoughts in the comments
Please Login to comment...