Count number of Faces from Image using Django
Last Updated :
04 Jan, 2024
This article outlines the process of creating a face-counting feature in images through a Simple Django Web App. The project allows users to count the number of faces in uploaded images. Users simply need to upload an image, and the web app will automatically analyze the image to determine the count of faces. The result is then displayed on the web page. Additionally, if users upload an image without any faces, the web app will indicate a count of zero as a result.
Django | Face Counting Images
Here is a step-by-step explanation of the method for creating Face Counting in Images: A Simple Django Web App:
To install Django follow these steps.
Starting the Project Folder
To start the project use this command
django-admin startproject face_counting_project
cd  face_counting_project
To start the app use this command
python manage.py startapp face_counting_app
Now add this app to the ‘settings.py’
INSTALLED_APPS = [
    "django.contrib.admin",
    "django.contrib.auth",
    "django.contrib.contenttypes",
    "django.contrib.sessions",
    "django.contrib.messages",
    "django.contrib.staticfiles",
    "face_counting_app", #App Name
]
File Structure
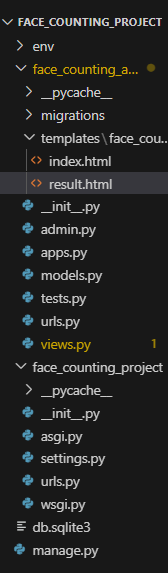
Setting Necessary Files
views.py: In this file code defines a Django web app with two functions. The `count_faces` function detects faces in an image using dlib, while `count_faces_route` handles a POST request with an uploaded image. It temporarily saves the image, counts faces using `count_faces`, encodes the image in base64, and renders a result page with the original image and face count. The index function renders the app’s initial page. Overall, the code integrates facial detection into a Django web application.
Use the below commands for install neccessary libraries .
pip install opencv-python
pip install dlib
Python3
from django.shortcuts import render
from django.core.files.storage import default_storage
from django.core.files.base import ContentFile
import cv2
import dlib
import base64
from io import BytesIO
from django.http import HttpResponse
def count_faces(image_path):
image = cv2.imread(image_path)
face_detector = dlib.get_frontal_face_detector()
gray_image = cv2.cvtColor(image, cv2.COLOR_BGR2GRAY)
faces = face_detector(gray_image)
return len(faces)
def index(request):
return render(request, 'face_counting_app/index.html')
def count_faces_route(request):
image_file = request.FILES['image']
temp_image_path = default_storage.save(
'temp_image.jpg', ContentFile(image_file.read()))
face_count = count_faces(temp_image_path)
encoded_image = base64.b64encode(open(temp_image_path, 'rb').read()).decode('utf-8')
default_storage.delete(temp_image_path)
return render(request, 'face_counting_app/result.html', {'encoded_image': encoded_image, 'face_count': face_count})
|
project/urls.py :The code configures the URL patterns for a Django project, directing requests to the Django admin interface at ‘/admin/’ and including the URL patterns defined in ‘face_counting_app.urls’ for the project’s main path (”).
Python3
from django.contrib import admin
from django.urls import path, include
urlpatterns = [
path('admin/', admin.site.urls),
path('', include('face_counting_app.urls')),
]
|
app/urls.py: The code sets up URL patterns for a Django app, linking the main path (”) to the ‘index’ view and the ‘count_faces/’ path to the ‘count_faces_route’ view, providing names for easy reference in the Django project.
Python3
from django.urls import path
from .views import index, count_faces_route
urlpatterns = [
path('', index, name='index'),
path('count_faces/', count_faces_route, name='count_faces'),
]
|
Creating GUI
index.html : The HTML document creates a webpage for a Face Counting application. It includes a form with an image upload option, a “Detect Faces” button, and styling for layout and appearance. JavaScript is used to preview the selected image before submission, and the detected faces are displayed in the result section after processing.
HTML
<!DOCTYPE html>
<html lang="en">
<head>
<meta charset="UTF-8">
<meta name="viewport" content="width=device-width, initial-scale=1.0">
<title>Face Counting in Images</title>
<style>
body {
font-family: 'Arial', sans-serif;
background-color: #f4f4f4;
margin: 0;
padding: 0;
display: flex;
justify-content: center;
align-items: center;
height: 100vh;
}
#container {
text-align: center;
max-width: 600px;
width: 100%;
padding: 20px;
background-color: #fff;
border-radius: 8px;
box-shadow: 0 0 10px rgba(0, 0, 0, 0.1);
}
h1 {
color: #333;
}
#uploadForm {
margin-top: 20px;
}
#imageInput {
display: none;
}
#uploadLabel, #detectButton {
background-color: #3498db;
color: #fff;
padding: 10px 20px;
font-size: 16px;
cursor: pointer;
border: none;
border-radius: 4px;
transition: background-color 0.3s ease;
}
#uploadLabel:hover, #detectButton:hover {
background-color: #2980b9;
}
#result {
display: none;
margin-top: 20px;
}
#detectedFaces {
max-width: 100%;
max-height: 400px;
margin-top: 10px;
}
#previewImage {
max-width: 100%;
max-height: 300px;
margin-top: 20px;
}
</style>
</head>
<body>
<div id="container">
<h1> Face Counting in Images</h1>
<form id="uploadForm" action="{% url 'count_faces' %}" method="post" enctype="multipart/form-data">
{% csrf_token %}
<label for="imageInput" id="uploadLabel">Choose Image</label>
<input type="file" id="imageInput" name="image" accept="image/*" onchange="previewImage()">
<button type="submit" id="detectButton">Detect Faces</button>
</form>
<div id="result">
<h2>Detected Faces</h2>
<div id="detectedFaces"></div>
</div>
<div id="previewImage"></div>
</div>
<script>
function previewImage() {
const input = document.getElementById('imageInput');
const preview = document.getElementById('previewImage');
if (input.files && input.files[0]) {
const reader = new FileReader();
reader.onload = function (e) {
preview.innerHTML = '<img src="' + e.target.result + '" alt="Preview">';
document.getElementById('result').style.display = 'block';
};
reader.readAsDataURL(input.files[0]);
}
}
</script>
</body>
</html>
|
result.html : This HTML document represents the result page for a Face Counting application. It displays the detected faces in an image encoded as base64, along with the number of detected faces. The page has a clean layout with responsive design elements and includes a link to navigate back to the upload page.
HTML
<!DOCTYPE html>
<html lang="en">
<head>
<meta charset="UTF-8">
<meta name="viewport" content="width=device-width, initial-scale=1.0">
<title>Face Counting in Images Result</title>
<style>
body {
font-family: 'Arial', sans-serif;
background-color: #f4f4f4;
margin: 0;
padding: 0;
display: flex;
justify-content: center;
align-items: center;
height: 100vh;
}
#container {
text-align: center;
max-width: 600px;
width: 100%;
padding: 20px;
background-color: #fff;
border-radius: 8px;
box-shadow: 0 0 10px rgba(0, 0, 0, 0.1);
}
h1 {
color: #333;
}
#detectedFaces {
max-width: 100%;
max-height: 400px;
margin-top: 20px;
}
p {
margin-top: 10px;
font-size: 18px;
color: #333;
}
a {
display: block;
margin-top: 20px;
color: #3498db;
text-decoration: none;
font-size: 16px;
transition: color 0.3s ease;
}
a:hover {
color: #2980b9;
}
</style>
</head>
<body>
<div id="container">
<h1>Face Counting in Images Result</h1>
<img src="data:image/jpeg;base64,{{ encoded_image }}" alt="Detected Faces" id="detectedFaces">
<p>Number of detected faces: {{ face_count }}</p>
<a href="{% url 'index' %}">Back to Upload</a>
</div>
</body>
</html>
|
Deployement of the Project
Run these commands to apply the migrations:
python3 manage.py makemigrations
python3 manage.py migrate
Run the server with the help of following command:
python3 manage.py runserver
Output

Face Counting in Images
Videp Demonstration
Conclusion
In conclusion, the “Face Counting in Images” is a simple Django web application that leverages OpenCV, dlib, and base64 encoding to detect and count faces in uploaded images. The project comprises two main components: the backend, which is responsible for face detection and counting, and the frontend, which provides a user interface for image uploading, processing, and displaying the results.
Share your thoughts in the comments
Please Login to comment...