Bulma with webpack
Last Updated :
10 May, 2022
In this article, we will see how to use Bulma with webpack. As Bulma elements are pre-styled components, what if we want to modify or customize them according to our own requirements? Yes, we can style them with Bulma webpack. The full step-by-step process demonstrating the full modification or styling of a Bulma element using a webpack is given in the below steps.
Step 1: Creating a package.json file: First, create a new folder where you want to create your sass files. In the terminal, first, navigate to the folder directory and write the following command:
npm init
When prompted to write entry point, write- webpack.config.js. Now, the above command will create a package.json file in the folder that you have created before.
Step 2: Installing some node dev dependencies: For using webpack with Bulma, we need to install the following node packages:
npm install bulma --save-dev
npm install css-loader --save-dev
npm install extract-text-webpack-plugin@next --save-dev
npm install mini-css-extract-plugin --save-dev
npm install node-sass --save-dev
npm install sass-loader --save-dev
npm install style-loader --save-dev
npm install webpack --save-dev
npm install webpack-cli --save-dev
Step 3: Creating a webpack config: Create a webpack.config.js file. This file takes the src folder as input and outputs in the dist folder.
const path = require('path');
const ExtractTextPlugin = require("extract-text-webpack-plugin");

module.exports = {
  entry: './src/index.js',
  output: {
    path: path.resolve(__dirname, 'dist'),
    filename: 'js/bundle.js'
  },
  module: {
    rules: [{
      test: /\.scss$/,
      use: ExtractTextPlugin.extract({
        fallback: 'style-loader',
        use: [
          'css-loader',
          'sass-loader'
        ]
      })
    }]
  },
  plugins: [
    new ExtractTextPlugin('css/mystyles.css'),
  ]
};
Step 4: Creating an src folder: Here, we need to create an src folder that will contain the index.js file with the following code.
require('./mystyles.scss');
Step 5: Creating a SASS file: Here, we will create a SASS file called mystyles.scss containing the following code.
@charset "utf-8";
@import "~bulma/bulma";
Step 6: Creating a dist folder: Create two empty folders first, dist for adding CSS files, and second js folder. The files will be automatically generated by webpack while running.
Step 7: Creating the HTML file: We create an HTML file that we want to customize and save it as: filename.html. Note that the css/mystyle.css path in your stylesheet is correct as it will be the location of the CSS file that will generate with SASS. Refer to the below example syntax.
HTML
<!DOCTYPE html>
<html lang="en">
<head>
<link rel="stylesheet"
href="css/mystyle.css" />
</head>
<body>
<div class="container">
<h1 class="title has-text-primary">
GeeksforGeeks
</h1>
<p>Looking for a course to level-up your
coding skills or want to know the
geeks courses?
</p>
<br>
<div class="select is-rounded is-success">
<select>
<option>C++</option>
<option>Java</option>
<option>Python</option>
<option>NodeJS</option>
</select>
</div>
</div>
</body>
</html>
|
Here you will notice the unstyled page. The next steps will solve this.
Step 8: Adding node scripts to build webpack bundle: Add the following code in the package.json file.
"scripts": {
    "build": "webpack --mode production"
},
After adding the above code, run the following code in your terminal:
npm run build
Step 9: Adding our own styles: We can add our own styles, or for example, add the below styles to your mystyles.scss file.
@charset "utf-8";

// Set your brand colors
$success: #2dfcb7;
$white: #ffffff;
$primary: #15e215;

// Update Bulma's global variables
$widescreen-enabled: false;
$fullhd-enabled: false;

// Update some of Bulma's component variables
$body-background-color: $white;
$control-border-width: 2px;

// Import only what you need from Bulma
@import "../node_modules/bulma/sass/utilities/_all.sass";
@import "../node_modules/bulma/sass/base/_all.sass";
@import "../node_modules/bulma/sass/elements/_all.sass";
@import "../node_modules/bulma/sass/form/_all.sass";
Example 1: Below example illustrates the Bulma with webpack.
HTML
<!DOCTYPE html>
<html lang="en">
<head>
<link rel="stylesheet"
href="css/mystyle.css" />
</head>
<body>
<div class="container">
<h1 class="title has-text-primary">
GeeksforGeeks
</h1>
<p>Looking for a course to level-up your
coding skills or want to know the
geeks courses?
</p>
<br>
<div class="select is-rounded is-success">
<select>
<option>C++</option>
<option>Java</option>
<option>Python</option>
<option>NodeJS</option>
</select>
</div>
</div>
</body>
</html>
|
CSS
@charset "utf-8";
// Set your brand colors
$success: #2dfcb7;
$white: #ffffff;
$primary: #15e215;
// Update Bulma's global variables
$widescreen-enabled: false;
$fullhd-enabled: false;
// Update some of Bulma's component variables
$body-background-color: $white;
$control-border-width: 2px;
// Import only what you need from Bulma
@import "../node_modules/bulma/sass/utilities/_all.sass";
@import "../node_modules/bulma/sass/base/_all.sass";
@import "../node_modules/bulma/sass/elements/_all.sass";
@import "../node_modules/bulma/sass/form/_all.sass";
|
Output:

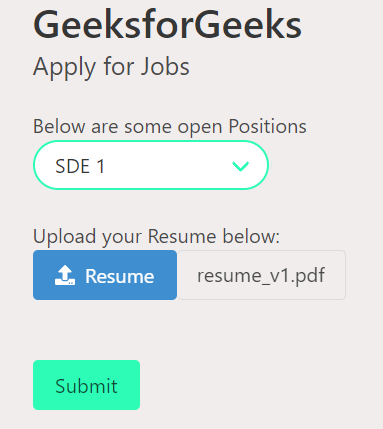
Example 2: Another example illustrating the Bulma with webpack.
HTML
<!DOCTYPE html>
<html lang="en">
<head>
<link rel="stylesheet"
href="css/mystyle.css" />
<script src=
</script>
</head>
<body>
<div class="container">
<h1 class="title has-text-primary">
GeeksforGeeks
</h1>
<h2 class="subtitle has-text-primary">
Apply for Jobs
</h2>
<p>Below are some open Positions</p>
<div class="select is-rounded is-success">
<select>
<option>SDE 1</option>
<option>NodeJS developer</option>
<option>C++ developer</option>
<option>Product Manager</option>
<option>More</option>
</select>
</div>
<br>
<br>
<p>Upload your Resume below:</p>
<div class="file is-left is-info">
<label class="file-label">
<input class="file-input"
type="file" name="resume">
<span class="file-cta">
<span class="file-icon">
<i class="fas fa-upload"></i>
</span>
<span class="file-label">
Resume
</span>
</span>
<span class="file-name">
resume_v1.pdf
</span>
</label>
</div>
<br>
<br>
<button class="button is-success">
Submit
</button>
</div>
</body>
</html>
|
CSS
@charset "utf-8";
// Set your brand colors
$success: #2dfcb7;
$white: #ffffff;
$primary: #15e215;
$grey: #f1eded;
// Update Bulma's global variables
$widescreen-enabled: false;
$fullhd-enabled: false;
// Update some of Bulma's component variables
$body-background-color: $grey;
$control-border-width: 2px;
// Import only what you need from Bulma
@import "../node_modules/bulma/sass/utilities/_all.sass";
@import "../node_modules/bulma/sass/base/_all.sass";
@import "../node_modules/bulma/sass/elements/_all.sass";
@import "../node_modules/bulma/sass/form/_all.sass";
|
Output:
Reference: https://bulma.io/documentation/customize/with-webpack/
Share your thoughts in the comments
Please Login to comment...