In the increasingly complicated IT systems of today, effective and consistent infrastructure management is essential. Ansible shows up as a potent automation tool that makes it simple to configure, deploy, and manage systems in a variety of scenarios. This book will provide you with a fundamental grasp of Ansible’s fundamental commands and useful uses, even if you are new to it.
Ansible enables scalable and effective automation on a variety of servers and hardware. It is a flexible solution for optimized IT operations, supporting everything from smooth software installation and configuration management to efficient provisioning, deployment, and testing. This article lays the groundwork for efficient automation processes by providing a comprehensive article on key Ansible commands. We’ll explore:
- Installation: Install Ansible on your system with ease.
- Inventory Management: Constructing an inventory file to define targeted hosts meticulously.
- Ad-hoc Command Execution: Initiating immediate actions on targeted hosts for dynamic control.
- Playbook Development and Execution: Defining and enacting comprehensive task sequences through playbooks.
- Troubleshooting: Navigating common Ansible challenges with confidence.
By traversing these topics, you’ll gain the necessary proficiency to unlock the power of Ansible automation, streamlining your IT infrastructure and boosting productivity.
Key Concepts
Ansible: Ansible is an IT automation tool written in Python, primarily focused on infrastructure management and configuration.
Playbook: A YAML-based file containing Ansible tasks and instructions for automating actions on target systems.
Inventory: A file defining the systems Ansible will manage, typically including their IP addresses, hostnames, or cloud resource IDs.
Module: An Ansible unit that performs specific tasks on target systems, such as installing software, managing files, or running commands.
How to install Ansible on your system
The ansible installation process varies slightly depending on your operating system, but the core requirements remain consistent: a compatible Python version (2.7 or higher). This article outlines the streamlined installation methods for popular Linux distributions and macOS.
Linux and Unix-like Systems
- Package Manager: Leverage your system’s package manager for a quick and convenient installation.
Ubuntu/Debian
sudo apt-get install ansible
Output:

CentOS/Red Hat
sudo yum install ansible
- pip: This method offers flexibility and is often preferred for development environments.
Install pip if necessary: https://pip.pypa.io/en/stable/installation/
Then, run:
pip install ansible
MacOS
Homebrew: This popular package manager simplifies installation on macOS.
- Install Homebrew: https://brew.sh/
- Then, run:
brew install ansible
Verification
Once installed, confirm successful setup by running:
ansible --version
Expect output similar to:

Congratulations! You’re now equipped to harness the power of Ansible automation.
How to create an inventory file that lists the target hosts
Upon installation, Ansible generates a default inventory file at /etc/ansible/hosts. While functional, utilizing project-specific inventories is a recommended practice for several reasons:
- Prevention of Accidental Cross-Configuration: Separate inventories prevent unintended interaction between servers across projects, safeguarding your production and development environments.
- Enhanced Collaboration: Including inventory files within your project’s code repository simplifies sharing your provisioning setup with colleagues, fostering collaborative efforts.
Step-by-Step Guide
Navigate to your home directory and create a dedicated directory for Ansible files:
cd ~
mkdir ansible
Move to the newly created directory and open a new inventory file using your preferred text editor:
cd ansible
nano inventory
Populate the file with individual server entries, each on a separate line. Both hostnames and IP addresses are valid:
203.0.113.111
203.0.113.112
203.0.113.113
server_hostname
Validate and retrieve information about your inventory using the ansible-inventory command:
ansible-inventory -i inventory --list
Output:
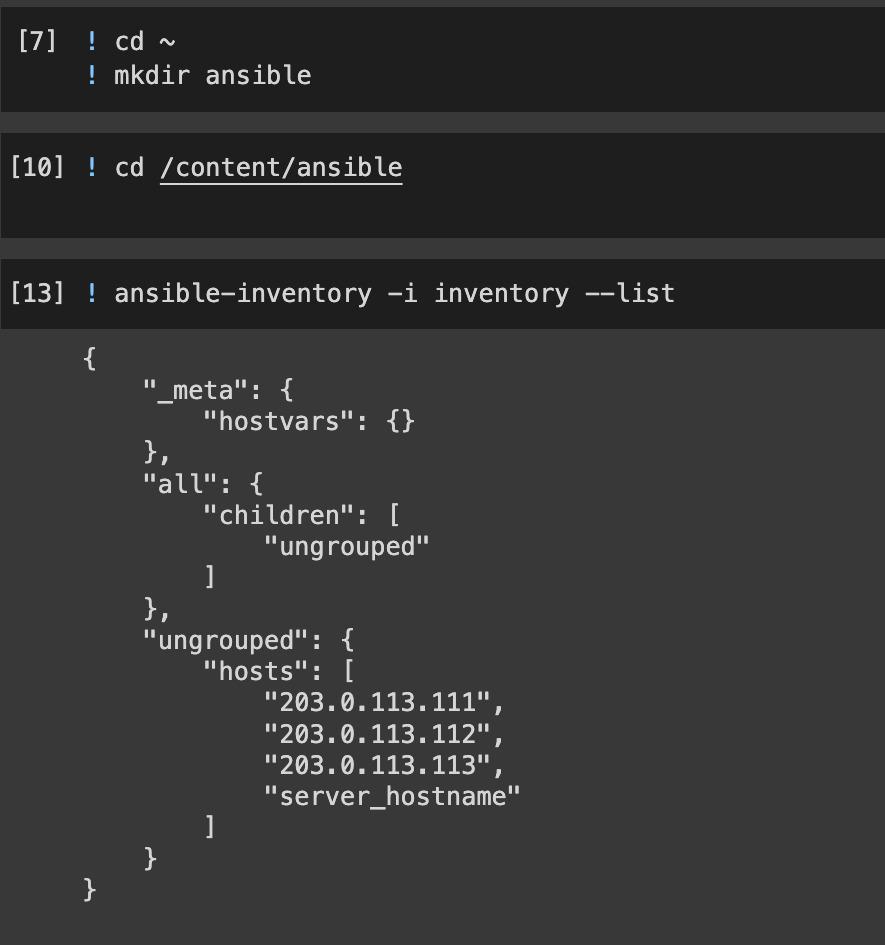
Understanding the Output
Even without explicitly defining groups, the output displays two automatically inferred groups:
- All: Encompasses all servers in your inventory, regardless of grouping.
- Ungrouped: Contains servers not assigned to a specific group.
Remember, groups enable granular targeting and variable assignment within your playbooks, enhancing organization and efficiency.
(BONUS) Example
The following example showcases a basic inventory file structure with two host groups:
[web]
web1.example.com
web2.example.com
web3.example.com

[db]
db1.example.com
db2.example.com
In this instance, we manage three web servers and two database servers. Group names enable efficient group-level targeting, while individual hostnames or IP addresses allow granular control. To verify connectivity to your hosts, leverage the ping module:
ansible web -m ping
A successful response should resemble:

This indicates successful communication with your web servers. Any errors or failures warrant investigating SSH settings, firewall rules, and target host permissions.
Executing On-Demand Tasks: Mastering Ad-Hoc Commands in Ansible
Ad-hoc commands offer an agile approach to interact with your Ansible hosts, enabling one-time execution without requiring playbooks. Ideal for rapid tasks or troubleshooting, they empower immediate intervention and verification.
Utilizing ad-hoc commands follows a consistent structure
ansible <host-pattern> -m <module-name> -a <module-arguments>
Breaking Down the Syntax
- <host-pattern>: Represents the target group or individual host. Leverage wildcards (*), ranges ([]), and logical operators (!) for intricate targeting.
- <module-name>: Identifies the desired module from Ansible’s extensive library, covering actions like file management, service control, user creation, and package installation. Consult ansible-doc for documentation and examples.
- <module-arguments>: Parameters passed to the module, their format and meaning varying based on the specific module. Explore ansible-doc to understand required and optional arguments.
Example Scenarios
- Uptime Check: Verify system uptime across all hosts:
ansible all -m command -a uptime
- Directory Creation: Establish a tmp/test directory on web servers:
ansible web -m file -a "path=/tmp/test state=directory"
- Service Restart: Restart the nginx service on web servers:
ansible web -m service -a "name=nginx state=restarted"
- Package Installation: Update git to the latest version on database servers:
ansible db -m apt -a "name=git state=latest"
Remember, ad-hoc commands offer a versatile tool for immediate interactions with your Ansible managed infrastructure.
Playbooks, defined in YAML files, serve as the blueprints for your automation endeavors. They orchestrate a sequence of tasks across target hosts, empowering you to install applications, configure systems, and manage your infrastructure efficiently.
Structure and Syntax
- Playbooks consist of plays, each targeting specific host groups or individual hosts.
- Within each play, tasks represent atomic actions executed sequentially.
- Each task possesses three essential attributes:
- Name: A descriptive identifier for clarity.
- Module: An Ansible module performing the desired action (e.g., file management, service control).
- Arguments: Parameters specific to the chosen module.
Beyond these core elements, playbooks leverage:
- Variables: Store reusable values for dynamic configuration.
- Conditionals and Loops: Enable conditional execution and task repetition based on specific criteria.
- Handlers: Manage asynchronous tasks and define post-task actions.
- Templates: Generate configuration files or dynamic content.
Example: Deploying and Configuring Nginx
---
- name: Install and configure nginx on web servers
  hosts: web
  become: yes
  vars:
    nginx_port: 80
    nginx_root: /var/www/html
  tasks:
    - name: Install nginx
      apt:
        name: nginx
        state: present
        update_cache: yes
    - name: Copy index.html file
      copy:
        src: index.html
        dest: "{{ nginx_root }}/index.html"
    - name: Configure nginx port
      lineinfile:
        path: /etc/nginx/sites-available/default
        regexp: "^\s*listen\\s+"
        line: "    listen {{ nginx_port }};"
        backup: yes
    - name: Restart nginx service
      service:
        name: nginx
        state: restarted
Execution and Verification
Run playbooks using the ansible-playbook command, specifying the playbook file:
ansible-playbook nginx.yml
A successful execution displays task results for each targeted host. Verify their application by accessing the configured web servers to confirm the deployed index.html file, below is the raw output of above command :

Encountering Obstacles in Ansible: Troubleshooting Common Errors and Issues
While Ansible empowers efficient automation, sometimes errors or issues can impede its smooth operation. Here’s a guide to tackling common challenges:
1. Authentication Failed
Symptom: Ansible cannot connect to the target host via SSH.
Causes: Incorrect SSH settings, username/password, missing keys, or firewall rules.
Solutions:
- Verify SSH access with the same credentials used in Ansible.
- Ensure SSH is enabled and listening on the target host’s default port (22) or your specified port.
- Confirm firewall rules allow connections from the Ansible control node.
- Verify sufficient permissions on the target host to execute desired tasks.
2. Module Not Found
Symptom: Ansible cannot locate the specified module.
Causes: Typo in the module name, missing module, or incorrect module path.
Solutions:
- Double-check the module name’s spelling and alignment with Ansible’s supported modules. Use ansible-doc for a list and documentation.
- Ensure the required module is installed on the Ansible control node (e.g., using pip or your system’s package manager).
- Verify the module path is correct (default: /usr/share/ansible/plugins/modules, ~/.ansible/plugins/modules, or the ANSIBLE_LIBRARY environment variable). Use -M or module_path to specify custom paths.
3. Syntax Error
Symptom: Ansible cannot parse the playbook or inventory file due to syntax errors.
Causes: Missing/extra characters, incorrect indentation, formatting, or data types.
Solutions:
- Adhere to YAML syntax rules and conventions. Use a YAML validator for error checking.
- Ensure correct format and data types for arguments and variables (consult ansible-doc).
- Maintain proper indentation and spacing (two spaces per level, avoid tabs or mixing spaces/tabs).
Beyond these common issues, you may encounter specific challenges based on your environment. Here are some general troubleshooting tips:
- Increase verbosity: Use -v options (up to four) with ansible or ansible-playbook for more details and debug information.
- Dry run: Use –check to simulate actions without actual changes, allowing you to test your playbook or command before execution.
- Diff comparison: Use –diff to see pre- and post-execution file differences, aiding in verifying changes and identifying potential errors.
- Interactive exploration: Use ansible-console to connect to target hosts in a shell-like environment, enabling interactive troubleshooting and ad-hoc command execution.
Remember, effective troubleshooting often requires a combination of these techniques and a close examination of your specific context.
Conclusion
This article has equipped you with a foundational understanding of Ansible, empowering you to automate tasks across multiple servers or devices. We’ve explored:
- Installation: Seamlessly integrating Ansible into your system.
- Inventory Management: Constructing an inventory file to define your target infrastructure.
- Ad-Hoc Commands: Streamlining immediate, one-time interactions with your hosts.
- Playbook Development: Orchestrating complex tasks through modular, reusable playbooks.
- Troubleshooting Techniques: Confidently navigating common Ansible errors and issues.
Ansible’s power and flexibility lie in its ability to simplify and expedite numerous IT tasks, ultimately enhancing your productivity and efficiency. We trust this article has provided a valuable introduction, igniting your journey towards streamlined automation with Ansible.
Basic Ansible Commands – FAQ’s:
What is Ansible used for?
Ansible empowers automation, configuration management, and orchestration across IT infrastructure, streamlining repetitive tasks for administrators.
How does Ansible stand out?
Unlike many peers, Ansible is agentless, removing the need for software installation on managed nodes. Utilizing SSH for communication, it champions lightweight operation and effortless setup.
Is Windows compatibility possible?
Absolutely! WSL (Windows Subsystem for Linux) and Cygwin serve as gateways for running Ansible on Windows machines.
What is the significance of the inventory file?
Your inventory file acts as a crucial roadmap, dictating the specific hosts or groups upon which Ansible operates. It’s vital for effectively managing your remote systems.
Are there graphical interfaces for Ansible?
Tools like Ansible Tower offer web-based graphical interfaces, enabling intuitive management and visualization of your Ansible playbooks.
What are Ansible variables?
Variables function as data repositories, storing reusable information throughout playbooks, enhancing their dynamism and flexibility.
How do I handle conditional logic in playbooks?
Conditional statements like when and unless empower you to control task execution based on specific criteria, guiding the logic flow within your playbooks.
What are roles, and how do I use them?
Roles champion code reusability and organization by encapsulating tasks, variables, and files into self-contained units, promoting modularity and efficiency.
How do I manage passwords securely with Ansible?
Leverage the vault module to securely store sensitive information like passwords. Retrieve them seamlessly during playbook execution, ensuring security best practices.
What are best practices for writing Ansible playbooks?
Maintain modularity and focus within your playbooks, assigning each playbook a defined set of tasks. Embrace variables for configuration, leaving hardcoded values behind. Remember, clear documentation is key for long-term maintainability.
Share your thoughts in the comments
Please Login to comment...