Spring Boot – Web Socket
Last Updated :
29 Dec, 2023
WebSocket is used as a communication protocol that provides full-duplex communication channels over a single, long-lived connection between a client and a server. In this protocol, there are no restrictions like HTTP that for a response you have to make a request first.
The server can send the message without getting any request and this can be useful in many applications like
- Chat applications
- Sending any notification to the user
- And many more.
Why WebSocket is used Over HTTP?
In HTTP client has to request only the response or the payload from the server will be given and then the connection is terminated. Now if you require further payload or data then you have to repeat the whole process.
- WebSocket client establishes the socket connection with the server and receives the message or data without any refresh
- The connection won’t be terminated which means that we can again receive the message.
Also, WebSocket is a bi-directional protocol which means that the server and client can exchange the message in parallel and it decreases the round trip and the time for response. An application like trading, monitoring, or creating functionality like notifications WebSocket is very useful.
Creating a Chat Application using WebSocket in Spring Boot
1. Initialize the Project
So, using WebSocket we will create a chat application where two clients can connect to the server using the client application and they can exchange the message through sockets.

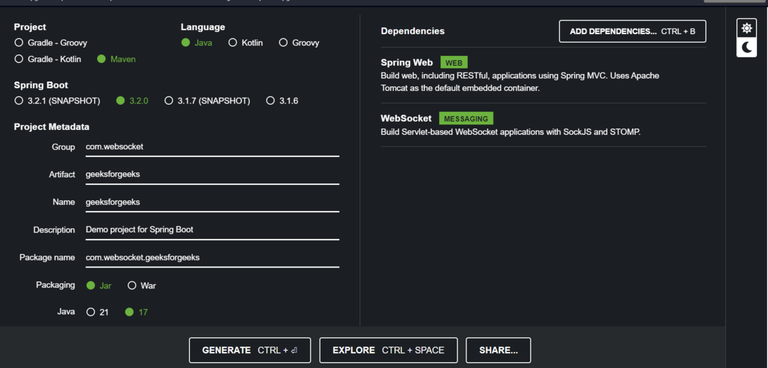
Spring Intilializr
This is what our Project initialization should look like. We are using Java 17 and Spring Boot version 3.2.0
2. Handling WebSocket’s Connections – Handler File
First, we have to create a file that can handle the operations of the WebSocket. We will extend the class TextWebSocketHandler and using that we will manage some operations.
So, We want to manage
- The function that can handle the First-time connection from the user.
- Functions that can handle when the user Disconnects from the server
- Users exchange the messages
Note: For managing the connections we will be using a list but in real-time you can use In-Memory storage like Redis, Dedicated Database and Dedicated Message broker like RabbitMQ.
Below is the implementation of Handling WebSocket’s Connections:
Java
package com.websocket.geeksforgeeks.handlers;
import java.util.ArrayList;
import java.util.Collections;
import java.util.List;
import org.springframework.web.socket.CloseStatus;
import org.springframework.web.socket.WebSocketMessage;
import org.springframework.web.socket.WebSocketSession;
import org.springframework.web.socket.handler.TextWebSocketHandler;
public class SocketConnectionHandler extends TextWebSocketHandler {
List<WebSocketSession> webSocketSessions
= Collections.synchronizedList(new ArrayList<>());
@Override
public void
afterConnectionEstablished(WebSocketSession session)
throws Exception
{
super.afterConnectionEstablished(session);
System.out.println(session.getId() + " Connected");
webSocketSessions.add(session);
}
@Override
public void afterConnectionClosed(WebSocketSession session,
CloseStatus status)throws Exception
{
super.afterConnectionClosed(session, status);
System.out.println(session.getId()
+ " DisConnected");
webSocketSessions.remove(session);
}
@Override
public void handleMessage(WebSocketSession session,
WebSocketMessage<?> message)
throws Exception
{
super.handleMessage(session, message);
for (WebSocketSession webSocketSession :
webSocketSessions) {
if (session == webSocketSession)
continue;
webSocketSession.sendMessage(message);
}
}
}
|
- In the Handler file we have taken the methods afterConnectionEstablished, afterConnectionClosed, and handleMessage. Functions for managing the connections also log the ID of the session which can be useful for confirming whether the user has made a successful connection or not.
- In handleMessage we are iterating over the list of connections and one by one we will send the message to all the connections except the one session who is sending the message.
3. Code For Creating Socket in Spring Boot – Configuration File
Now we can manage the socket connection so it is a time to create an endpoint where the socket can be found. But for that, we want to create a configuration file so that Middleware intercepts the incoming request.
Java
package com.websocket.geeksforgeeks.configuration;
import com.websocket.geeksforgeeks.handlers.SocketConnectionHandler;
import org.springframework.context.annotation.Configuration;
import org.springframework.web.socket.config.annotation.EnableWebSocket;
import org.springframework.web.socket.config.annotation.WebSocketConfigurer;
import org.springframework.web.socket.config.annotation.WebSocketHandlerRegistry;
@Configuration
@EnableWebSocket
public class WebSocketConfig
implements WebSocketConfigurer {
@Override
public void registerWebSocketHandlers(
WebSocketHandlerRegistry webSocketHandlerRegistry)
{
webSocketHandlerRegistry
.addHandler(new SocketConnectionHandler(),"/hello")
.setAllowedOrigins("*");
}
}
|
We have used EnableWebSocket annotation with Configuration and this is mandatory for processing the WebSocket request.
We have implemented the WebSocketConfigurer interface which reduces our lot of work. In that, in webSocketRegistry, we are adding a handler with two parameters.
- Create an instance of the Handler file which we created in Step 2
- Pass the endpoint of the socket as a String
Note: If your socket is only going to be used in the same application then don’t call the setAllowedOrigins method. And if any other domain is going to use this application then pass the domain address as the parameters. “*” means that any domain can connect to the socket.
So, Till here we have created two files that are sufficient for now to connect and exchange messages. Files are
- Configuration: In that, we will be creating an endpoint for WebSocket.
- Handlers: We will be using this, for handling the connections.
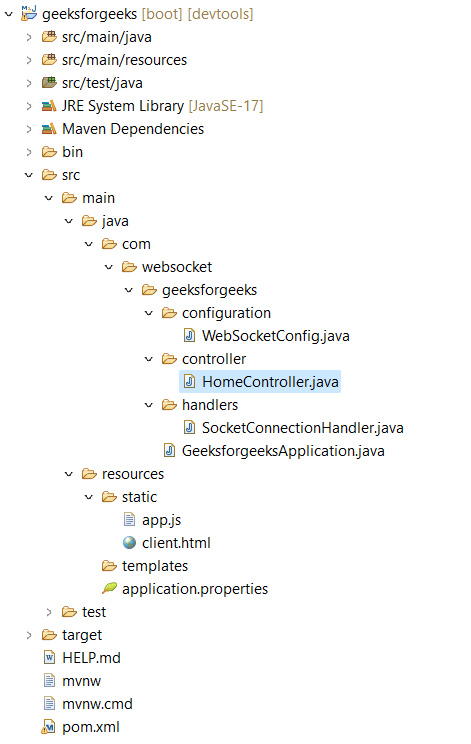
The image shown below is the project structure which can help you manage the files in the right directory.

Folder Structure
4. Testing the Socket Connection
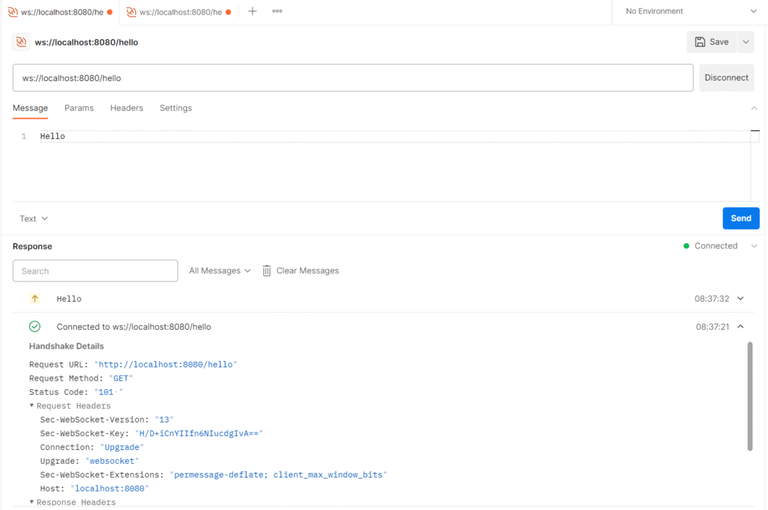
We can test whether the sockets are working fine or not in Postman. Just change the request type to WebSocket put the endpoint and click on Connect and then you can send the message to the socket. In the below image first we establish the connection and then we send a Hello message to the network.

Result in Postman
For chatting we can create two connections to the same endpoint using different tabs and sending the message from one tab will show the message in another tab. And if this happens then we are good to go.
5. Create a User Friendly interface for chatting
5.1 Create a Controller
In controller we will handle the request and redirect it to the client.html page
Java
package com.websocket.geeksforgeeks.controller;
import org.springframework.stereotype.Controller;
import org.springframework.web.bind.annotation.GetMapping;
/**
* Controller class for handling web requests.
*/
@Controller
public class HomeController {
/**
* Handles GET requests to the "/" endpoint.
*
* @return View name for the client page.
*/
@GetMapping("/")
public String index() {
return "client";
}
}
|
Currently controller have only one method named as index with the GetMapping of “/” which means when websites load this method will get invoked. This will only return the content of the HTML file.
5.2 Create a HTML File
For the client side, we will create 2 input fields and one button for each.
- The First Field will be for the user and a button to connect
- The second field for writing the message and a button to send it.
HTML
<!DOCTYPE html>
<html lang="en">
<head>
<meta charset="UTF-8" />
<meta name="viewport" content="width=device-width, initial-scale=1.0" />
<title>Socket Client</title>
<link
rel="stylesheet"
/>
<style>
/* Custom styling */
body {
padding: 20px;
}
#messages {
margin-top: 20px;
}
.outgoing-message {
text-align: right;
background-color: #308D46;
color:white;
margin-bottom: 10px;
padding:10px;
border-radius:5px;
}
.incoming-message {
text-align: left;
background-color: #2C3E50;
color:white;
margin-bottom: 10px;
padding:10px;
border-radius:5px;
}
.gfg-color{
background-color:#308D46;
color:white;
}
.gfg-color:hover{
color:white;
}
.gfg-blue{
background-color:#2C3E50;
color:white;
}
.gfg-blue:hover{
color:white;
}
</style>
</head>
<body>
<div class="container">
<div class="row">
<div class="col">
<input
type="text"
id="name"
class="form-control mb-2"
placeholder="Your Name"
/>
<input
id="connectButton"
type="button"
value="Connect"
class="btn gfg-blue mb-2"
onclick="connect()"
/>
</div>
</div>
<div class="row">
<div class="col">
<input
type="text"
id="message"
class="form-control mb-2"
placeholder="Type a message"
/>
<input
type="button"
value="Send"
class="btn gfg-color mb-2"
onclick="sendToGroupChat()"
/>
</div>
</div>
<div class="row">
<div class="col">
<div id="messages" class="border p-3"></div>
</div>
</div>
</div>
<script src="app.js"></script>
</body>
</html>
|
As mentioned this file contains the buttons and input field. But with this all element we also a messages element which will be used to show the message on the screen. Incoming and Outgoing message will be appended over here and it will be done by the JavaScript Code.
5.3 Create a JavaScript file
Here we will create some functions in JavaScript for handling some operations.
- For Connection
- Printing the message
- Sending the message
- We will use the property onmessage to get the new message from the server
Javascript
let ws, currentUser;
function connect() {
ws.onmessage = function (e) {
console.log(e);
printMessage(e.data);
};
document.getElementById("connectButton").disabled = true;
document.getElementById("connectButton").value = "Connected";
document.getElementById("name").disabled = true;
currentUser = document.getElementById("name").value;
console.log(currentUser);
}
function printMessage(data) {
let messages = document.getElementById("messages");
let messageData = JSON.parse(data);
let newMessage = document.createElement("div");
newMessage.className = "incoming-message";
newMessage.innerHTML = messageData.name + " : " + messageData.message;
messages.appendChild(newMessage);
}
function sendToGroupChat() {
if (ws == undefined) return;
let messageText = document.getElementById("message").value;
document.getElementById("message").value = "";
let name = document.getElementById("name").value;
let messageObject = {
name: name,
message: messageText,
};
let newMessage = document.createElement("div");
newMessage.innerHTML = messageText + " : " + currentUser;
newMessage.className = "outgoing-message";
messages.appendChild(newMessage);
ws.send(JSON.stringify(messageObject));
}
|
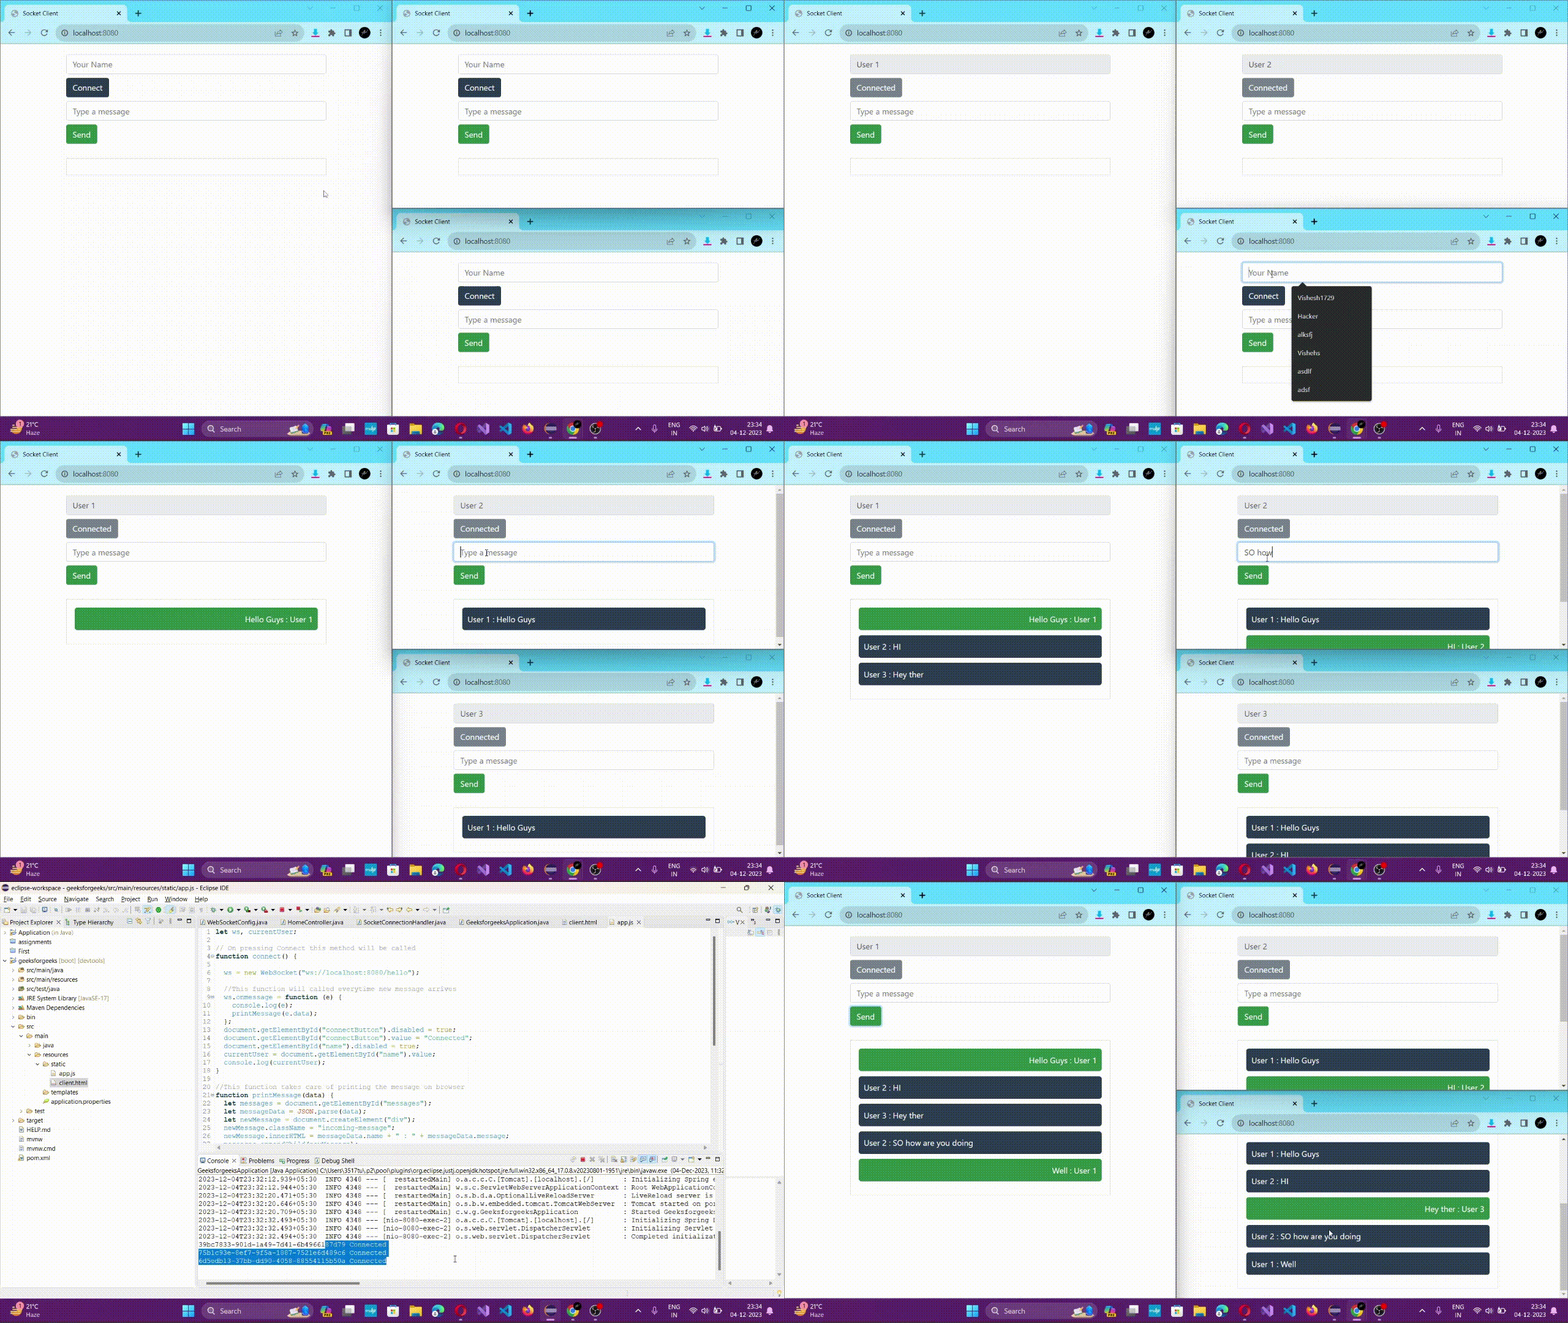
Output:
Message sent from the user appears on the right side and message coming from other user appear on the other side. Also, the logs are appearing in the console section.

Explanation of the above code:
This javascript code contains the methods on frontend side for various connection and message sharing methods
- connect(): Auto updates the UI and establishes WebSocket connection with server also sets a event listener for incoming messages.
- printMessage(data): Used to parse the incoming message data and display that into the messages container UI.
- sendToGroupChat(): This function creates a message object and converts it to JSON format then sends it to the WebSocket server.
So, printMessage(data) appends incoming message from the server and the sendToGroupChat() will append the outgoing message in the messages element mentioned in the HTML file. While connect() manages the operations for the connection with the socket.
Conclusion
WebSocket is a powerful protocol that enables real-time communication between a client and a server.
To establish a real-time communication between the client and server WebSocket is definitely a great tool in use. In this article, we have discussed the use WebSocket to create a simple chat application using Spring Boot. We have covered the following topics:
- Establishing a WebSocket server using Spring Boot
- Creating a handler class to manage WebSocket connections
- Configuring the WebSocket endpoint
- Testing the WebSocket connection with Postman
- Creating a client-side chat application using HTML and JavaScript
The chat application we created is a basic example, but it demonstrates the key concepts of WebSocket development. With a little more work, you could create a more advanced chat application with features such as
- Private messages
- Group chats
- File sharing
Share your thoughts in the comments
Please Login to comment...