Spring boot is a backed-end framework used for developing stand-alone Java applications rapidly. It minimizes configuration so developers can focus only on developing business logic.
What is Docker?
Docker is an open-source platform designed for developing, transporting, and strolling applications. Docker has containers that’s a standalone, executable packages that include everything that has to run a chunk of software program, along with the code, runtime, libraries, and gadget tools. A docker image is a blueprint for creating packing containers. It consists of the software code and all its dependencies, as well as the runtime, machine equipment, and libraries.
In this article, we can learn how to dockerize our Spring boot software built on Gradle.
Prerequisite
If you need to learn how to create a Spring boot application or need to research extra about Docker check below articles:
Steps for creating a docker image using Gradle in Spring Boot
Step 1: Create Spring Boot Application
In your web browser visit start.spring.io and create a Spring Boot project with the following configurations,
- Project: Gradle – Groovy
- Language: Java
- Spring Boot: 3.2.1
- Packaging: Jar
- Java: 17
- Dependencies: Spring Web

Click on Generate and download the project, after it finishes download, Open with any IDE of your choice and wait for some time untill it finishes the configuration and indexing.
Here is the gradle.build file for reference:
plugins {
    id 'java'
    id 'org.springframework.boot' version '3.2.1'
    id 'io.spring.dependency-management' version '1.1.4'
}
group = 'com.gfg'
version = '0.0.1-SNAPSHOT'
java {
    sourceCompatibility = '17'
}
repositories {
    mavenCentral()
}
dependencies {
    implementation 'org.springframework.boot:spring-boot-starter-web'
    testImplementation 'org.springframework.boot:spring-boot-starter-test'
}
tasks.named('test') {
    useJUnitPlatform()
}
Step 2: Create a Controller
Now for the time being, create a REST controller just to display “Hello World” when requested.

Inside com.gfg.SpringDocker let’s create a new class name HelloController
HelloController.java:
Java
package com.gfg.SpringDocker;
import org.springframework.web.bind.annotation.GetMapping;
import org.springframework.web.bind.annotation.RequestMapping;
import org.springframework.web.bind.annotation.RestController;
@RestController
@RequestMapping
public class HelloController {
@GetMapping("/hello") public String getMessage()
{
return "Hello World!";
}
}
|
Let’s quickly run this and check if it’s working.
.png)
On the web browser type localhost:8080/hello and check if we are getting the output from the REST controller.

Step 3: Create and Configure Docker File
In your project create a file and name it as “Dockerfile” where we will write docker configurations. Right click on the SpringDocker package and select New, then click on File and name it.

Check the folder structure now,

Inside your Dockerfile write,
FROM openjdk:17
ARG JAR_FILE=build/libs/*.jar
COPY ${JAR_FILE} app.jar
ENTRYPOINT ["java","-jar","/app.jar"]
FROM openjdk:17: This line specifies the base picture for the Docker image. In this case, it’s using the OpenJDK 17 base image.
ARG JAR_FILE=construct/libs/*.Jar: This argument is used to specify the direction to the JAR report so as to be copied into the Docker image. The *.Jar suggests that any JAR file in the particular listing might be taken into consideration.
COPY $JAR_FILE app.Jar: This line copies the JAR file distinct with the aid of the JAR_FILE argument from the construct context into the Docker image.
ENTRYPOINT [“java”,”-jar”,”/app.Jar”]: This line sets the default command to be carried out whilst the Docker field starts off evolved. It specifies that the Java Virtual Machine (JVM) have to run the JAR report (app.Jar) the use of the -jar option.
If you have no .Jar document in buid/libs folder attempt executing the subsequent command on Terminal.
./gradlew build

Below is the build folder:

Step 4: Create Docker image
Get the Docker desktop installed from docker.com/products/docker-desktop if you don’t have it installed in your computer.
Open terminal in your project directory and execute the following commands.
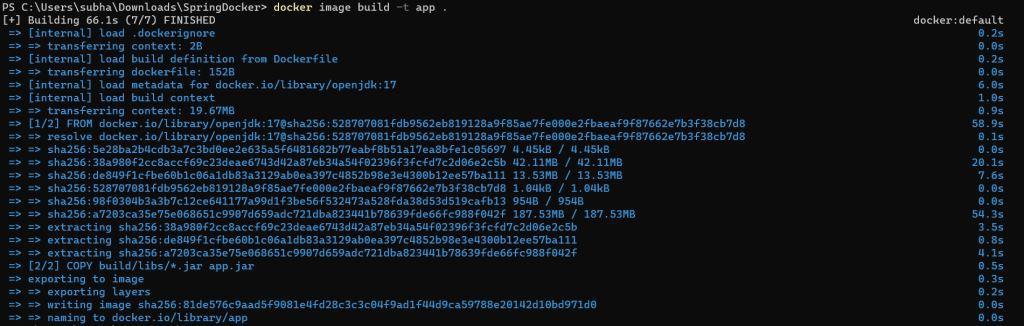
docker image build -t app .
This command will initiate the docker image build. The -t flag allows you to specify a name and optionally a tag for the image. The dot at the end specifies that the Dockerfile and other necessary files for building the image are located in the current directory.
Now to check the docker image created and its details run the following command:
docker images
This will help you get the IMAGE ID.

Otherwise, you can use the Docker Desktop Application to check and run your application.

Step 5: Run Docker Container
Now, to run the docker image enter the following command, otherwise use the start button on the Docker Desktop.
docker run -d IMAGE_ID
docker run command is used to run a Docker container and -d stands for “detach.” It runs the container in the background, and the terminal is freed up for in addition commands. Update the IMAGE_ID with your docker image identification from that you want to run the container.

Below we can see the docker desktop:

Let’s check the log in Docker Desktop App if it’s running on the default port no 8080.

Step 6: Check Output
Let’s go to port no 8080 on our local host without running the Spring Boot aplication through IDE, You should be able to see the “Hello World” text which is coming from the application running on the Docker Container.

Now you can build your Spring boot application and create a Docker image of the same and send it out or run efficiently with simple commands or using Docker Desktop. This simplifies the deployment process, as containers can be easily distributed and executed on any platform supporting Docker.
Share your thoughts in the comments
Please Login to comment...