Redirecting From One Frame to Another Frame in Java AWT
Last Updated :
14 Dec, 2023
In Java Programs, If we work with the two frames in Java if the user takes the input from one frame then it should redirect to the other frame. Now let’s create an AWT frame in the java using the java.awt package we can maintain connection for the two frames by creating the button using the ActionListener class which is present in the java.awt package by clicking on the button directs to the the second frame we can terminate any frame in the frame by using the dispose() method.
The dispose() Method terminates the frame from the memory.
- In Frame1 we will use ActionListener which is present in java.awt package.
- In the ActionListener class we have actionPerformed(), In the actionPerformed() method.
- We will call Frame2 and also we create a button in Frame1 by clicking on the button in Frame1 it will call Frame2.
we will look at a program with the above-explained details about redirecting from one AWT frame to another.
Example of Redirect to other AWT frame
The <a> tag contains the href so that when we click on text between the anchor tag it redirects to the hyperreference given. In a similar way here we work with the AWT Frames instead of Web pages. In place of <a> anchor tag, we are using buttons in our present explanation to redirect to another AWT frame.
Let’s look at an example program in Java.
Program for Frame1 by using AWT
Another important point is that the two classes implementing the two frames should be in the same directory.
Java
import java.awt.*;
import java.awt.event.*;
import java.util.*;
public class GeeksForGeeks
extends Frame implements ActionListener {
Button button;
GeeksForGeeks()
{
this.setLayout(null);
this.addWindowListener(new WindowAdapter() {
@Override
public void windowClosing(WindowEvent e)
{
System.exit(0);
}
});
button = new Button("NEXT");
button.setFont(
new Font("Agency FB", Font.BOLD, 32));
button.setBounds(250, 250, 100, 100);
button.addActionListener(this);
this.add(button);
}
public void actionPerformed(ActionEvent ae)
{
if (ae.getSource().equals(button)) {
Geek g = new Geek();
g.setTitle("Geek");
g.setSize(500, 500);
g.setVisible(true);
}
else {
System.exit(0);
}
}
public static void main(String args[])
{
GeeksForGeeks gfg = new GeeksForGeeks();
gfg.setTitle("GeeksForGeeks");
gfg.setSize(600, 600);
gfg.setVisible(true);
}
}
|
Output for Frame1:

Explanation of the above Program:
- First, we create a class GeeksForGeeks which extends the Frame present in the java.awt package.
- In the GeeksForGeeks we implement the addWindowListener() method so that when we hit the close icon it closes the frame.
- After that, we declared a Button which is one of the components in java.awt frame.
- We have set the name of the button as “NEXT” and set the font of the button and before that to make our button work we have to implement the ActionListener class and add the actionPerformed() method in our class.
- In the actionPerformed() method we pass the ActionEvent object as a parameter we use ActionEvent.getSource() method with the help of this method when we click on the button it returns that particular button object and we can check that using the equals() method in Java.
- In that we have created an object for another frame with the title named “Geek” so when the button is clicked the Geek frame will be displayed and the working of the frame Geek is explained in the below code.
The Output for the Frame GeeksForGeeks is given below
Note: Don’t compile and run Frame1 until you compile Frame2 in Java AWT.
Program For Frame2
An important thing is that the Frame2 class doesn’t have Main Method we need to just compile that so that the Window Tool Kit Method will be called from Frame1 named “GeeksForGeeks” when we press the button “NEXT” which is present in the Frame GeeksForGeeks.
Java
import java.awt.*;
import java.awt.event.*;
import java.util.*;
public class Geek extends Frame implements ActionListener {
Button back;
Geek(){
this.setLayout(null);
back = new Button("BACK");
back.setBounds(250, 250, 100, 100);
back.setFont(new Font("Algerian", Font.BOLD, 22));
back.addActionListener(this);
this.add(back);
}
public void actionPerformed(ActionEvent ae){
this.dispose();
}
}
|
Explanation of the above Program:
- In the above program, we created a class named Geek which extends the Frame in java.awt package and this is almost similar in every program to extend the Frame when we want to perform any operation using the awt in Java.
- Similar to the above program we create a button in java named “BACK” with the help of the ActionListener class present in the java.awt package.
- After that, we implement the method actionPerformed(). In this method, we call the dispose() method which is used to terminate the frame Geek (“as we have given the name of the frame as “Geek” in the setTitle() Method”) from the memory.
- So that when we click on the button in the Geek frame named BACK will terminate the frame from the memory.
- The important thing to remember is that this will only be called when we click on the button in the “NEXT” in the GeeksForGeeks Frame.
The total detailed explanation of this whole concept is illustrated in the below video just see and understand it, and the output image is also shown.
Output:
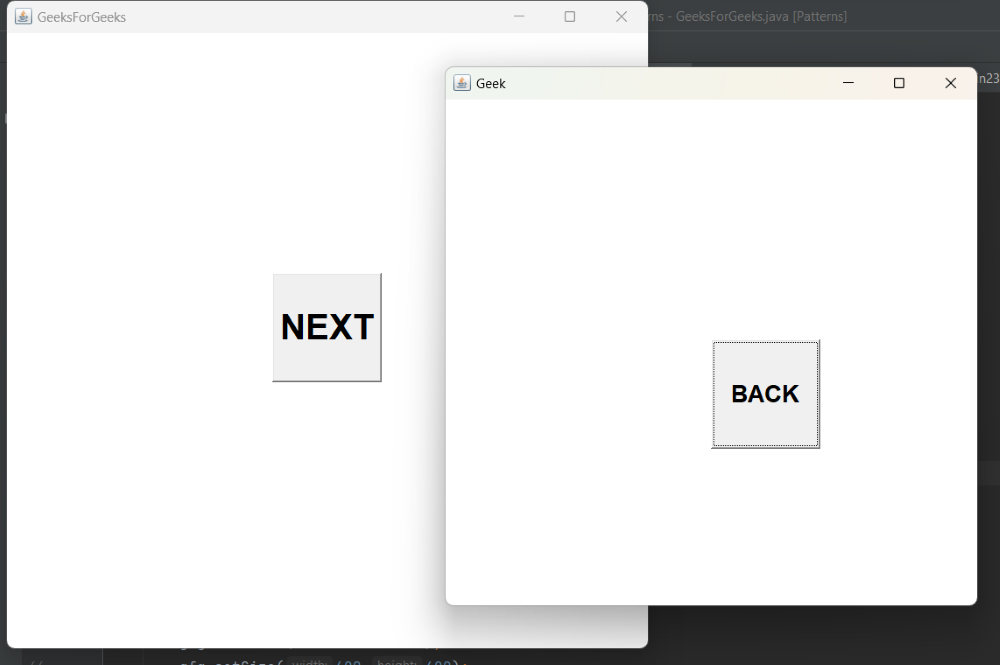
When we click on the button of Frame1 then it redirects to the Frame2.
After clicking on the button Back it terminates the Frame2 named “Geek” From the memory. The output is below.
Demo Video:
This is about working with the Multiple Frames using the Abstract Window ToolKit in Java.
Share your thoughts in the comments
Please Login to comment...