Networking is a great way to connect your application with the world. Yes, before going straight into our topic, let’s first try to find its necessity in your application. Networking is an essential aspect of modern applications, allowing them to connect with servers, databases, APIs, and other applications across the globe.
- Efficient Data Exchange: Networking allows you to exchange data efficiently with browsers, databases, and other applications. APIs provide a modern approach for two or more disparate applications to communicate or talk to each other.
We will explain this later. - Global Reach: Through networking, the application meets with a global audience who can access its resources and services from anywhere in the world.
- Scalability: Networking supports the scalability of the applications.
- Integration: Networking allows applications to integrate with third-party APIs.
API Integration in Android
Most of the applications have some backend interaction. For example:
- The App needs to back up the data.
- The App needs to send and receive data from the back end (web service).
- The App needs to access location-based services to complete some of the functionality.
These functionalities are one of the crucial parts of your app, based on the requirements of the application. The best way to implement these functionalities is to use a separate interface, which can act as a storeroom, contains various properties and functions, and provides as per our needs, such Interfaces are called Application Programming Interfaces (APIs).
Request and Request Libraries
Now slowly we are coming towards the goal of the article. Now the question arisen how can we access the store-room? Is it available for everyone? If it is, then it might cause security issues. Well, these APIs have their protocols. HTTP (Hyper Text Transfer Protocol ) and HTTPS (Hyper Text Transfer Protocol Secure). With these protocols, we can send access requests to these APIs. We will discuss Restful Web Services here, as nowadays most Android applications implement networking through Restful Web Services.
Restful Web Services for Android Networking
We can use HTTP methods like GET, POST, PUT, and DELETE to create a new request to these APIs and can perform the following operations:
- GET: Fetch data from API.
- POST: Adding new data to API.
- PUT: Updating existing data.
- DELETE: Deleting data on the server.
Restful web services often transmit data in JSON or XML format. Let us start with Rest API integration with Android application.
Project Overview
Last.fm, The world’s largest online music service, provides. The Last.fm API allows developers to access a vast database of music-related data and build their own applications using this data. We will create our application with this API. The name of our application will be MusicWiki. MusicWiki is an unofficial Last.fm app that contains information about different music genres, the albums, artists and tracks listed under the genre or tag.
Goal:
Through this project we will going to cover the following topics:
- Rest API integration with Retrofit Library.
- Learn how to thrott API Documentation.
- Authentication Handling
- Error Handling and Analytics
- Third Party Libraries.
Step by Step Implementation
Step 1: Download the Project
We will download the Project, In order to proceed further.
Step 2: Set up your last.fm account in order to get API key
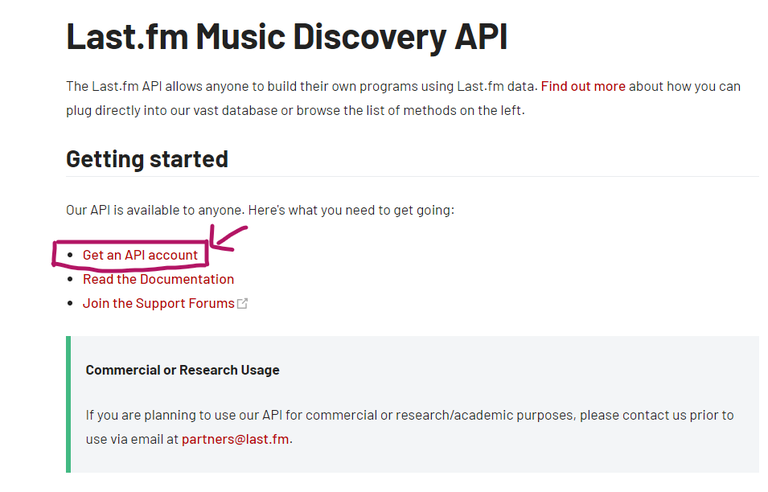
last.fm Get API account
Create your own account.
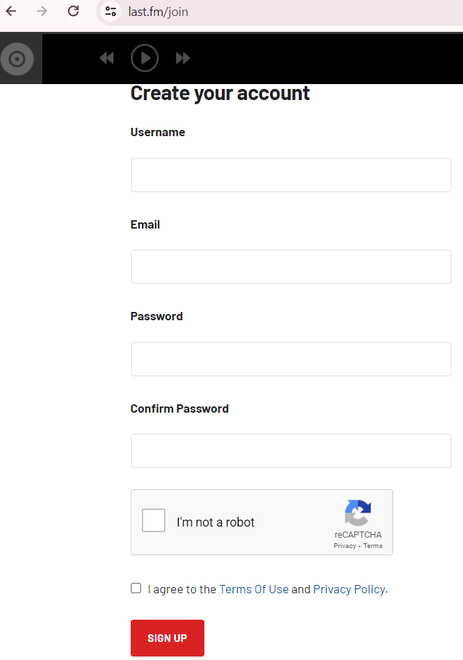
Last.fm sign up page
Fill up the information required for your application. (Don’t need to give the Callback URL & Homepage name, if you don’t have such information.)
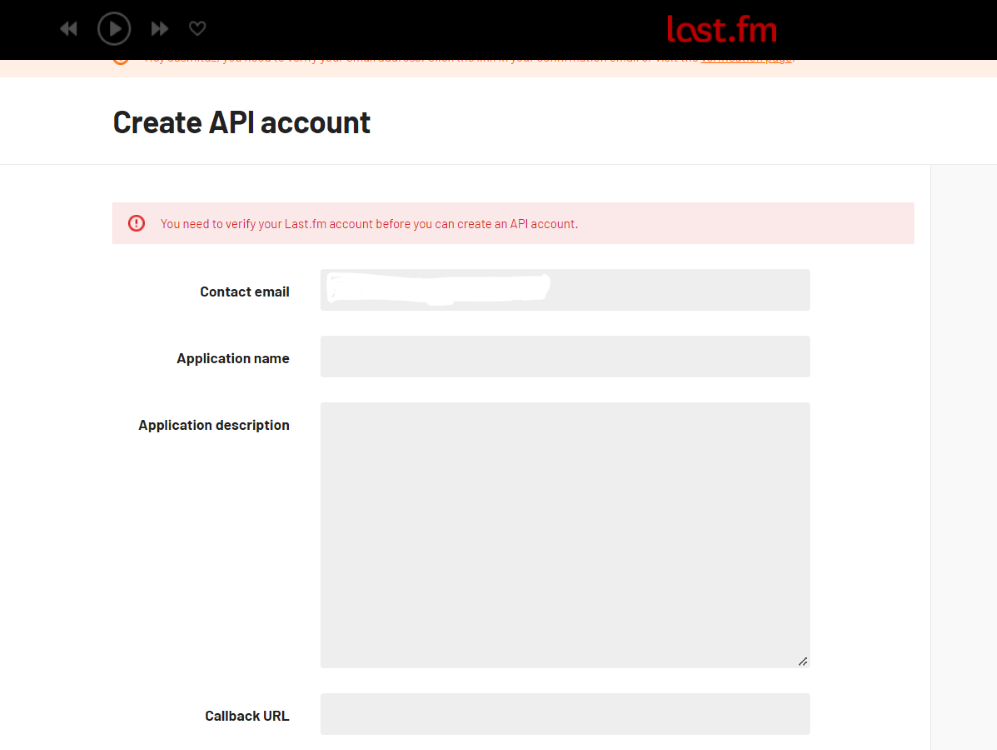
Create API account
Click on profile, verify your email and return back to the page. When you successfully cover the following step, you get your API key.
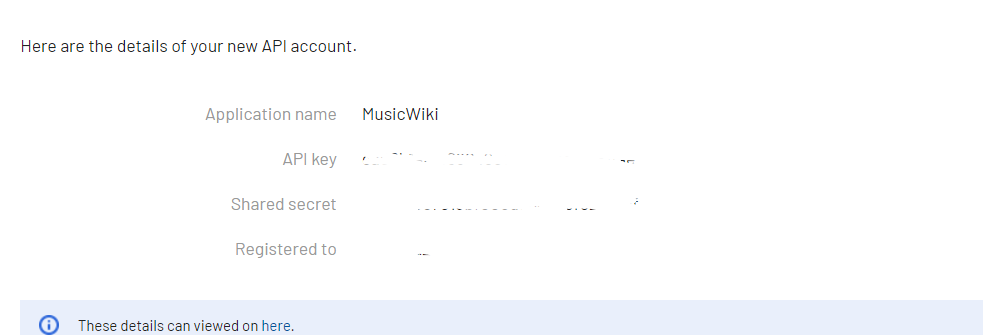
API key for your application
Copy the API_KEY and stored it into string.xml file.
<string name=”API_KEY”></string>
Do you know, What have you learned for so long? The answer is Throttling API Documentation. As we mentioned earlier, Restful Web Services have their own protocols for accessing them. So our first task was to select one such well-documented and easily accessible API And find out from its documentation how we can use it. In the future, we will see how this API works and where we have to use the API_KEY. (Authentication Handling).
Step 3: Prepare your Android Application for API integration
See here we have two options, we can code from scratch, Here you may need more knowledge and it is also a hectic process. Or we can take the help of third-party in-built libraries. Retrofit is a REST Client library (Helper Library) used in Android and Java to create an HTTP request and also to process the HTTP response from a REST API.
(i) Set up Retrofit for Jetpack-Compose application
Add the following dependencies in your app level build.gradle file. and sync the project.
// Retrofit for API requests
implementation ("com.squareup.retrofit2:retrofit:2.9.0")
implementation ("com.squareup.retrofit2:converter-gson:2.9.0")
// ViewModel and LiveData for MVVM architecture
implementation ("androidx.lifecycle:lifecycle-viewmodel-compose:2.7.0")
implementation ("androidx.lifecycle:lifecycle-livedata-ktx:2.7.0")
(ii) Create the API interface as well as Retrofit instance
Keep in mind, That you have entered to the first phase of Error Handling and Analytics. Because, it’s important to implement robust error handling and retry mechanisms to handle scenarios like server errors, network failures, or timeouts.
Kotlin
// DataModel.kt
package com.example.musicwiki.model

import java.io.Serializable

/************************************************ For Genre *******************************************/
data class Genre(
    val toptags: Toptags
)
data class Toptags(
    val tag: List<Tag>
)

data class Tag(
    val count: String,
    val name: String,
    val url: String
) : Serializable


/*************************************** For Genre Detail **********************************************/

data class GenreDetail(
    val tag: GenreInfo
)

data class GenreInfo(
    val name: String,
    val reach: Int,
    val total: Int,
    val wiki: Wiki
)

data class Wiki(
    val content: String,
    val summary: String,
    val published: String,
)
// DataInterface.kt
package com.example.musicwiki.services

import com.example.musicwiki.model.Genre
import com.example.musicwiki.model.GenreDetail
import retrofit2.Call
import retrofit2.http.GET
import retrofit2.http.Query

interface DataInterface {

    @GET("2.0/")
    fun getGenres(@Query("method") method: String, @Query("api_key") apiKey: String,@Query("format") format:String): Call<Genre>

    @GET("2.0/")
    fun getTagInfo(@Query("method")method: String, @Query("tag")tagname:String,@Query("api_key") apiKey: String,@Query("format") format:String)
    : Call<GenreDetail>

}
// DataService , Retrofit Instance
package com.example.musicwiki.services

import retrofit2.Retrofit
import retrofit2.converter.gson.GsonConverterFactory

object DataService {

    val retrofit = Retrofit.Builder()
        .baseUrl("https://ws.audioscrobbler.com/")
        .addConverterFactory(GsonConverterFactory.create())
        .build()

    val lastFmService = retrofit.create(DataInterface::class.java)
}
Let’s try to deep dive onto the following code-snippet.
 @GET("2.0/")   // API_ENDPOINT
 fun getGenres(@Query("method") method: String, @Query("api_key") apiKey: String,@Query("format") format:String): Call<Genre>

 @GET("2.0/")
 fun getTagInfo(@Query("method")method: String, @Query("tag")tagname:String,@Query("api_key") apiKey: String,@Query("format") format:String)
 : Call<GenreDetail>
When you build an application, first structure your requests. It is also applicable to your own APIs. In our application, We only needed to create GET requests to fetch the required data. The second part is to know the api endpoint and see if any authorization is needed for this request or not. This part will always customized according to your API requirement.
Authentication Handling:
In many cases, your API might need an authentication, In that case, you need to include an appropriate authentication header, or you need to pass an API_KEY with requests, like in our case.
(iii) Create the ViewModel
Kotlin
package com.example.musicwiki.viewModel

import android.util.Log
import androidx.lifecycle.ViewModel
import androidx.lifecycle.viewModelScope
import com.example.musicwiki.model.Genre
import com.example.musicwiki.model.GenreDetail
import com.example.musicwiki.model.GenreInfo
import com.example.musicwiki.model.Tag
import com.example.musicwiki.services.DataService
import kotlinx.coroutines.flow.MutableStateFlow
import kotlinx.coroutines.flow.StateFlow
import kotlinx.coroutines.launch
import retrofit2.Call
import retrofit2.Callback
import retrofit2.Response

class MainViewModel: ViewModel() {

    private val apiService = DataService.lastFmService

    private val _genres = MutableStateFlow<List<Tag>>(emptyList())
    val genres: StateFlow<List<Tag>> = _genres

    val _genreDetail: MutableStateFlow<GenreInfo?> =  MutableStateFlow(null)
    val genreDetail:StateFlow<GenreInfo?> = _genreDetail
    private val apiKey = "xxxxxxxxxxxxxxxxxxxxxxxxxxxxxxxxxxxxxxxxxxxxx"

    fun getAllGenres() {
        viewModelScope.launch {
            try {
                val response = apiService.getGenres("tag.getTopTags",apiKey,"json")

               response.enqueue(object: Callback<Genre> {

                    override fun onResponse(call: Call<Genre>, response: Response<Genre>) {

                        val body = response.body();

                        Log.d("Response",body.toString())
                        if(response.isSuccessful){
                           _genres.value= body?.toptags?.tag!!

                        }
                    }
                   /** Handle Network Error, Server Error */
                    override fun onFailure(call: Call<Genre>, t: Throwable) {
                        Log.d("GenreError",t.localizedMessage)
                    }
                })
            } catch (e: Exception) {

                /** Handle Error */
                Log.d("GenreError", e.localizedMessage)
            }
        }
    }


    fun getGenreInfo(tagName:String){

        viewModelScope.launch {
            try{
                val genreInfoResponse= DataService.lastFmService.getTagInfo("tag.getinfo",tagName,apiKey,"json")
                genreInfoResponse.enqueue(object: Callback<GenreDetail> {

                    override fun onResponse(call: Call<GenreDetail>, response: Response<GenreDetail>) {

                        val body = response.body();

                        Log.d("Response",body.toString())
                        if(response.isSuccessful){
                            _genreDetail.value= body?.tag

                        }
                    }
                    /** Handle Network Error, Server Error */
                    override fun onFailure(call: Call<GenreDetail>, t: Throwable) {
                        Log.d("GenreDetailError",t.localizedMessage)
                    }
                })
            }catch(e:Exception){
                /** Handle Error */
                Log.d("GenreDetailError", e.localizedMessage)
            }
        }
    }

}
Let us deep-dive into ViewModel and try to find out why error handling is one of the crucial parts of API integration.
Error Handling and Analytics:
There may be many reasons for a failure request to API, such as a server error, or network error (unavailability of internet connection. If we don’t consider those cases, it can result in an unnecessary application crash. Retrofit offers a simple way to manage errors and extract information from the response body. Creating a custom Retrofit CallAdapter allows for centralized handling of API error responses, reducing boilerplate code effectively.
/** Handle Network Error, Server Error */
override fun onFailure(call: Call<GenreDetail>, t: Throwable) {
               Log.d("GenreDetailError",t.localizedMessage)
         }
    })
  }
  catch(e:Exception){
        /** Handle Error */
        Log.d("GenreDetailError", e.localizedMessage)
}
(iv) Create the ViewModel object inside MainActivity and pass it to required component
Kotlin
// MainActivity.kt

package com.example.musicwiki

import android.os.Bundle
import androidx.activity.ComponentActivity
import androidx.activity.compose.setContent
import androidx.activity.viewModels
import androidx.compose.foundation.layout.fillMaxSize
import androidx.compose.material3.MaterialTheme
import androidx.compose.material3.Surface
import androidx.compose.material3.Text
import androidx.compose.runtime.Composable
import androidx.compose.ui.Modifier
import androidx.compose.ui.tooling.preview.Preview
import com.example.musicwiki.navigation.Navigation
import com.example.musicwiki.ui.theme.MusicWikiTheme
import com.example.musicwiki.viewModel.MainViewModel

class MainActivity : ComponentActivity() {

    private val viewModel: MainViewModel by viewModels()
    override fun onCreate(savedInstanceState: Bundle?) {
        super.onCreate(savedInstanceState)
        setContent {
            MusicWikiTheme {
                // A surface container using the
                  // 'background' color from the theme
                Surface(
                    modifier = Modifier.fillMaxSize(),
                    color = MaterialTheme.colorScheme.background
                ) {
                   Navigation(viewModel = viewModel)
                }
            }
        }
    }
}
(v) Final Overview of your Application
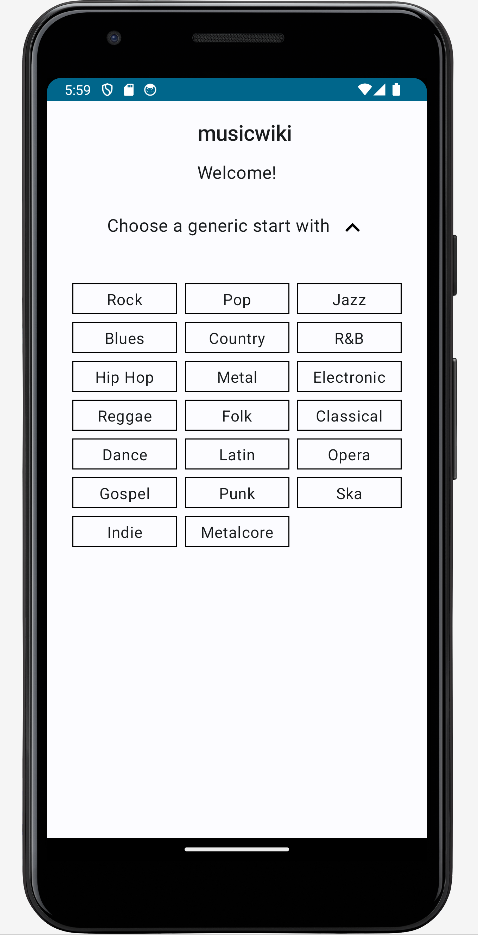
On Clicking any Button you can check the data about that Music Form:
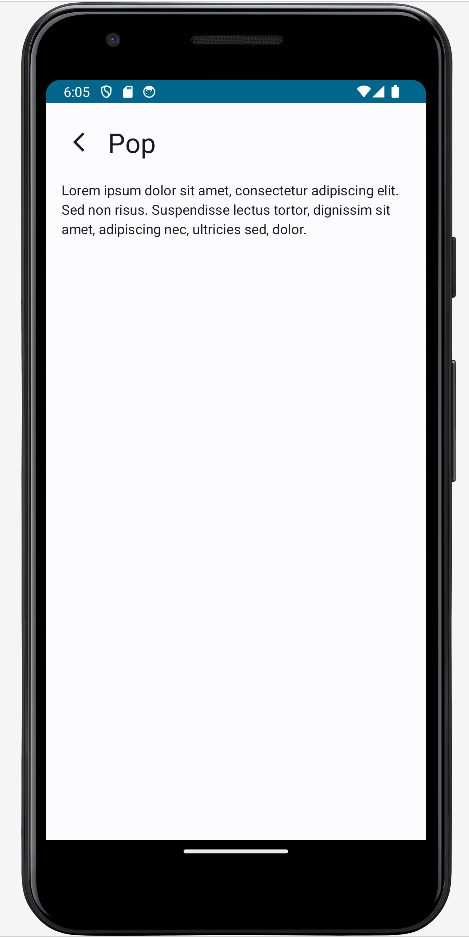
Check what happens when we click Pop on the screen
Let us conclude our discussion with Security Rate Limiting.
Security Rate Limiting
This term indicates how many requests you can make within a certain period of time, While working or using any application, you may observe one message with Toast or Snackbar.
Too many requests
If too many requests are made over that period, the API system will return an error message telling you that the rate limit has been exceeded. However, you can handle it by optimizing API calls for a particular screen, by sending a proper message to the user, or by creating a restriction on view-click events, so that, the user does not call the same API again and again.
Share your thoughts in the comments
Please Login to comment...