JSP – Server Response
Last Updated :
02 Apr, 2024
In JavaServer Pages development, the server response refers to the data sent back to the client from the server after receiving and processing the client request, and the server response typically includes the dynamically generated by the HTML, XML, JSON, or other based on the JSP file logic and data.
Key Terminologies
- Server: The server is a computer or software system that can process the requests from the clients and provide the responses. In JSP, the server can typically host the web applications and execute the JSP files and servlets to generate the dynamic web content.
- Request: It can be defined as the message sent by the client to request the specified resources or the act on the server.
- Scriptlet: It is a block of Java code that can be embedded with a JSP page delimited by the <% %> tags.
- Request Parameter: The request parameter sent from the client to the server as part of the HTTP request. In the registration form, form input field values are sent as the request parameters to the server when the form is submitted.
- Server-side Processing: The processing of the data that can occur on the server after receiving the request from the client. The server-side processing involves tasks such as data validation database interaction and generating the response to send back to the client.
Implementation of JSP Server Response
We can develop a simple server response form that can be handled with the servlet for the processing after response to the client.
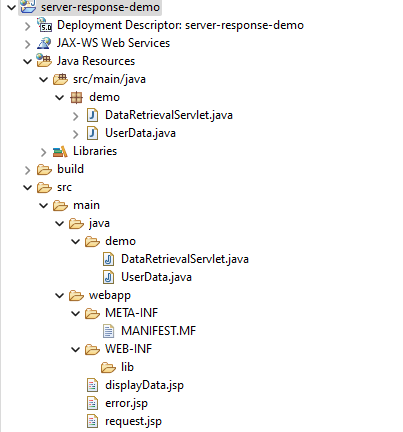
Step 1: Create the dynamic web project using Eclipse and it is named as the server-response-demo Open the project into the eclipse.
After project creation is done, then the file structure looks like the below image.
Step 2: Create the new Java class and it named as the UserData.java and its servlet can handle the client requests.
Go to src > java > demo > UserData.java and put the below code.
Java
package demo;

/**
 * UserData class represents the data structure for user information including name, education, and occupation.
 */
public class UserData {
    private String name;
    private String education;
    private String occupation;

    /**
     * Constructs a new UserData object with the specified name, education, and occupation.
     * @param name the name of the user
     * @param education the educational background of the user
     * @param occupation the occupation of the user
     */
    public UserData(String name, String education, String occupation) {
        this.name = name;
        this.education = education;
        this.occupation = occupation;
    }

    /**
     * Retrieves the name of the user.
     * @return the name of the user
     */
    public String getName() {
        return name;
    }

    /**
     * Retrieves the educational background of the user.
     * @return the educational background of the user
     */
    public String getEducation() {
        return education;
    }

    /**
     * Retrieves the occupation of the user.
     * @return the occupation of the user
     */
    public String getOccupation() {
        return occupation;
    }
}
Step 3: Create the new Java class and it named as the DataRetrievalServlet.java and it servlet can handles the client requests.
Go to src > java > demo > DataRetrievalServlet.java and put the below code.
Java
package demo;

import java.io.IOException;
import java.util.HashMap;
import java.util.Map;

import jakarta.servlet.ServletException;
import jakarta.servlet.annotation.WebServlet;
import jakarta.servlet.http.HttpServlet;
import jakarta.servlet.http.HttpServletRequest;
import jakarta.servlet.http.HttpServletResponse;

@WebServlet("/retrieveData")
public class DataRetrievalServlet extends HttpServlet {
    private static final long serialVersionUID = 1L;

    public DataRetrievalServlet() {
        super();
    }

    // Simulated database containing user data
    public Map<String, UserData> userDataMap;

    @Override
    public void init() throws ServletException {
        super.init();
        // Initialize user data map with sample user IDs and data
        userDataMap = new HashMap<>();
        userDataMap.put("001", new UserData("John Doe", "Bachelor's in Computer Science", "Java Developer"));
        userDataMap.put("002", new UserData("Jane Smith", "Master's in Business Administration", "Business Analyst"));
        // Add more user IDs and data as needed
    }

    protected void doGet(HttpServletRequest request, HttpServletResponse response) throws ServletException, IOException {
        // Assume we are trying to retrieve user data based on some ID
        String userId = request.getParameter("userId");

        // Retrieve user data from the simulated database
        UserData userData = userDataMap.get(userId);

        if (userData == null) {
            // Data not found, set an attribute to indicate error
            request.setAttribute("error", "Data not found for user ID: " + userId);
            request.getRequestDispatcher("/error.jsp").forward(request, response);
        } else {
            // Data found, set attribute and forward to display page
            request.setAttribute("userData", userData);
            request.getRequestDispatcher("/displayData.jsp").forward(request, response);
        }
    }
}
Step 4: Create the new JSP file and it named as request.html and its servlet can handle the client requests.
Go to src > java > webapps > request.html and put the below code.
HTML
<%@ page language="java" contentType="text/html; charset=UTF-8" pageEncoding="UTF-8"%>
<!DOCTYPE html>
<html>
<head>
    <meta charset="UTF-8">
    <title>Client Request Page</title>
    <style>
        body {
            font-family: Arial, sans-serif;
            background-color: #f2f2f2;
            margin: 0;
            padding: 0;
        }
        h1 {
            color: #333;
            text-align: center;
            margin-top: 50px;
        }
        form {
            max-width: 400px;
            margin: 20px auto;
            background-color: #fff;
            padding: 20px;
            border-radius: 5px;
            box-shadow: 0 0 10px rgba(0, 0, 0, 0.1);
        }
        label, input[type="text"], input[type="submit"] {
            display: block;
            margin-bottom: 10px;
        }
        input[type="text"], input[type="submit"] {
            width: 100%;
            padding: 10px;
            border-radius: 3px;
            border: 1px solid #ccc;
        }
        input[type="submit"] {
            background-color: #4CAF50;
            color: white;
            border: none;
            cursor: pointer;
        }
        input[type="submit"]:hover {
            background-color: #45a049;
        }
    </style>
</head>
<body>
    <h1>Client Request Page</h1>
    <form action="retrieveData" method="get">
        <label for="userId">Enter User ID:</label>
        <input type="text" id="userId" name="userId" required>
        <input type="submit" value="Retrieve Data">
    </form>
</body>
</html>
Step 5: Create the new JSP file and it named as displayData.html and it displays the server response data.
Go to src > java > webapps > displayData.html and put the below code.
HTML
<%@ page import="demo.UserData"  language="java" contentType="text/html;  charset=UTF-8" pageEncoding="UTF-8"%>

<!DOCTYPE html>
<html>
<head>
    <meta charset="UTF-8">
    <title>User Data</title>
    <style>
        body {
            font-family: Arial, sans-serif;
            background-color: #f2f2f2;
            margin: 0;
            padding: 0;
        }
        .container {
            max-width: 600px;
            margin: 20px auto;
            background-color: #fff;
            padding: 20px;
            border-radius: 5px;
            box-shadow: 0 0 10px rgba(0, 0, 0, 0.1);
        }
        h1 {
            color: #333;
            text-align: center;
        }
        .userData {
            margin-bottom: 10px;
        }
        .userData p {
            margin: 10px 0;
        }
        .userData p strong {
            font-weight: bold;
            margin-right: 10px;
        }
    </style>
</head>
<body>
    <div class="container">
        <h1>User Data</h1>
        <div class="userData">
            <p><strong>User ID:</strong> <%= request.getParameter("userId") %></p>
            <%
                UserData userData = (UserData) request.getAttribute("userData");
                if (userData != null) {
            %>
            <p><strong>Name:</strong> <%= userData.getName() %></p>
            <p><strong>Education:</strong> <%= userData.getEducation() %></p>
            <p><strong>Occupation:</strong> <%= userData.getOccupation() %></p>
            <% } else { %>
            <p>User data not found.</p>
            <% } %>
        </div>
    </div>
</body>
</html>
Step 6: Create the new JSP file and it named as error.html and it displays the error message if data is not found.
Go to src > java > webapps > error.html and put the below code.
HTML
<%@ page language="java" contentType="text/html; charset=UTF-8"
    pageEncoding="UTF-8"%>
<!DOCTYPE html>
<html>
<head>
    <meta charset="UTF-8">
    <title>Error</title>
    <style>
        body {
            font-family: Arial, sans-serif;
            background-color: #f2f2f2;
            margin: 0;
            padding: 0;
        }
        h1 {
            color: #333;
        }
        .container {
            max-width: 600px;
            margin: 20px auto;
            background-color: #fff;
            padding: 20px;
            border-radius: 5px;
            box-shadow: 0 0 10px rgba(0, 0, 0, 0.1);
        }
        .error {
            color: #FF0000;
        }
    </style>
</head>
<body>
    <div class="container">
        <h1>Error</h1>
        <p class="error"><%= request.getAttribute("error") %></p>
    </div>
</body>
</html>
Step 7: Once the project is completed, run it in the tomcat server then it will run the project on the port 8082.
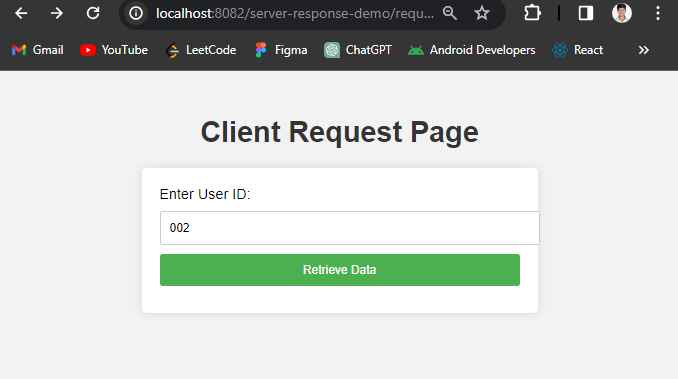
Output:
Request page:
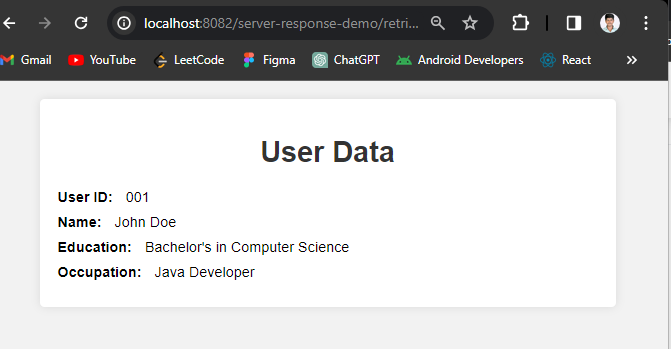
Response page:
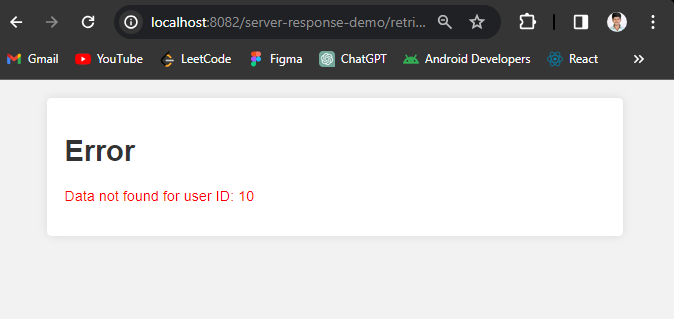
Error Page:
If we follow the above steps, then we can successfully develop the JSP Client Request then Server Response to the client with display the User Data as a result of the server.
Share your thoughts in the comments
Please Login to comment...