Java ActionListener in AWT
Last Updated :
13 Nov, 2023
The Java Abstract Window Toolkit (AWT) is a GUI framework that provides a set of classes and methods for creating and managing user interfaces in Java applications. One of the most important components in AWT is the ActionListener interface. It is a key element for adding interactivity in Java applications by handling user actions. In this article, let us understand about the ActionListener interface in detail.
In Java AWT, the ActionListener interface is a part of the ‘java.awt.event’ package. When you click on a button, menu item, or a check box, the Java ActionListener is called. It is notified in reference to an ActionEvent. It only has one method, actionPerformed(). The principle of an ActionListener is to record and respond to user interactions with GUI components.
Method of ActionListener
// When we click on the registered component, it triggers automatically.
public void actionPerformed(ActionEvent e)
Syntax of an ActionListener
1. At first, implement the ActionListener interface in the class.
public class Example Implements ActionListener
2. Configure the component with the Listener.
component.addActionListener(instance of the Listener class);
3. Override the actionPerformed method as a response to the method call.
public void actionPerformed(ActionEvent e){
           //Write the code here
}
Examples of AWT ActionListener
Given below are some examples that will help you to understand the workings of the ActionListener interface easily.
Example 1:
In this example, a simple ActionListener is implemented on a Button component. The text on the label is updated with the name entered in the TextField when the Button is clicked.
Java
import java.awt.*;
import java.awt.event.*;
public class Main {
public static void main(String[] args){
Frame f = new Frame("AWT ActionListener Example");
f.setSize(400, 200);
f.setLayout(null);
f.setVisible(true);
f.setBackground(Color.LIGHT_GRAY);
Button b = new Button("Click Me");
b.setBounds(160, 100, 80, 40);
f.add(b);
b.setBackground(Color.GREEN);
TextField tf = new TextField();
tf.setBounds(50, 50, 300, 30);
f.add(tf);
Label lb = new Label();
lb.setBounds(100, 150, 300, 30);
f.add(lb);
b.addActionListener(new ActionListener() {
public void actionPerformed(ActionEvent e){
lb.setText("Hey " + tf.getText() + "! "
+ "Welcome to GeeksforGeeks!");
}
});
}
}
|
Run the code using the following commands:
javac Main.java
java Main
Output:
ActionListener Example-1 GIF
Final Screen Output of the Example:
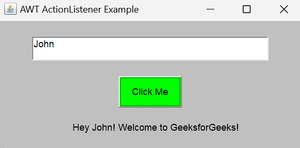
ActionListener Example-1 Image Output
Example 2:
In this example, when the “Order” button is clicked, the ActionListener calculates the total cost of selected food items and displays it in a message dialog.
Java
import java.awt.*;
import java.awt.event.*;
import javax.swing.*;
public class Main implements ActionListener {
JCheckBox cb1, cb2, cb3;
Main(){
Frame f = new Frame("AWT ActionListener Example");
Label l = new Label("Food Menu");
l.setBounds(150, 50, 300, 20);
cb1 = new JCheckBox("Pizza @ 100");
cb1.setBounds(100, 100, 150, 20);
cb2 = new JCheckBox("Burger @ 30");
cb2.setBounds(100, 150, 150, 20);
cb3 = new JCheckBox("Tea @ 10");
cb3.setBounds(100, 200, 150, 20);
Button b = new Button("Order");
b.setBounds(100, 250, 80, 30);
b.addActionListener(this);
f.add(l);
f.add(cb1);
f.add(cb2);
f.add(cb3);
f.add(b);
f.setSize(400, 400);
f.setLayout(null);
f.setVisible(true);
}
public void actionPerformed(ActionEvent e){
float amount = 0;
String msg = "";
if (cb1.isSelected()) {
amount += 100;
msg = "Pizza: 100\n";
}
if (cb2.isSelected()) {
amount += 30;
msg += "Burger: 30\n";
}
if (cb3.isSelected()) {
amount += 10;
msg += "Tea: 10\n";
}
msg += "-----------------\n";
JOptionPane.showMessageDialog(
null, msg + "Total: " + amount);
}
public static void main(String[] args) {
new Main();
}
}
|
Run the code using the following commands:
javac Main.java
java Main
Output:
Final Screen Output of the Example:

Share your thoughts in the comments
Please Login to comment...