Jupyter Notebook is a popular IDE (Integrated Development Environment) mostly used in Data fields. Jupyter Notebook is a very versatile platform. Here we can work with multiple programming languages with the help of changing kernels, we just need to use different kernels for different languages. Each kernel is responsible for interpreting and executing code in a specific language. And yeah, that’s it, Jupyter Notebook will let us work with multiple languages with ease.
For using different kernels for different programming languages, we need to install the appropriate kernels for each language separately, then we can seamlessly switch between different languages within the same Jupyter Notebook itself. Let’s now discuss how can we work in Jupyter Notebook with multiple languages.
1. Installing Jupyter Notebook
The first thing is to keep in mind whether we have Jupyter Notebook installed in our system or not. Without having our Notebook installed how are we going to work with languages?
For installing Jupyter Notebook there are a bunch of ways and methods, but in this article, we’re not discussing how to install it, it’ll take the whole article alone. So, to install Jupyter Notebook, simply open your command prompt and provide the following command:
This will install the Jupyter Notebook. But make sure you already have Python installed in your system. Because Pip is the Package Installer for Python, without having Python installed in your system, how are you gonna install Jupyter Notebook? So, consider that in mind and then install Jupyter Notebook.
2. Installing the Kernels for the Specific Languages
If we want to work in Jupyter Notebook with multiple languages, we first need to install the kernels for the specific languages, it’s also called Language-Specific-Kernels. The kernels in Jupyter Notebook are available for popular languages such as Python, R, Julia, and more. One way to install these kernels for different languages we can install kernels using package managers like pip (as we used it to install the Jupyter Notebook itself) or conda or by following language-specific instructions.
We don’t need to installed a specific kernel for Python, reason is that Jupyter Notebook comes with a default Python kernel and after installing Jupyter Notebook, we can instantly start working.
As we already have Python, now let’s try another language, let’s use R language in out Jupyter Notebook and create another kernel. To install the different kernel for R, we can use the following command:
R
conda install -c r r-essentials
|
It’ll install the R specific kernel separately and we’ll be eligible to work with R along with Python. There is another way to install R kernel in our Jupyter Notebook as well. Either we can use the above command or we can try the following commands as well:
R
install.packages("IRkernel")
IRkernel::installspec(user = FALSE)
|
We can simply open an R console and give the above commands or use command prompt as well. But we need to make sure that any programming language we want to work with in Jupyter Notebook or in terminal then also we first need to install the language itself.
Let’s see how can we install a separate kernel for Julia other than Python and R to use it in Jupyter Notebook. Here also first we need to install the Julia and then we can gop ahead and install its packages by giving the following commands:
Julia
using Pkg
Pkg.add("IJulia")
|
Other than these langauges, if we want to use another langauges in Jupyter Notebook, then we first need to check whether Jupyter supports them or not and if there are the kernels available for such langaues or not. This is because to work with multiple langauges in Jupyter Notebook, we need to switch between the kernels and use the specific kernels for the perticular langauges, and if there is not available any kernel for any specific langauge then Jupyter will not support that language.
Once we have installed the kernels for the langauges we want to work with in Jupyter Notebook then we can simply open jupyter notebook from either command prompt or anaconda prompt, as we want to and then in the Jupyter interface, there is an option “Kernel”, we can also check it by going to that option. To create a new file, we can simply go to the “new” tab in the Jupyter Homepage and after clicking new we will be able to the options of the langauges we have installed (for example, Python 3, R, Julia and all) and it’ll create a new file. We can write our code and execute it with ease.
In case we want to change our code cells within a single file, means if we want to write multiple code cells in a single notebook, then in this case we can simply click on the “kernel” tab and from the menu, we can choose the specific kernel according to our prefered kernel.
3. Launching Our Jupyter Notebook
Now our next step is to launch our Jupyter Notebook so that we can start working with our languages.
For this we just need to open our command promp or anaconda promp in case we are using anacoda, and simply type “jupyter notebook” and press enter and it’ll take us to the Jupyter homepage directly by opening a web browser window.
4. Creatign a New Notebook and work in Different Languages
Once we came to the home page of the Jupyter Notebook, we can now create a new notebook and start working with our prefered language. In the jupyter home page we can see a “new” tab, and on new tab we can see the languages as well. We can simplly select them and create a new notebook along with our choosen language. Once we created a new file, we can see the file name as untitled and by tapping there we cna rename the file name as well so that in future we won’t be losing the file we’ve created. To switch between languages, we just need to choose the appropriate kernel whenever we open a new notebook. For example, Python 3 for Python and R for R.
5. Writing Code and Adding Markdown Cells
Once we have created our new notebook successfully with the prefered lanaguge now we can start working there. We can write our code, run and execute with ease and also we can add markdown cells in case we want to add explanations, headings and formating inside.
We can also use key shortcuts to make our work easies. We can simply press “m” to switch to Markdown cell and “y” to switch again to code cells. To execute our code cells we can press (Shift + Enter (or Ctrl + Enter on Windows/Linux) or simply click the “run” tab to run the code. It’ll then display the output below the code block.
Examples of Using Different Languages in a Notebook
Let’s understand by seeing example of workign in Jupyter Notebook with multiple langaue, we’ll switch the kernels as well.
1) Python and R in the same Notebook
Python3
import numpy as np
python_array = np.array([1, 2, 3])
|
R
r_vector <- c(4, 5, 6)
sum_r <- sum(r_vector)
print(sum_r)
|
We won’t get any output in this Python cell, but we will see “15” in the R cell. Here, we began by generating a numpy array in the python cell and importing the NumPy library as np. Then, we transition to R, where “r_vector” is used to denote the sum of the R vectors, which is why 4 + 5 + 6 = 15.
2) Julia in Jupyter Notebook:
Julia
julia_array = [7, 8, 9]
sum_julia = sum(julia_array)
println(sum_julia)
|
The Julia cell will output “24” in this case. In this instance, we are building a Julia array much as we did in our earlier Python and R example. Additionally, it uses the “sum” function to compute the array’s total elements: 7+8+9 = 24.
7. Saving and Exporting our Notebook
Once our code has been written and run, we can save our notebook by selecting the save button. The “save” button is located in the top left corner, immediately below the “file” tab and next to the “+” symbol.

Jupyter Notebook
Once you saved the notebook, we can now download the notebook in any format as per our need and export it safely.

Jupyter Notebook
We can see the following formats we can download in:
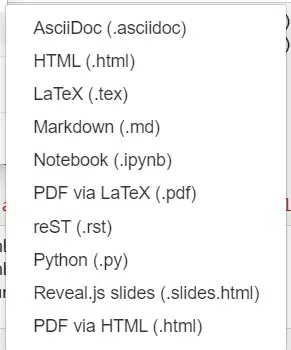
Jupyter Notebook File Formats
8. Shutdown and Cleanup
Once we’ve finished working with our notebook and we ensured that we’ve suceessfully saved it, then we should shut it down to release resources. We can do this in the Jupyter Interface, either by selecting the notebook we want to shutdown or we can go to the “running” tab and then shutdown the specific notebook we want to close once we’re done. If we’re not using a notebook or kernel, it’s always a good practice to shut down the kernel to free up memory.
If we want to work with less common languages, then we need to install additional kernels to work with those languages again. Remember to install the language specific kernels and use different languages separately. For that we can also search for community-contributed kernels on platforms like GitHub and follow their installation instructions.
Different methods of using different languages in the Jupyter Notebook
Till now, we have understood about how to install the specific kernels for different langauges and how to work wiht multiple langauges in Jupyter Notebook. We also saw that how to switch between kernels and how can we create multiples cells within a single notebook. Let’s see some more ways and methods to use the languages in Jupyter Notebook.
1) Using separate notebooks for each languages with different names
It’s always a good practice to use different notebooks for different langauges with different names of those notebooks so that we won’t ever get confused about which notebook contains which code and which one is for which work. By having this practice, our work won’t be messed up and can use them independently.
2) Using Magic Commands in the Notebook
There is a features in Jupyter Notebook, where we can use such commands to run and execute different langauges within a single notebook; and we call these commands as Magic Commands. These commands comes with a prefix either “%” or “%%”. We can simply give the command “%run” or “!” to run the cell and execute multiple programming languages wihtin a single notebook. Let’s now we’re writing our code in Python and then we want to switch it to R then we can simply use “%run” or “!” to switch between kernels and run securely.
3) Using Extensions in Jupyter Notebook
Not all Notebooks, but some Jupyter Notebooks extensions like “%%script” help us to specify various interpreter for the specific code cells. This can be useful when we’re working with multiple programming languages or mixed languages within a single notebook.
By understanding these methods, we can manage mixed langauges in Jupyter Notebook. These are some steps and methods to work in Jupyter Notebook with multiple programming langauges and keep a good practice. Hope this article was helpful and you got some valuable content.
Thanks for reading and happy exploring!
Share your thoughts in the comments
Please Login to comment...