Annotations are key-value pairs that are used to attach non-identifying metadata to Kubernetes objects. Various tools that are built over Kubernetes use this metadata attached by annotations to perform actions or enhance resource management. Labels and Annotations are used to attach metadata to Kubernetes objects. This makes annotations important for working with Kubernetes clusters. To learn more about Kubernetes cluster and its architecture refer to Kubernetes – Architecture.
Types of Information That Can Be Stored in Annotations
- Fields managed by declarative config layer.
- information related to Build and release.
- Name and version details.
- registry address, branch, Pull Request number, and image hashes.
- Pointers to various repositories for logging, monitoring, analytics, and audit.
Kubernetes Objects
Objects are the fundamental units in Kubernetes that represent the desired state of the cluster. The desired state means what containers should be running, on what nodes those containers should be running, what resources should be used for those containers, and some other features like policies, upgrades, fault tolerance, etc. To know more about Kubernetes Objects read this GeeksforGeeks article: Kubernetes – Services
Kubernetes Metadata
Metadata is the part of Kubernetes configuration file that consists of Labels, Resources and Attributes. In UI, this metadata is displayed by the container details.In Kubernetes configuration files, mostly metadata consists of “name” and “label”. Example can be given as follows. To know more about kubernetes deployment refer to Kubernetes – Deployments. Even kubernetes replica-set uses concept annotations.

Kubernetes Metadata includes the following:
- Kubernetes Attributes
- Resources
- Labels
How To Write Annotations
Annotations just like labels are key value pairs. Therefore for writing an annotation, we add a “key” and a corresponding “value” to the key. Kubernetes only allows keys and the values to be in string. therefore, any other data type (boolean, int, etc.) must be avoided. the syntax for annotations looks like the following.
Syntax:
"metadata": {
  "annotations": {
    "key1" : "value1",
    "key2" : "value2"
  }
}
1. Annotation Keys: For creating valid annotation keys, it must have a name, having a prefix is optional. you can use alphanumeric characters for the names and prefixes. You can use dashes (“-“), underscores (“_”) and dots (“.”) as separations. name and prefix are separated by a slash (“/”).According to the Kubernetes convention, private user keys don’t have prefix, while the system components in Kubernetes that add annotations to the end-user objects always holds a prefix. Examples can be “kube-scheduler” or “kube-controller-manager”.
An example of Annotation key that has a name and a prefix is following:
a8r.io/owner: “@1shubham7”
Here @1shubham7 is my GitHub username. An example of Annotation key that has a name but not a prefix is following:
description: "This is the description"
An example service file using Annotations looks like this:

a8r.io/owner represents the GitHub username, email address linked to the GitHub account, or unstructured owner description.
2. Values: Annotation Values are the values or information associated with the corresponding Annotation key. In the above example, Annotation value for a8r.io/owner is “@1shubham7”.
Convention For Annotations In Kubernetes Services
There is a Convention for Annotations in Kubernetes in order to ensure consistency and readability. A documented set of convention is given below:
|
a8r.io/owner
|
Add the GitHub username or email address linked to GitHub.
|
|
a8r.io/repository
|
Add link to the repository
|
|
a8r.io/runbook
|
Add link to external project runbook.
|
|
a8r.io/chat
|
Add a link to external chat system like Slack channels.
|
|
a8r.io/support
|
Add a link to external support center.
|
|
a8r.io/bugs
|
Add a link to external bug tracker.
|
|
a8r.io/description
|
You can add a description of the service file here.
|
|
a8r.io/incidents
|
Add a link to external incident dashboard.
|
|
a8r.io/dependencies
|
You can add some text for describing the service dependencies for humans.
|
|
a8r.io/performance
|
Add a link to external performance dashboard.
|
|
a8r.io/logs
|
Add a link to external log viewer.
|
|
a8r.io/uptime
|
Add a link to external uptime dashboard.
|
Step By Step Guide To Use Annotations
For using annotations in a Kubernetes services file, follow the given steps:
Step 1. Create a file and name it example.yaml. Enter the following command in your terminal to create a new file called
Example.yaml:
touch example.yaml
Step 2. Open a text editor for adding code to the file. Use can use the following command in your terminal to open vim text editor.
vim example.yaml
Step 3. Add the following code to the configuration file. Here we have created a services file and we are using the annotation key “a8r.io/owner” which corresponds to the value ‘@1shubham7″ which is a username.
apiVersion: v1
kind: Service
metadata:
  name: example
  annotations:
    a8r.io/owner: “@1shubham7”
spec:
  ports:
  - name: http
    port: 80
    targetPort: 8080
  selector:
    app: quote
Step 4. enter the following command in your terminal in order to get all the services that have been created in your local machine.
kubectl get services
If you have never created any services, then only auto-generated Kubernetes service will be shown in the output.

Step 5. apply the configuration file to create a Kubernetes service named example
kubectl apply -f example.yaml
Now when you enter the following command in your terminal in order to get all the services that have been created in your local machine:
kubectl get services
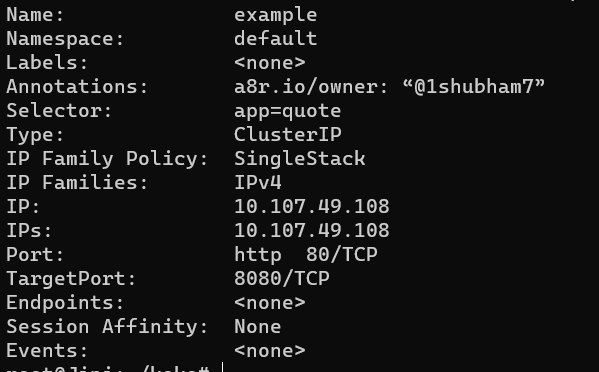
you will the example service in the output along with other services:

Step 6. Enter the following command in your terminal to display detailed information about the example service:
kubectl describe service example
This will output a detailed information about the example service. In the “Annotations” part you will find the annotations created by in previous steps:
Or you can also check annotations by using the following command in your terminal:
kubectl get service example -o jsonpath='{.metadata.annotations}'
This will give you an output similar to this:

Here we can see that we have an annotation key (“a8r.io/owner”) and a value (“@1shubham7”) corresponding to it.
How To Add Annotations Using Cli Commands
We discussed above about how to add annotations in a configuration file, now we will be discussing how to add annotations in the CLI itself. note that we will continue the same example.yaml service file from above and add annotations to the example service created above. In order to add annotations with the CLI commands, follow the given steps:
Step 1. Enter the following command in your terminal to find current annotations:
kubectl describe service example | grep -i "anno"
This will give a list of the current annotations. The output will be:

This is the annotation we created in the step by step guide above.
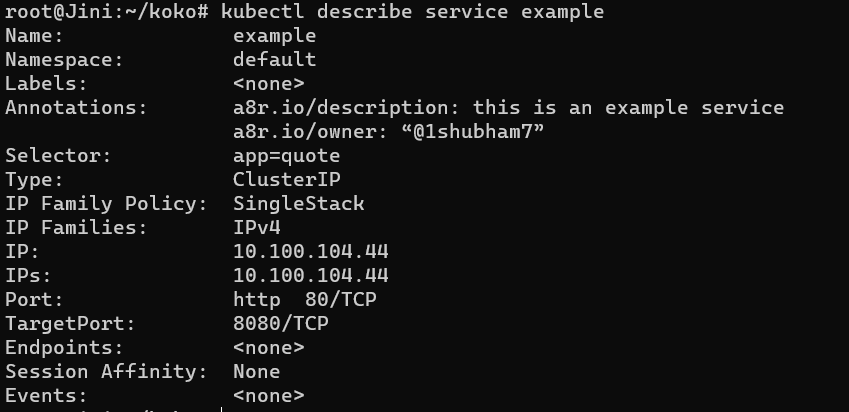
Step 2. “kubectl annotate” is used to add annotations in the service directly using CLI. Enter the following command in the terminal:
kubectl annotate service example a8r.io/description="this is an example service"
The annotation has been added to the example service. This will give you a similar output:

Step 3. You can view the current annotations by the command we used before:
kubectl describe service example | grep -i "anno"
Since we have added a new annotation, we will get the new annotation in the output:

We can also find annotations by the “kubectl describe service” command. you can do that by adding the following command in the terminal:
kubectl describe service example
Performing CRUD In Kubernetes Annotations
In this section we will discuss how to create, update and delete Kubernetes annotations. All these operations are performed by the “annotate” command in the CLI. We will learn how to add an annotation, update a single annotation, update all annotations in a namespace and how to delete an annotation.
Adding An Annotation
For adding an annotation, we simply use the “annotate” command as we used earlier, Enter the following command in your terminal:
kubectl annotate service example description='this is the example description'
and you can check the information about the service by “kubectl describe” command like before:
kubectl describe service example
This will give an output wiith an additional annotation in our example service:

Updating An Annotation
For updating an annotation we the –override flag in the annotate command
kubectl annotate [--overwrite] (-f FILENAME | TYPE NAME) KEY_1=VAL_1 ... KEY_N=VAL_N [--resource-version=version]
For simpler explanation, since we are using a service, we can use this command for updating an annotation
kubectl annotate service [NAME] --override [KEY]='[VALUE]
For example, in order to update the description annotation, enter the following command in your terminal
kubectl annotate service example --overwrite description='this is the new description'
And now if you check the information for the service by using “kubectl describe” command like before:
kubectl describe service example
You will get the following output with the updated annotation:

Updating Annotation In All The Services
To update annotation in all the services in a namespace we use the –all flag. We use the following command syntax in the terminal:
kubectl annotate services --all description='changing description of all services'
Similarly to Update the annotations of all the pods, we use the command given below.
Updating Annotation In All The Pods
Similar to updating annotations in all the services together, to update annotations in all the pods in a namespace we use the –all flag. We use the following command syntax in the terminal:
kubectl annotate pods --all description='changing description of all services'
Deleting An Annotation
For deleting an annotation, we use a dash (“–“) at the end of the annotation key. For deleting the description annotation, enter the following command in your terminal:
kubectl annotate service example description-
This will delete the description annotation and now when you use
kubectl describe service example
for checking the example service information. You will see we have only two annotations left and the description annotation is deleted. You will see a similar output:

Benefits of using Annotations
- Human Service Discovery: We often realise the need for human service discovery when the production breaks or when we have better metrics to implement. Using annotations early helps in having human service discovery later.
- Building Versions: Using annotations is an essential part of the building an effective “version 0” of the services.
- Documentations: Annotations also helps in documenting the services so that is easier for others to understand the services.
- Tooling: Various Tools and Kubernetes client side libraries uses the metadata attached by Annotations.
- Versioning: As we discussed in the Introduction of the article, annotations can be used for providing version information, registry address, branch and Pull Request number in Git and image hashes.
- Integration With External Systems:Annotations can be used to store references or metadata required by external systems or services. This helps in integration with CI/CD pipelines, external databases, or configuration management systems.
Difference Between Annotations And Labels In Kubernetes
|
Attaches non-identifying metadata:
Annotations are used to attach non-identifying metadata to the objects. Various tools that are build over Kubernetes use this metadata attached by annotations to perform actions or enhance the resource management.
|
Attaches identifying metadata:
Labels are used to attach identifying metadata to Kubernetes objects that Help in selecting, grouping, or filtering Kubernetes objects
|
|
In annotations, keys contains of a name and an optional prefix
|
in Labels, keys must have both – name as well as a prefix
|
|
The metadata attached by annotations can be short or long and structured or unstructured.
|
The metadata attached by Labels should be Short and unstructured
|
|
Annotations store additional information like description, name ,version details etc.
|
Labels stores information to Identify objects, Group objects, manage Kubernetes costs etc.
|
Similarities Between Annotations And Labels In Kubernetes
- Both annotations and labels are key-value maps. In both Annotation and labels we have a key and a corresponding value attached with it. These keys and values in both annotations and labels are strings and cannot be of any other datatype (boolean, int etc.)
- Both annotations and labels are used to attach metadata to Kubernetes resources. They are used to provide context, documentation, or categorization for resources. This metadata is then used later on by libraries and tools build upon Kubernetes.
- Both annotations and labels offer flexibility for storing data. We can use annotations and labels both to store custom metadata respective to our needs.
Conclusion
In this article we discussed about Annotations in Kubernetes. we started with the definition of annotations that is – Annotations are the key value pairs associated with Kubernetes objects that are used to attach non-identifying metadata to the objects. then we discussed topics like Kubernetes Objects and Metadata. We also discussed how to use Kubernetes Annotations which was the center theme of this article. We discussed a step by step guide to create annotations with examples and proper code snippets. We also learned about adding, updating and deleting annotations which is mostly done using the “kubectl annotate” command. After that we discussed Benefits or annotation, differences and similarities between annotations and labels in Kubernetes. Finally, we discussed some Frequently asked questions on annotations.
FAQs On Kubernetes Annotations
1. Is It Necessary To Add Annotations In A Service File?
No, it is not necessary to add Annotations in a service file
2. Can We Add Annotations On The Services In Cli?
Yes, we can add annotations on the services in CLI by using command “kubectl annotate” but it is not the recommended method.
3. Are Annotations Same As Labels?
No, Annotations and labels are different and serve a different purpose.
Share your thoughts in the comments
Please Login to comment...