Easily Solve 4×4 Cube – Step by Step Guide
- Solve the center pieces
- Pair similar edge pieces
- Turn only the outer layers, and solve it like a 3×3 Rubik’s Cube
The 4×4 Rubik’s Cube, also known as the Rubik’s Revenge, is an interesting twisty puzzle that challenges even expert cubers. Unlike its 3×3 counterpart, the 4×4 cube introduces additional complexity due to its larger size and more complex mechanisms.
So grab your cube and let’s explore the world of cubing, separating the layers of color and discovering the joy of mastering the Rubik’s Cube 4×4!

What is Rubik’s Cube
The Rubik’s Cube, originally known as the Magic Cube, is a 3-D mechanical twisty puzzle invented by Hungarian sculptor and professor of architecture Ernő Rubik in 1974. This iconic puzzle has captured the imagination of millions worldwide and remains a popular brain-teasing challenge.
Key Facts about the 4×4 Rubik’s Cube
- Inventor: The 4×4 Rubik’s Cube was designed by Sebestény Péter, and it’s a Hungarian invention.
- Variations: This cube can be used as a 2x2x2 (by not turning the outer layers) or as a 3x3x3 (by rotating only the outer layers).
- Permutations: There are a staggering 7.4×10^45 possible permutations for this puzzle.
- Components: The 4×4 cube has 24 edges, 24 centers, and 8 corner fields.
How to Solve a 4×4 Cube- The Rubik’s Revenge
Step 1: Familiarize Yourself with the Rubik’s 4×4 Cube
- Rubik’s Cube is made up of edge, corner, and center pieces.
- Rubik’s Cube has 24 center pieces, 24 Corner pieces and 24 edge pieces.
- Rubik’s Cube has no fixed center piece to indicate the color of each face.

Understanding Rubik’s 4×4 Cube
Understanding 4X4 Rubik’s Cube Color Layout
Red, White, and Blue faces of the cube are on one side and the Green, Orange, and Yellow faces are on opposite side.
| White Color |
Opposite is |
Yellow |
| Red |
Opposite is |
Orange |
| Blue |
Opposite is |
Green |
Step 2: Understating the Move Notation Algorithm
An Algorithm is a sequence of moves that you need to do in a specific order in order to solve Rubik’s Cube.
- When observing a face directly, a turn is considered clockwise. If a letter is followed by an apostrophe (‘), it indicates an inverse or counterclockwise turn of that face.
- Lower-case letters mean turning 2 layers of the corresponding face.
- “2” before the face letter (e.g. 2F) means moving only the internal layer of the corresponding face.
- If the letter is followed by 2 (e.g. F2), then turn the layer clockwise twice.
For Example: F u’ r L2 u -> Turn the outside front layer clockwise once, the inside up layer counter-clockwise once, the inside right layer clockwise once, the outside left layer clockwise twice, and the inside up layer clockwise once.
Notation Convention for understanding the steps:
- U = upper layer
- u = layer just below upper layer
- R = rightmost side
- r = layer just left of rightmost side
- L = leftmost side
- l = layer just right of leftmost side
- B = Back layer
- F = Front layer
- D = Down (Bottom) layer
Face rotations (similar to the 3×3 cube):
- F: Turn the front face clockwise 90 degrees.
- F’: Turn the front face counterclockwise 90 degrees (F prime).
- B: Turn the back face clockwise 90 degrees.
- B’: Turn the back face counterclockwise 90 degrees (B prime).
- R: Turn the right face clockwise 90 degrees.
- R’: Turn the right face counterclockwise 90 degrees (R prime).
- L: Turn the left face clockwise 90 degrees.
- L’: Turn the left face counterclockwise 90 degrees (L prime).
- U: Turn the upper face clockwise 90 degrees.
- U’: Turn the upper face counterclockwise 90 degrees (U prime).
- D: Turn the bottom face clockwise 90 degrees.
- D’: Turn the bottom face counterclockwise 90 degrees (D prime).
Double-layer rotations:
- Rw: Turn the two rightmost columns (including the right face) clockwise 90 degrees.
- Rw’: Turn the two rightmost columns counterclockwise 90 degrees (Rw prime).
- Lw: Turn the two leftmost columns (including the left face) clockwise 90 degrees.
- Lw’: Turn the two leftmost columns counterclockwise 90 degrees (Lw prime).
- Fw: Turn the two frontmost columns (including the front face) clockwise 90 degrees.
- Fw’: Turn the two frontmost columns counterclockwise 90 degrees (Fw prime).
- Bw: Turn the two backmost columns (including the back face) clockwise 90 degrees.
- Bw’: Turn the two backmost columns counterclockwise 90 degrees (Bw prime).
- Uw: Turn the two uppermost layers (including the upper face) clockwise 90 degrees.
- Uw’: Turn the two uppermost layers counterclockwise 90 degrees (Uw prime).
- Dw: Turn the two bottommost layers (including the bottom face) clockwise 90 degrees.
- Dw’: Turn the two bottommost layers counterclockwise 90 degrees (Dw prime).
Slice moves:
- M: Middle slice. Turn the vertical slice between the left and right faces clockwise 90 degrees.
- M’: Middle slice counterclockwise 90 degrees (M prime).
- E: Equatorial slice. Turn the horizontal slice between the upper and bottom faces clockwise 90 degrees.
- E’: Equatorial slice counterclockwise 90 degrees (E prime).
- S: Standing slice. Turn the horizontal slice between the front and back faces clockwise 90 degrees.
- S’: Standing slice counterclockwise 90 degrees (S prime).
Step 3: Solving the Center 2×2 Pieces
The first step is about completely solving the 6 center blocks, which are 24 pieces in total.
Solve the 1st Center Block
Solving the first center block is straightforward with no pieces to maintain on other sides. Begin by aligning 2 center pieces adjacent to each other and then bring the 3rd and 4th pieces next to them.
Execute an r’ move to bring down the upper-right yellow center piece from the top face to the front face, aligning it adjacently with the front face’s center piece. Follow with an F move to position both pieces on the right side of the front face. Finally, perform an r move to bring both pieces back up to the top face and complete the yellow center block. Adjust the yellow piece on the front face using F turns if it’s in a different position. The same applies to the top face if needed.
In the below image we have begin with the yellow color.

Solve the 1st Yellow 2×2 Center Block First
Solve the 2nd Center Block
Now, let’s move on to the second center block, which should have a color opposite to the previously solved one. In this case, since we just completed the yellow center block, we will now focus on the white center block. To do this, flip the cube upside down so that the yellow center block is on the bottom layer. The approach to solve the white center block involves repositioning the white center pieces one by one or in pairs into the top face while ensuring the already solved yellow center block on the bottom remains unchanged. Since the only pieces that need to be preserved are the bottom and top centers, you can freely turn the F, B, R, and L layers.
- Execute an r’ move to bring down the non-white center pieces from the top to the F face.
- Switch these pieces with the 2 white pieces by performing F2. (Note that the 2 yellow pieces on the back face will return to their solved position in the next move.)
- Finally, reverse the r’ move with an r move, and the white pieces will be correctly positioned on the top face, leaving all yellow pieces on the bottom unchanged.

Solving the White Center 2×2 Blocks
Solve the 3rd Center Block
In this step, we’ll focus on solving the third center block using the Red Color. To start, rotate the cube so the already solved center blocks (yellow and white) are on the R and L faces. Then, rotate the cube again so these solved centers appear on the top face while keeping yellow and white on the R and L faces. If necessary, make some U turns to align the two red center pieces on the left side of the top face.
For First Two Red Pieces:
- Make a U’ move.
- Perform the r move to bring them together
- Make a U move to align both pieces on the left.

Pairing-up to adjacent red center pieces on top
Solve the remaining 2 Red Pieces Together
The optimal approach is to place one red center piece on the internal left side of the cube and the second piece on the right side.
- Execute an r/r’ move to pair them up.
- Execute F2 to reposition a piece to the left side.
- Perform r’ to pair them up.
- Use F to align them on the right side.
- Complete with an r move for the final position on the top face, solving all 4 red center pieces.

Solving last 2 red center piece
The 4th center block:
Next, let’s focus on the fourth center block, which should have a color opposite to the one we just solved. Now, flip the cube upside down so the red center is on the bottom face, while keeping yellow and white on the L and R faces.
For First 2 Orange Blocks:
- Start with r’ to lower the elevator with non-orange pieces.
- Use F’ to upload a piece to match the orange one on top.
- Execute r to elevate the elevator back up.
- Make a U move to align both pieces on the left side, freeing the elevator for the next pieces.

Solving first 2 orange center pieces
Solve the remaining 2 Orange center pieces
- Perform an r’ move to lower.
- Use an F move to upshift the orange piece.
- Execute an r move to move the orange center piece into the solved position.
Note: Do not make an [r] move, because there are red center pieces to preserve on the bottom)

Solving third orange center piece
To align the last center piece, follow the same steps as before, and the 2×2 Orange center block will be properly aligned.
- Execute F2 to position the orange piece on the left internal side of the cube, adjacent to the other orange piece for the next move.
- Make an r’ move to lower it down.
- Perform an F move to upload both pieces.
- Use an r move to up shift and solve the entire orange center block.
Solve the 5th & 6th center blocks together
Both the last 2 center blocks are solved simultaneously since solving one color automatically positions the other color pieces in the opposite center. For this step lets begin with green color and determine its correct position out of the 2 available places. The green color should be on the right. To proceed, flip the cube so that the face-to-be with green will be on top.
Solve the last 2 Green centers Blocks first
- Get 2 adjacent green pieces on the top layer (likely already there) and align them to the left.
- Position a green center piece on the left side using U moves
- Perform an r2 move and check if 2 adjacent green pieces are formed on the top face.
- If yes, align them with U/U’ move on the left side, then r2 to reverse.
- If no, reverse the r2 move, and use D moves on the bottom face to reposition a green piece on top to match the existing one.
Solving 2 green center pieces
Solve the Remaining 2 Green Center Pieces
In this step, there are two possibilities to consider – either only one piece is on the bottom, or both pieces are on the bottom.
If one piece is on top
- Align the green center piece on the bottom to the left side of the bottom face using D/D’ moves so it will match adjacent to the second green piece during the next r2 move.
- Perform an r2 move to match up the 2 green center pieces.
- Use D/D’ moves to align both pieces on the right side of the bottom center.
- Execute an r2 move to bring both pieces up to the top, solving all green pieces.
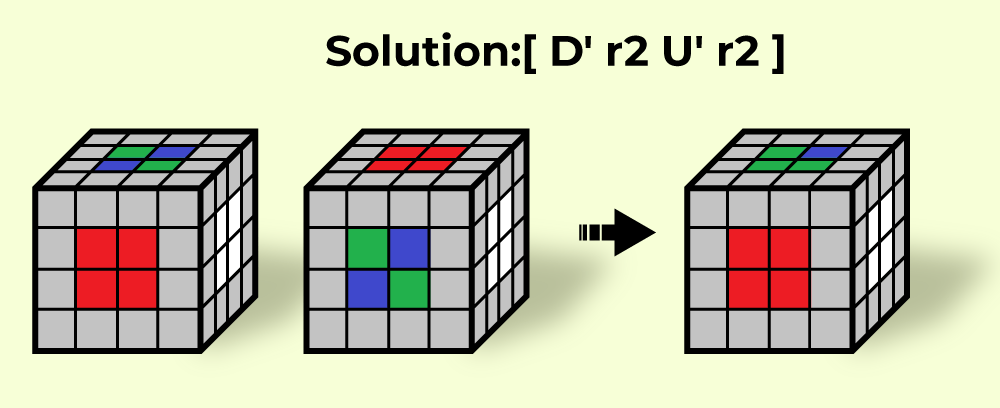
If both pieces are on the bottom
There are two possible cases: adjacent or diagonal to each other.
Diagonal Case: [ r2 D/D’ r2 ]
- Make an r2 move to lift one green piece to the top layer.
- Use a D/D’ move to position the remaining green piece on the bottom to the second available spot on the left side, so it will be adjacent to the second piece currently on top when it comes back down during the next move.
- Perform an r2 move to bring the green piece back down, and now the green center pieces are adjacent to each other. Proceed according to the instructions for the adjacent case below.

Solving the 4th green center piece
Adjacent Case: [ r2 D2 r2 ]
- Align both green pieces to the left side of the center area at the bottom using D/D’ moves.
- Execute an r2 move to lift both green pieces upwards.
- Perform a D2 move to position both green pieces on the right side, preparing them to be lifted upwards during the next move.
- Finally, reverse the r2 move to bring the green centers to the top face and complete the solution for the green (& blue) center block.

Solving last 2 green center pieces
Step 4: Pairing-up all Edge Pieces
There are 12 edge blocks to solve, which means we need to solve total of 24 edge pieces.
Solving the first 4 Edge Blocks
Using this method you’ll be able to quickly pair-up and store on top/bottom the first 8 edge-blocks.
- Pair up two edge pieces into a block without affecting any center piece by doing a d move.
- Use the R move to move the formed edge block upwards into the top layer.
- Secure the block on the top by making a U/U’/U2 move (choose based on existing edge blocks on the top to avoid disrupting solved ones).
- To ensure other pieces are not affected, complete the process with R’ d’ move.
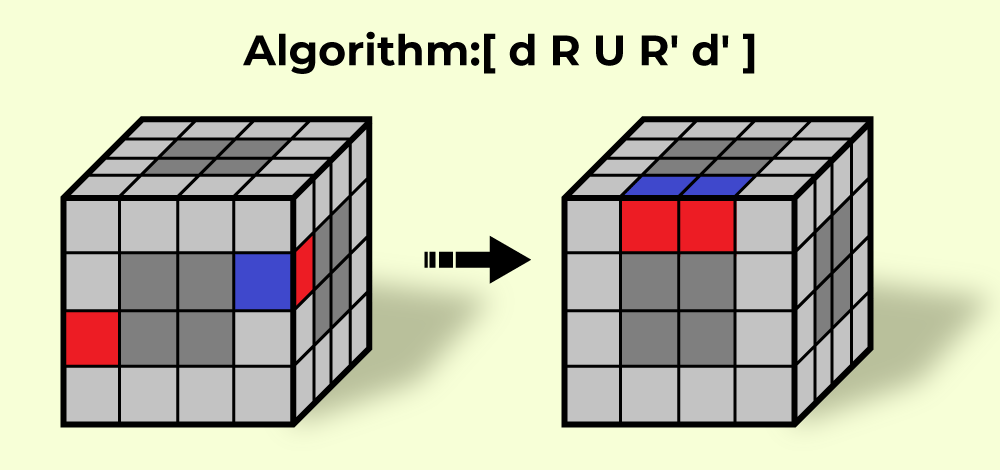
Forming an edge block
Bring the edge pieces into the case
- Use R2/L2/F2/B2 moves and U/D moves to bring both edge pieces to the same face.
- Follow a quick algorithm (mentioned din the below image) to position the 2 edges into the desired position.

Positioning edge pieces into desired position
By applying the method described above, you can align all 8 first edge pairs into the simple case position.
Solve the 4th Edge Blocks
- In the below image, 3 edge blocks are already formed, and the fourth one is split on the F face.
- The first 3 moves reposition the bottom edge piece to the “ideal” case where they both end up on the side faces with different colors on the F face.
- Afterwards, apply LD’L > d’L’ULd algorithm.

Solve the 4th Edge Blocks
Solve the 5th-8th Edge Blocks
- Flip the cube upside down to position all the paired-up edge pieces on the bottom layer.
- Use the same algorithms and concepts discussed above to solve the next 4 edge pairs.
- Execute – [R U R’] to move the edge block into the top layer while making the bottom edge blocks unchanged.

Solve the 5th-8th Edge Blocks
Solving the last 4 edge blocks:
In this step, our goal is to have the two twin edge pieces with the same color on their opposite face (as shown in the image below).
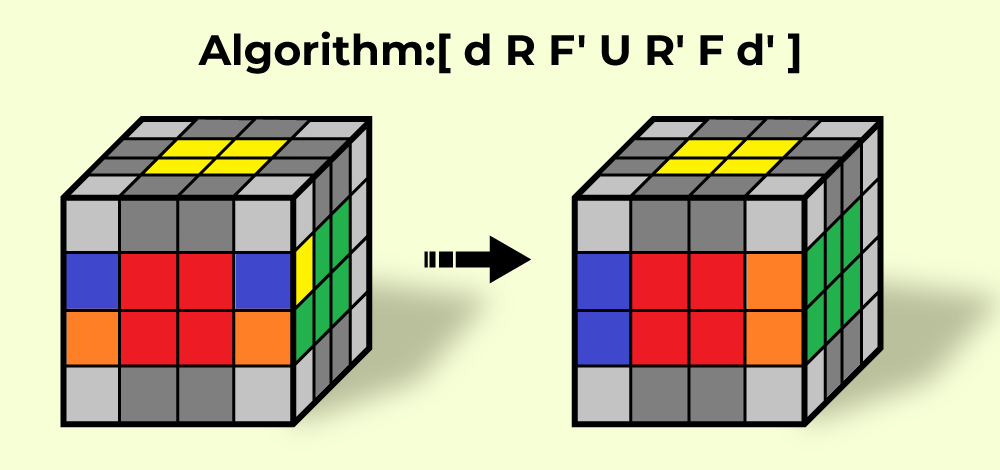
Solving the last 4 edge blocks using dRF’UR’Fd’
The below steps will solve 1 edge block out of the 4 remaining, and continue until all 4 are solved.
- The below image algorithm will flip the 2 edge pieces between the front and right faces, ensuring they match the desired case above.
- Even if only one edge pair has the same color on the mutual face while the second pair does not have it, execute the algorithm regardless.
- Now all edge pieces should be paired up with each other.
- The cube will now resemble like a regular 3×3 Rubik’s cube.

Solving the last 4 edge blocks and making it look like a 3×3 Cube
Step 5: Solve like 3×3 Rubik’s Cube
Upon reaching this step successfully, the cube will resemble a typical 3x3x3 Rubik’s cube. From this point, you can complete the cube by solving it like a 3×3, making turns only on the outer layers. Treat the center blocks as a single center piece and the edge blocks as single edge pieces.
Note: Carry on with the regular 3×3 Rubik’s Cube solving method until you reach the last layer. This approach is necessary due to two special cases, known as parities, which can occur in the 4×4 cube but are not possible in the 3×3 cube.

Now Solve like 3×3 Rubik’s Cube
Step 6: Solve the Last Layer (OLL & PLL parities)
These are the possible cases that can happen during the solution of a 4×4 cube:
What is OLL parity?
OLL parity occurs when only one edge block is not oriented, and this scenario is impossible in a regular 3×3 cube. The probability of encountering OLL parity during a 4×4 solve is 50%.
The algorithm we will use to fix OLL parity is as follows.
r U2 x r U2 r U2 r’ U2 l U2 r’ U2 r U2 r’ U2 r’
.webp)
Understanding OLL Parity and PLL Parity in Rubik’s Cube 4×4
What is PLL parity?
PLL parity occurs when only 2 edge pieces remain unsolved while the rest of the cube is fully solved. This situation cannot happen on a 3×3 cube due to specific reasons. It is used at the end of the solving process after solving all other last layer pieces. The probability of encountering PLL parity during a 4×4 solve is 50%.
To fix PLL parity, we use the following algorithm which swaps the front and back edge pairs:
2R2 U2 2R2 u2 2R2 2U2

Top View of PLL Parity Case In Rubik’s Cube 4×4
Important Note: Following this guide may lead to encountering a weird situation even if you follow the instructions correctly because there are chances that your cube may have a different color scheme.
Conclusion
Solving a Rubik’s Cube 4×4 is a rewarding challenge that requires a combination of techniques from both the 3×3 and 4×4 solving methods. By mastering the reduction method, we can transform the 4×4 cube into a series of 3×3-like solving stages, making the task more approachable. Throughout the process, it is crucial to remember the parity cases, namely OLL parity and PLL parity, which are unique to the 4×4 cube and can be resolved using specific algorithms. Remember that every Rubik’s Cube solver has their own pace of improvement, so do not be discouraged by initial difficulties. With determination and perseverance, you can attain the satisfaction of solving the Rubik’s Cube 4×4 and take pride in your newfound cubing skills. So, whether you are a beginner or 3×3 Cube expert, take on the Rubik’s Cube 4×4 with confidence, knowing that with practice and dedication, you can conquer this multi-layered puzzle and unlock the joy of solving even bigger challenges in the world of cubing.
Share your thoughts in the comments
Please Login to comment...