How to Execute a SQL Script File using JDBC?
Last Updated :
05 Apr, 2024
JDBC stands for Java Database Connectivity. It is an API (Application Programming Interface) that allows developers to connect their Java code to any SQL database instance. The connection gives the power to developers to execute any SQL queries, be it creating, updating, or data retrieving queries, programmatically using Java. This gives developers the freedom to write logical code which includes a Database.
Steps to execute a SQL script file using JDBC
Below are the implementation steps to execute a SQL script file using JDBC.
Step 1: Creating a new Project
Create a new project in any preferred IDE as per choice.
Step 2: Add JDBC to the project
- Download the JDBC connector from its official website and add it to the project files as an external library.
- This step adds the SQL connector containing essential classes that are required to make a connection with the SQL Instance.
- SQL Connectors are available for various SQL vendors, such as MySQL, PostgreSQL, SQLite, Microsoft SQL Server, etc. We need to install the correct SQL Connector to establish the connection between the Java class and the SQL Instance.
Note: Here, we are using MySQL connector as we will be working with MySQL to demonstrate how to execute a SQL Script file using JDBC.
Step 3: Copy the Script file inside the project folder.
Copy the script file stored in the computer and paste it inside the project folder.
Remember, the path of the file as it needed to read the SQL Script written inside the file.
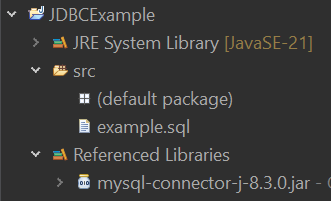
Here, we can see the project folder which contains MySQL connector and the SQL script file: example.sql.
Here is the example.sql Script file that will be executed using JDBC.
-- Create a new table
CREATE TABLE students (
    id INTEGER PRIMARY KEY,
    name TEXT NOT NULL,
    age INTEGER,
    grade TEXT
);

-- Insert some data into the table
INSERT INTO students (id, name, age, grade) VALUES (123, 'Alice', 20, 'A');
INSERT INTO students (id, name, age, grade) VALUES (456, 'Bob', 22, 'B');
INSERT INTO students (id, name, age, grade) VALUES (789, 'John', 25, 'A+');

-- Update some data
UPDATE students SET age = 21 WHERE name = 'Alice';

-- Delete a record
DELETE FROM students WHERE name = 'Bob';

-- Read data
SELECT * FROM Students;
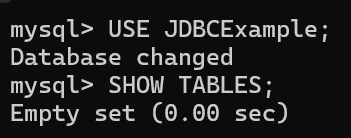
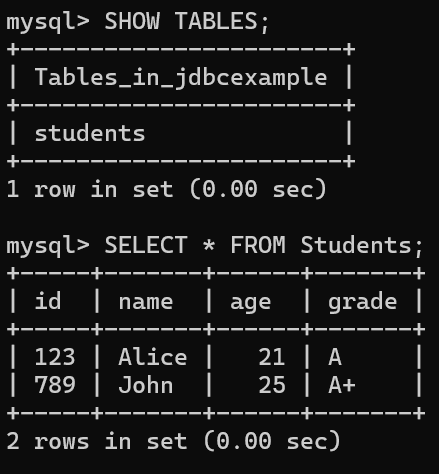
- The Database JdbcExample contains nothing, but after executing this script file, it will contain a table named Student and the table will contain two rows of data.
- This SQL Script file is demonstrating the most commonly used queries, CREATE, INSERT, UPDATE, DELETE and SELECT.
Step 4: Create a new class
Now we will create a new Java class inside our project. Import the java.sql library using the following line:
import java.sql.*;
- Inside the main function make a try-catch block.
- A try-catch block is needed when we try to make a connection with the SQL Instance.
- Try-catch is compulsory as it won’t compile without it and is also considered as a good practice when connecting with any instance over the internet because there are several things that could go wrong while making the connection.
- This prevents our program to stop suddenly during runtime.
Try-catch block:
try {

}
catch (Exception e) {
    System.out.println(e.toString());
}
Inside the try block, make a Connection variable and connect it using DriverManager.getConnection() to the SQL Instance. getConnection() function requires three arguments, URL, Username and Password.
General syntax of URL is:
jdbc:<vendor>://<server-address>:<port-number>/<database-name>
- jdbc: This is a constant prefix that identifies the connection as a JDBC connection.
- <vendor>: It specifies the database vendor which you are connecting to. For example: MySQL, SQLite etc.
- <server-address>: Server location address.
- <port-number>: The port of the address at which the SQL Instance is listening to.
- <database-name>: Which database to connect with.
Note: Here, the vendor is MySQL, and the URL is localhost and port is 3306. Replace the “username” and “password” with the actual username and password.
So, the connection can be made like this:
Connection con = DriverManager.getConnection("jdbc:mysql://localhost:3306/JdbcExample", "username", "password");After the connection variable is made successfully, we will make a Statement variable. Through this statement variables we can execute queries and updates inside the database in the MySQL Instance using Java.
Statement s = con.createStatement();
Methods inside Statement variables:
Methods
| Usage
|
|---|
executeQuery()
| Executes SQL query and then returns ResultSet.
|
|---|
executeUpdate()
| Executes a SQL INSERT, UPDATE or DELETE query and returns the number of rows affected.
|
|---|
execute()
| Executes any SQL query and returns a boolean value indicating type of return, true for a ResultSet, false for number of rows or no result.
|
|---|
addBatch()
| Adds a set of parameters to the batch of the commands to be sent to the database execution.
|
|---|
clearBatch()
| Clears the current batch of statements.
|
|---|
executeBatch()
| Executes the batch of commands and return an array of update counts.
|
|---|
Program to Execute a SQL Script File using JDBC
Reading the SQL File line by line and executing.
We will write program to read each line one by one and execute the query once a semicolon occurs. If the line starts with ‘– ‘, that means that SQL line is a comment, so we ignore that line.
Java
import java.io.BufferedReader;
import java.io.FileReader;
import java.sql.*;
public class jdbc_example {
public static void main(String[] args) {
try {
// Creating a connection between Java class and Database instance
Connection connection = DriverManager.getConnection("jdbc:mysql://localhost:3306/JdbcExample", "USERNAME", "PASSWORD");
Statement statement = connection.createStatement();
// path to our SQL Script file
String filePath = "Path";
BufferedReader br = new BufferedReader(new FileReader(filePath));
// String Builder to build the query line by line.
StringBuilder query = new StringBuilder();
String line;
while((line = br.readLine()) != null) {
if(line.trim().startsWith("-- ")) {
continue;
}
// Append the line into the query string and add a space after that
query.append(line).append(" ");
if(line.trim().endsWith(";")) {
// Execute the Query
statement.execute(query.toString().trim());
// Empty the Query string to add new query from the file
query = new StringBuilder();
}
}
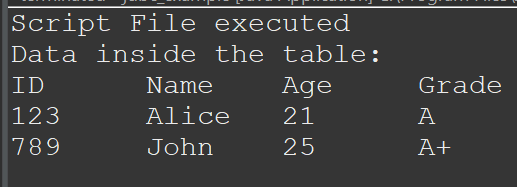
System.out.println("Script File executed");
System.out.println("Script File executed");
System.out.println("Data inside the table:");
System.out.println("ID\tName\tAge\tGrade");
// Getting the ResultSet after executing the Script File
ResultSet resultSet = statement.getResultSet();
while (resultSet.next()) {
// Getting the data inside the columns
int id = resultSet.getInt("id");
String name = resultSet.getString("name");
int age = resultSet.getInt("age");
String grade = resultSet.getString("grade");
System.out.println(id + "\t" + name + "\t" + age + "\t" + grade);
}
}
catch (Exception e) {
// Error handling Statements
System.out.println(e.toString());
}
}
}
Output:
Below is the console output of the program. We can see below all the data inside the table has printed.
The Database Before executing Java file:
The Database after executing the Java file:
Share your thoughts in the comments
Please Login to comment...