How to Enable HTTPs in Spring Boot Application?
Last Updated :
16 Apr, 2024
In today’s world security is the most important parameter while implementing any task. In Spring Boot, security is paramount. If we are developing a web application using spring boot, then enabling the HTTPs (Hypertext Transfer Protocol Secure) is the most crucial step to protect important data and other major things. Below is the process of configuring and enabling the HTTPs in a Spring Boot Application.
Enabling HTTPs in Spring Boot Application
HTTPs stands for Hyper Text Transfer Protocol Secure. When Spring Boot Application starts, by default it uses the HTTP 8080 port. To configure HTTPs protocol and port 443 in the spring boot application, we have to follow the below 2 steps.
- Create the SSL/TLS Certificate – A self-signed certificate or we can get it from a certificate authority.
- Enable HTTPS protocol and port number 443
Prerequisites
A list of prerequisites will be needed before getting started.
Step By Step Implementation
Here we will discuss the step-by-step guidance on configuring HTTPs on a spring boot application and how to use SSL/TLS certificate configuration.
Step 1: Create Self-Signed Certificate
Before creating SSL Certificate first let’s know what is SSL?
When communication occurs between client and server i.e. two-way communication, then companies or organizations need to add SSL certificates to their websites to secure online transactions and to keep customer’s data private. If you want to know more about SSL refer to this article SSL Certificate.
Java Command to create self-signed certificate is given below:
keytool -genkey -alias <alias> -storetype <storetype> -keyalg <keyalg> -keysize <keysize> -keystore <keystore> -validity <validity>
To create self-signed certificate, JDK comes under the process. If JDK is installed in the system, then the system already has keytool available. There is a certificate management utility keytool in JVM which is used to create self-signed certificate. Below is the Java code to create SSL Certificate:
keytool -genkey -alias tomcat -storetype PKCS12 -keyalg RSA -keysize 2048
-keystore keystore.p12  -validity 3650
Enter keystore password:
   Re-enter new password:
   What is your first and last name?
    [Unknown]: ABC DEF
   What is the name of your organizational unit?
    [Unknown]: GFG
   What is the name of your organization?
    [Unknown]: Geeksforgeeks
   What is the name of your City or Locality?
    [Unknown]: Noida
   What is the name of your State or Province?
    [Unknown]: Uttar Pradesh
   What is the two-letter country code for this unit?
    [Unknown]: IN
   Is CN = ABC DEF, OU= GFG, O = Geeksforgeeks, L = Noida, ST = Uttar Pradesh, C = IN correct?
   [no]: yes
Let us look at the commands below that we have written above:
- genkey: generates keypair
- alias: alias name for the item
- storetype: type of the keystore
- keyalg: algorithm to generate keypair
- keysize: size of the key
- keystore: name of the keystore
- validity: number of days validity
After Executing this we will get a keystore containing SSL/TLS certificate.
Step 2: Updating Application properties
To enable HTTPs we have to update the application.properties file in the project with explanation of important properties like keystore path and password etc. Let us open application.properties file and define the following properties in the properties file.
server.port = 443
server.ssl.key-store = keystore.p12
server.ssl.key-store-password = geeksforgeeks
server.ssl.keyStoreType = PKCS12
server.ssl.keyAlias = tomcat
Please refer to the below image if you are stuck somewhere.

If we are using YAML file, then for application.yml file we can use the following code for the same.
server:
   port: 443
   ssl:
      key-store: keystore.p12
      key-store-password: geeksforgeeks
      keyStoreType: PKCS12
      keyAlias: tomcat
Let us know the SSL configuration below that we have added in application property file above.
- server.port: The port on which the application runs. Here we have used port 443 instead of using the default port 8080
- server.ssl.key-store: This is the path to the keystore which contains the SSL Certificate.
- server.ssl.key-store-password: password used to access the keystore.
- server.ssl.keyStoreType: type of the keystore, it can be PKCS12 or any other keystore type.
- server.ssl.keyAlias: alias used to identify the key.
Step 3: Run Your Application
Now we can run our Spring Boot Application by using following commands. To use clean over compile the Maven project we can use the following command:
-X clean compile
To create an executable jar file and run the application we can use the following command:
mvn clean install
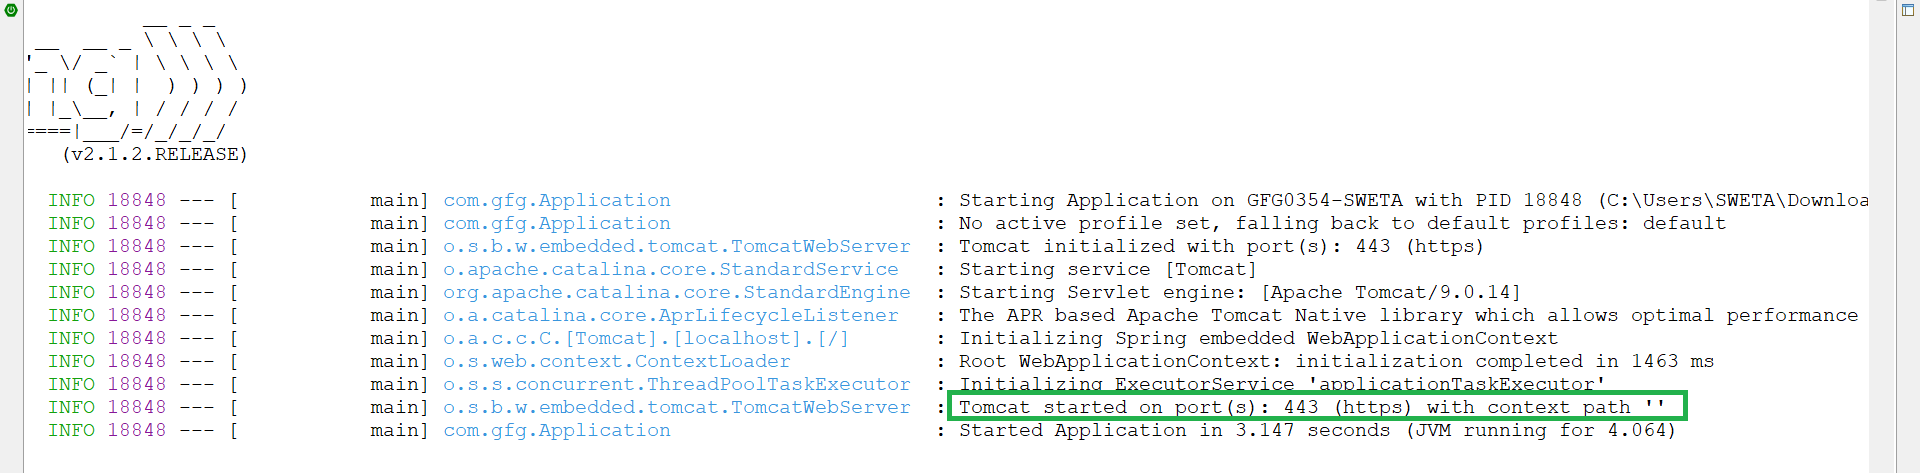
Below we can see that the application has started on port number 443 with HTTPs protocol:
Share your thoughts in the comments
Please Login to comment...