Tired of repeating the same tasks every day? Feeling like your computer’s to-do list is multiplying faster than dust bunnies? Well, say goodbye to manual madness and hello to cron jobs! Think of them as your robot assistants in the land of Linux, diligently taking care of those repetitive chores while you’re free to conquer bigger techy mountains.
Imagine waking up to a sparkling clean inbox (thanks to automatic email deletion) or finding your files neatly backed up every night (without lifting a finger). With cron jobs, these automation superpowers are just a few lines of code away.
Automate Tasks with Cron Jobs in Linux
What is Cron?
cron is like a helpful assistant that can automatically do tasks for you at specific times. Imagine if you could tell your computer, “Every day at 3 PM, run this program,” and it just happens without you having to do anything – that’s what cron does. It’s a scheduler that allows you to set up a timetable for your computer to perform certain jobs, whether it’s making backups, cleaning up files, or doing other routine stuff. You just need to give it a schedule (like every day at a certain time), and cron takes care of the rest. It’s a handy way to automate tasks and make your computer work for you without you always being there to give it instructions.
What is Crontab?
Crontab refers to the command-line utility that allows users to create, edit, and manage their own cron schedules. When a user wants to schedule a task using cron, they use the `crontab` command to define the schedule in their user-specific crontab file. Each user can have their own crontab, and the cron daemon reads these files to know when to execute scheduled tasks.
Starting with Crontab File
Cron jobs can be done with the root user or anyone. But the root user has admin privileges hence, we’ll go into that. To use Ubuntu Command Prompt as the administrator, we use the command:
sudo su
Enter the system password after entering the command.
Here, we check the version of Ubuntu OS with the command:
lsb_release -a
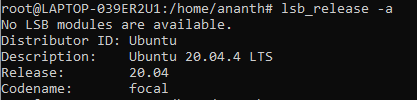
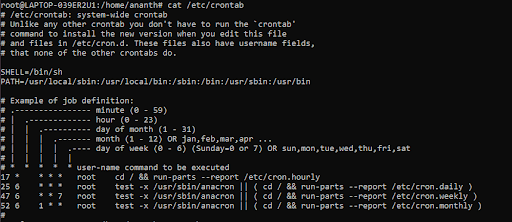
The version of Ubuntu OS is 20.04.4. Now we need to check whether the Cron tab module exists or not. This is done with the command cat <filename>:
cat /etc/crontab
Here, the “cat” command is used to read the file and print its output as a result. The output for the above command is shown below:
We can also check in which folder the crontab module is present using the “which” command in the Ubuntu command prompt.

We can see that it’s situated in the “sbin” folder.
Crontab Initialization
You can check whether crontab is running with the command:
service cron status

If it shows “cron is not running” as seen below, simply use the command mentioned below.
service cron start

Then check again. If it shows “cron is running” then there is no problem. In this way, we can check if cron is running or not to prevent scheduling errors.
How to List All the Cron jobs for the Current User
We can check the list of scheduled jobs available as shown below:

For now, there are no automated schedules. Let’s see how to create our own schedule in Linux OS.
How to Create New Schedules Using Crontab
Step 1: Open the Crontab Editor
To begin creating new schedules, open the crontab editor using the following command.
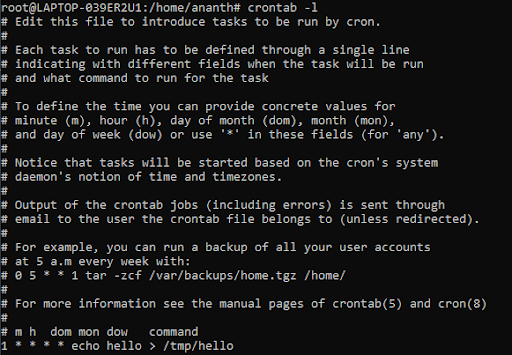
crontab -e
This command initiates the creation of a new cron file, allowing you to define schedules according to your requirements.

This will open the table as shown below:
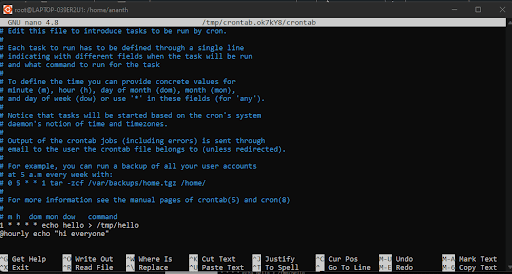
Step 2: Add a Schedule
In the crontab file, you can define schedules using the following basic syntax:
* * * * * command_to_be_executed
For example: let’s schedule a task to echo “hello” every minute:
Here, we have written a simple line to schedule sending “hello” after 1 minute. This is done with the command:
1 * * * * echo hello
Here’s the breakdown:
1: Minute (after 1 minute).* * * * *: Every day of the week, every month, every day of the month.
Step 3: Save and Exit
After adding your schedule, press Ctrl+X to exit the editor. You will be prompted to save your changes.
You will be prompted to save your changes. Press “Y” in this case. After which:

Step 4: Confirm and Exit
Press enter if there are no syntactical errors, it will display as shown below:

If there are no syntax errors in your crontab file, you will see a confirmation message. This indicates that your schedule has been successfully added.
Now, your defined task will execute as per the specified schedule. In this example, the command `echo hello` will be executed every minute.
Cron job Syntax
In managing crontab entries, various flags serve specific purposes for adding and viewing cron jobs.
- crontab -e: This flag is used to edit crontab entries, allowing you to add, delete, or modify cron jobs according to your requirements.
- crontab -l: By employing this flag, you can list all the cron jobs associated with the current user, providing an overview of the scheduled tasks.
- crontab -u username -l: When utilizing this flag, you can list the cron jobs belonging to another user. This allows for inspecting the scheduled tasks of a specified username.
- crontab -u username -e: This flag enables the editing of cron jobs for another user. It provides the capability to modify or add cron jobs for the specified username.
When viewing the list of cron jobs, the output typically resembles the following example:
# Cron job example
* * * * * sh /path/to/script.sh
In this example, a cron job is defined to execute the script located at “/path/to/script.sh” at intervals specified by the time parameters (* * * * *).
Here, we can see the indication of time as shown
|
0-59
|
Specific minute
|
|
0-23
|
Specific hour
|
|
1-31
|
Day of the month
|
|
1-12
|
Month of the year
|
|
0-6
|
Day of the week . Here, 0 is implicitly referred to as “Sunday”.
|
sh represents that the script is a bash script and should be run from /bin/bash./path/to/script.sh specifies the path to script.
If we Summarize the cron job syntax:
*    *    *    *    *    sh /path/to/script/script.sh
|     |     |     |     |     |
|     |     |     |     |     Command or Script to Execute
|     |     |     |     |
|     |     |     |     |
|     |     |     |     |
|     |     |     |    Day in Week(0-6)
|     |     |     |
|     |     |    Month in Year(1-12)
|     |     |
|     |    Day in Month(1-31)
|     |
|    Hour(0-23)
|
Min(0-59)
Cron job examples
Below are some examples of scheduling cron jobs.
|
At 01:01 on Saturday
|
|
At 22:30 on every day-of-week from monday to friday.
|
|
At 02:10 on 4th of May in January
|
Here, “*” in the cron job implies that the job will run all the time unless a number is specified. Hence, even the syntax:
* * * * * echo hello
This means that the cron job will print “hello” every single minute all the time.
Now if we check the list of cron jobs with the command:
crontab -l
It will display the jobs edited as shown below:
In the image below:
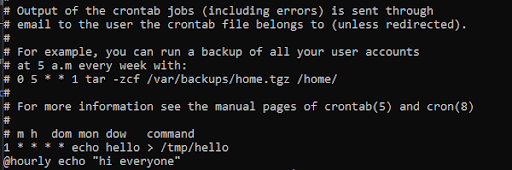
@hourly – Depicting 0 * * * * in the crontable command. This means that it will print “hi everyone” every hour or more exactly, the first minute of every hour.
Similarly, this message can also be written as:
- @daily – Used to execute any task on the first minute of a new day (midnight). Depicts 0 0 * * * in crontab.
- @weekly – Used to execute any task in the first minute of a new week specifically Sunday, at midnight.
- @monthly – Used to execute tasks on the first day of the new month.
- @yearly – Used to execute tasks on the first day of the new year.
Add more Schedules:
To add more schedules use the command given below and add more schedules.
crontab -e
Note: We need to keep spaces between each symbol we use in the cron job. If it’s not done, we’ll get syntactical errors, due to which there are possibilities of the cron file failing to save the edits or changes.
Code indentation is an important aspect to follow when dealing with command prompt lines.
Additional Commands:
Usually, it is good practice to store a backup file of the cron jobs you create by using the “> <directoryname>”
In this case, we’ve saved the file in the temporary folder “hello” using the command:
1 * * * * echo hello > /tmp/hello
Deleting a crontab file:
Similarly, to remove all cron jobs available, use the command:
crontab -r
This command removes all of the cron jobs available in your Linux system.
View all cron logs:
To view your cron logs in the Linux system, we can use the command:
grep CRON var/log/syslog
or
cat /var/log/cron
In some cases, when it involves using Linux for Windows subsystem, we may need to use the command:
ps aux | grep cron
In this way, we can schedule cron Jobs to run files or update systems at a specific time interval without the hassle of manual settings. This is one of the reasons Linux is preferred by the developers and learning crontab is one of the most useful skills in the Linux skill tree.
Note: For the cron jobs to keep running, we need to keep the command terminal open or else, the cron job module will deactivate and so as to prevent this, we need to include additional parameters.
Conclusion
As technological advancements improve at an unprecedented rate, the need for a scheduler hardcoded into the Operating System (OS) decreases considerably since all the new applications requiring mundane, repetitive tasks have an inbuilt scheduler in them. For example, system updates are scheduled automatically, or as per user specifications. This has considerably decreased the usage of Crontab.
Share your thoughts in the comments
Please Login to comment...