How Spring Boot Application Works Internally?
Last Updated :
23 Oct, 2023
Spring Boot Application starts using a main method, like any other Java program, and the main method is called the “run” method i.e. SpringApplication.run(),. From this run method, the application context of IOC (Inversion Of Control) searches the class annotated with @Configuration annotation which calls all the beans in the classpath and initializes those classes. Beans are stored inside a particular space in JVM (Java Virtual Machine). That particular space is known as the IOC Container.
After beans are created the requests will go to the dispatcher servlet and the dispatcher servlet will distribute all the requests among the appropriate controllers. To understand how a Spring Boot application works internally, it is essential to know its key components and the flow of the application.
Spring Boot Layered Architecture
Spring Boot follows a layered architecture in which each layer communicates with the other layer directly in a hierarchical structure. There are 4 layers in Spring Boot as follows:
- Presentation Layer
- Business Layer
- Persistence Layer
- Database Layer
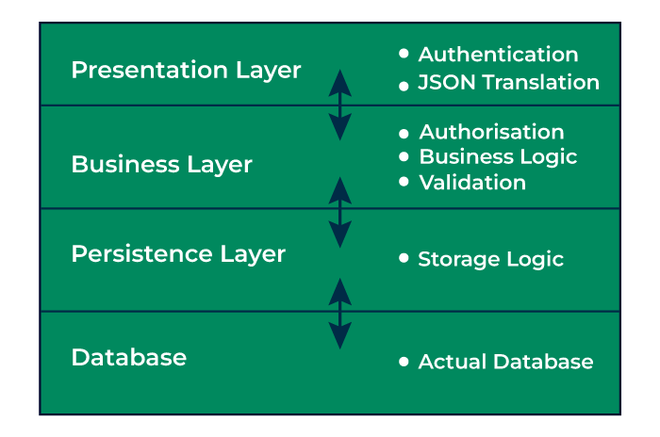
1. Presentation Layer
This layer handles all the HTTP requests made by clients, then it translates the JSON parameter to object and also authenticates the request, and transfer it to the business layer. In short, it only consists of the frontend part or we can say the view part.
2. Business Layer
This is also known as the Service layer which handles all the business logic of an application. It consists of service classes and uses services provided by the data access layers. It also performs authorization and validation.
3. Persistence Layer
It contains all the storage logic which are required and translates the business objects to database rows.
4. Database Layer
In this layer, all the CRUD (create, read update, delete) operations are performed.
Spring Boot Application Flow Architecture
Let us understand the control flow of a Spring Boot Application in the below diagram:
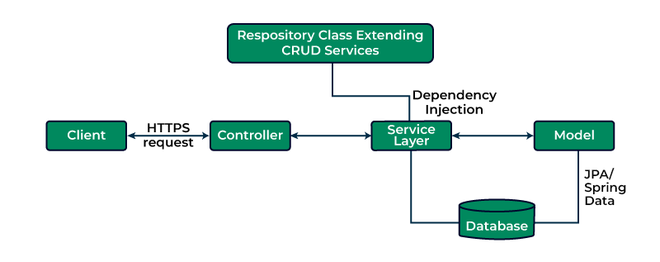
Explanation:
- Client makes an HTTP request(GET, POST, PUT, DELETE) to the browser.
- Then the request will go to the controller where all the requests will be mapped and handled.
- After mapping done, in Service layer all the business logic will be performed. It performs the logic on the data that is mapped to JPA(Java Persistence API) using model classes.
- In repository layer, all the CRUD operations is done for the rest APIs.
- A JSP page is returned to the user if no errors are there.
How Does Spring Boot Application Starts?
Spring Boot is very popular for It’s auto-configuration feature. This means it automatically configures our application based on the dependencies added during the project creation. As we don’t need to configure xml file, Spring internally do all the xml configuration which are provided by jar. We just have to use the pre-configured jars. To enable those pre-configured jars, simply we need to define starter dependencies in pom.xml file.
 <dependency>
       <groupId>org.springframework.boot</groupId>
       <artifactId>spring-boot-starter-data-jpa</artifactId>
 </dependency>
By adding this starter-data-jpa dependency, we get all the pre-configured JPA configuration which are needed for connecting our application with the database. Then we just need to focus on defining the JPA entities, repositories, business logic, while Spring Boot takes care of all internal configuration and database interaction.
Basic Annotations to Start a Spring Boot Application
The entry point of the Spring Boot Application is the class which contains @SpringBootApplication annotation along with the main method. The main method should contain SpringApplication.run method.
Below is the implementation of the above method:
Java
import org.springframework.boot.SpringApplication;
@SpringBootApplication
public class GFG {
public static void main (String[] args) {
SpringApplication.run(GFG.class, args);
}
}
|
Here we have used @SpringBootApplication annotation along with the class GFG and a main method just like other java program with SpringApplication.run method to bootstrap the application.
How @SpringBootApplication Works?
@SpringBootApplication annotation is the combination of another three annotations i.e. @Configuration, @EnableAutoConfiguration, @ComponentScan.
@SpringBootApplication = @Configuration + @EnableAutoConfiguration + @ComponentScan
@Configuration Annotation:
- This annotation configures the application context such as transaction, resource handler, view resolver, security etc.
- It is used in class level and it specifically indicates that a class declare one or more than one @Bean methods.
Below is the implementation of the above method:
Java
@Configuration
public class GFG {
@Bean(name = gfg)
public demoClass demo(){
}
}
|
@EnableAutoConfiguration Annotation:
- This annotation will automatically configures our application we don’t need to configure manually.
- It enables the auto-configuration feature of Spring Boot.
Below is the implementation of the above method:
Java
import org.springframework.boot.SpringApplication;
import org.springframework.boot.autoconfigure.EnableAutoConfiguration;
@EnableAutoConfiguration
public class GFG {
public static void main (String[] args) {
SpringApplication("GFG.class, args");
}
}
|
Here we have used @EnableAutoConfiguration annotation along with the class name to perform the automatic configuration over an application.
@ComponentScan Annotation:
- This annotation will automatically scans all the beans and package declaration when the application initializes inside the class path.
- It will automatically scan all the components added to our project.
Below is the implementation of the above method:
Java
@ComponentScan("com.geeksforgeeks.springboot")
@SpringBootApplication
public class GFG {
}
|
Here we have used @ComponentScan annotation along with the @SpringBootApplication annotation which will scan the package which is passed inside the parameter. We can also use this annotation without argument, where Spring is responsible for scan the current package and it’s sub-packages. We can use these annotations separately as per our need because spring boot supports loosely coupled feature.
Spring Boot enables the developers to use a single annotation instead of using three different annotations we can use one annotation which has the default attributes of all those annotations.
Conclusion
Spring Boot is an open-source framework of java built on the top of the Core Spring framework. Here we learnt about different layers of Spring Boot architecture. We also learnt about project flow of Spring Boot application, different annotations to start the RESTful web application.
Share your thoughts in the comments
Please Login to comment...