Git – Life Cycle
Last Updated :
26 Apr, 2022
Git is used in our day-to-day work, we use git for keeping a track of our files, working in a collaboration with our team, to go back to our previous code versions if we face some error. Git helps us in many ways. Let us look at the Life Cycle that git has and understand more about its life cycle. Let us see some of the basic steps that we follow while working with Git –
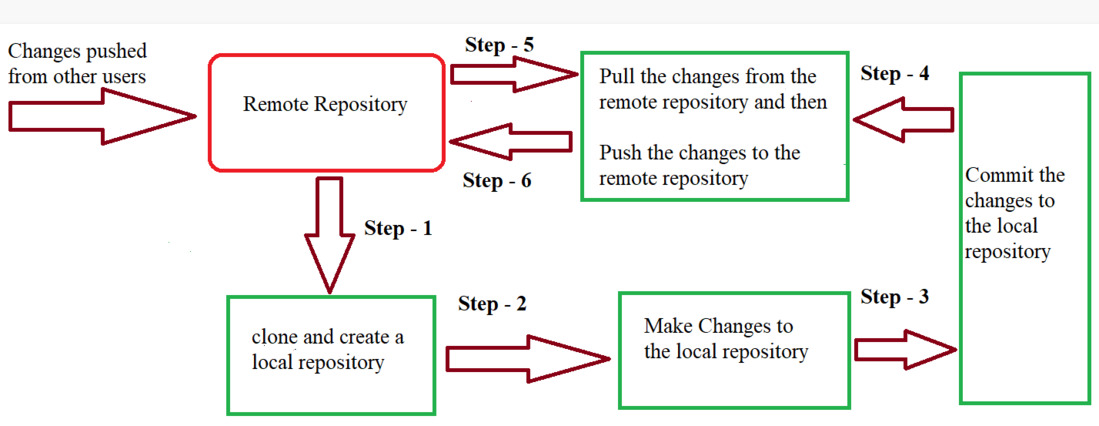
- In Step – 1, We first clone any of the code residing in the remote repository to make our own local repository.
- In Step-2 we edit the files that we have cloned in our local repository and make the necessary changes in it.
- In Step-3 we commit our changes by first adding them to our staging area and committing them with a commit message.
- In Step – 4 and Step-5 we first check whether there are any of the changes done in the remote repository by some other users and we first pull that changes.
- If there are no changes we directly proceed with Step – 6 in which we push our changes to the remote repository and we are done with our work.
When a directory is made a git repository, there are mainly 3 states which make the essence of Git Version Control System. The three states are –
- Working Directory
- Staging Area
- Git Directory
Let us understand in detail about each state.
1. Working Directory
Whenever we want to initialize our local project directory to make it a git repository, we use the git init command. After this command, git becomes aware of the files in the project although it doesn’t track the files yet. The files are further tracked in the staging area.
git init
2. Staging Area
Now, to track the different versions of our files we use the command git add. We can term a staging area as a place where different versions of our files are stored. git add command copies the version of your file from your working directory to the staging area. We can, however, choose which files we need to add to the staging area because in our working directory there are some files that we don’t want to get tracked, examples include node modules, env files, temporary files, etc. Indexing in Git is the one that helps Git in understanding which files need to be added or sent. You can find your staging area in the .git folder inside the index file.
// to specify which file to add to the staging area
git add <filename>
// to add all files of the working directory to the staging area
git add .
3. Git Directory
Now since we have all the files that are to be tracked and are ready in the staging area, we are ready to commit our files using the git commit command. Commit helps us in keeping the track of the metadata of the files in our staging area. We specify every commit with a message which tells what the commit is about. Git preserves the information or the metadata of the files that were committed in a Git Directory which helps Git in tracking files and basically it preserves the photocopy of the committed files. Commit also stores the name of the author who did the commit, files that are committed, and the date at which they are committed along with the commit message.
git commit -m <Commit Message>
Share your thoughts in the comments
Please Login to comment...