Before moving to the hands-on of distributed data storage with Amazon S3, let us have a brief overview of “What is Amazon S3 ?”.
- Amazon S3 has a simple web services interface that you can use to store and retrieve any amount of data, at any time, from anywhere on the web.
- Advantages – Durable – Flexible – Available – Cost Efficient – Scalable – Secure.
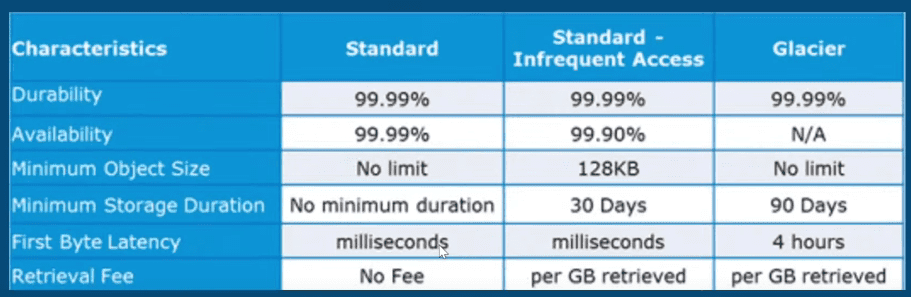
- Amazon S3 has three storage classes – Standard, Infrequent Access, and Glacier.
Versioning
- You may use versioning to keep multiple versions of an object in one bucket.
- By default versioning is disabled.
- It prevents overwriting or accidental deletion.
- Get the non-concurrent version by specific version ID.
Cross Region Replication
Cross-region replication(CRR) enables automatic, asynchronous copying of objects across buckets in different AWS regions. Buckets configured for cross-region replication can be owned by the same AWS account or by different accounts.
Distributed Data Storage with Amazon S3
Step 1: First step will be to create an IAM user group and an IAM user.
Why so ? Using an IAM user account over a root user account is safer in terms of cost control because you can apply fine-grained permissions, preventing accidental and costly actions. IAM users are limited in their access, reducing the risk of unexpected resource provisioning or deletions that could result in uncertain charges.
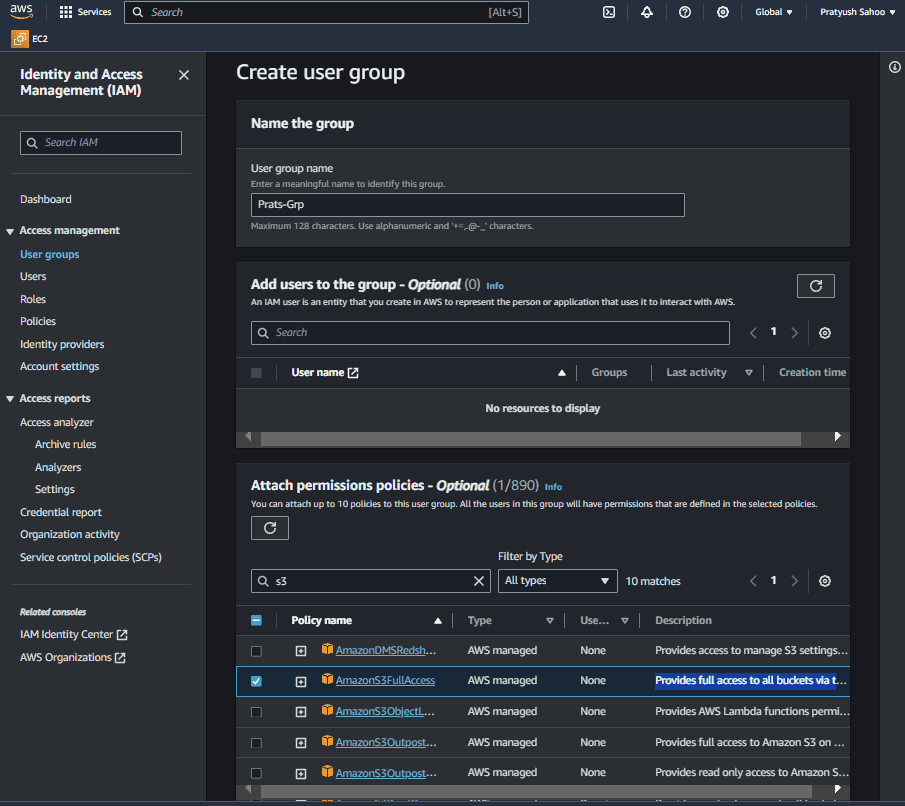
Creating an IAM user group
- Go to AWS management console and search for IAM. After getting redirected to IAM dashboard, click on the “User groups” under the “Access Management” section of the left navigation bar. And then click on “Create group”.
- After getting on to the “Create user group” page, enter a unique group name(in my case, its “Prats-Grp”).
- On that particular page, under the section of “Attach permissions policies – Optional”, search for “AmazonS3FullAccess” policy name and select it. This policy actually provides full access to all buckets via the AWS Management Console. Then click on “Create group” and you are good to go.
Creating an IAM user belonging to the above IAM user group
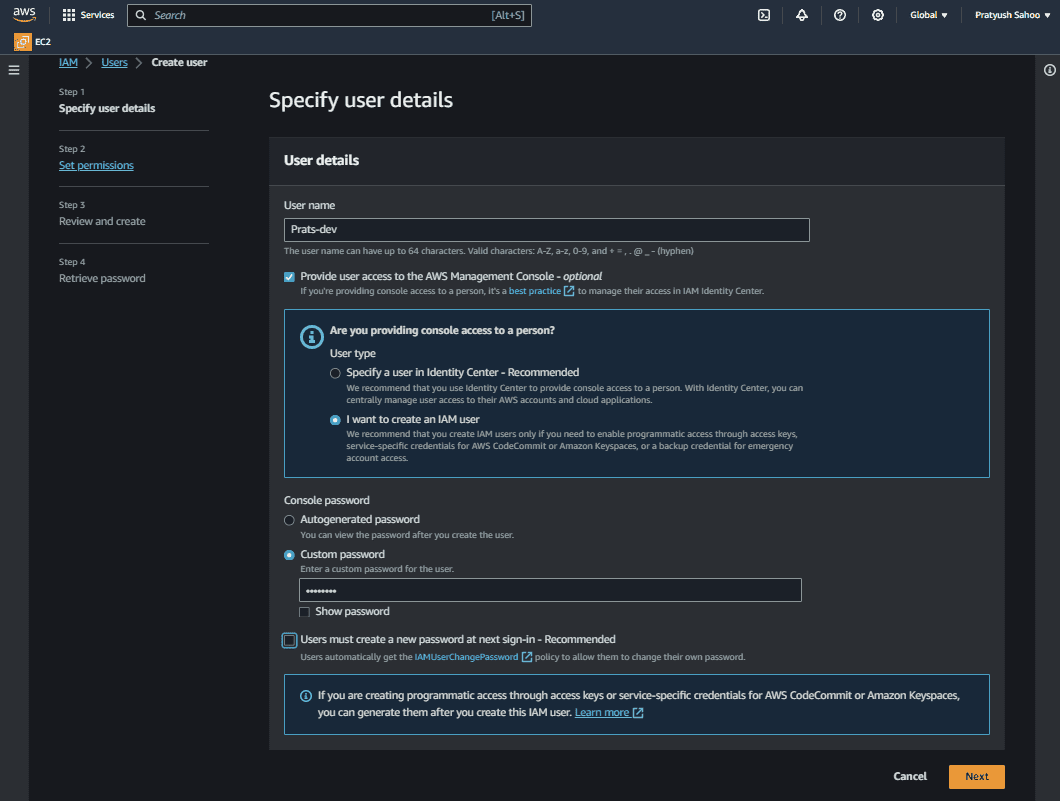
- Go the IAM homepage and click on the “Users” section under the “Access Management” section of the left navigation bar. And then click on “Create user”.
- Provide an unique User name(in my case, its “Prats-dev”) and tick the option asking for “Provide user access to the AWS Management Console – optional”.
- Then select “I want to create an IAM user” on the question which goes by “Are you providing console access to a person?”.
- Then select either “Autogenerated password” or “custom password” depending upon your choice. Its your call. Then click on “next” to proceed to next step i.e., “Set permissions” step.
- Select “Add user to group” under permission options and select the user group created above(in my case, its “Prats-Grp”). And then click on next and then on “Create user”.
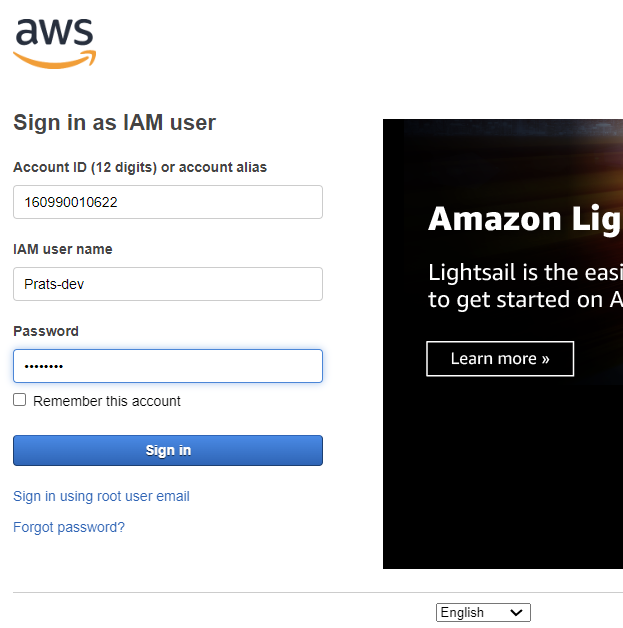
- Now, you have a console sign-in details page where you have “console sign-in URL”. By going to this URL, you will be redirected to AWS Console sign-in page as an IAM user and there you have to provide your credentials i.e., your username and console password.
Console sign-in Page
 IAM User Sign-in Page
And finally, you are good to go. Now, remember you have to create your Amazon S3 bucket as an IAM user, not as a root user. And that’s the reason, we first created an IAM user account.
Step 2: Create a Amazon S3 bucket(both public and private bucket) and upload a file into it.
Creating a public Amazon S3 bucket
- Go to the Amazon management console and search for S3. After being redirected to the Amazon S3 page, go the “buckets” section of the left navigation bar, and then click on “Create bucket”.
- Give an unique name for your bucket(in my case, it’s “prats-bucket”) and remember to untick the option “Block all public access” as we are creating a public Amazon S3 bucket.
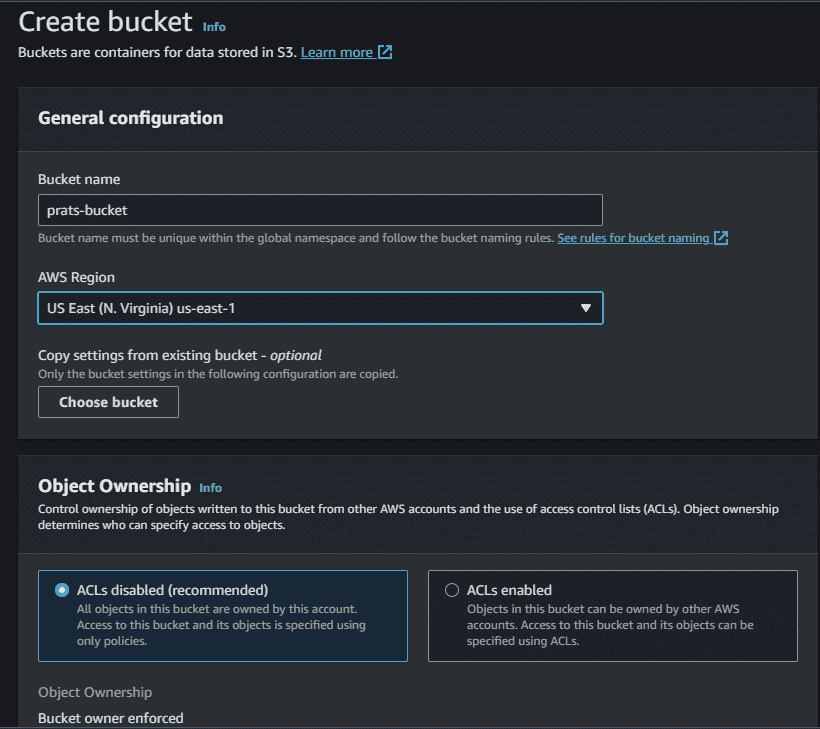

The same above picture continued…
- Then click on “Create bucket”.
- After clicking on “Create bucket”, you can see your list of buckets. Choose the bucket you just now created and go to “permissions” and scroll down to bucket policy and click on “edit bucket policy”.
- Write the below shown code and then click on “save changes”.
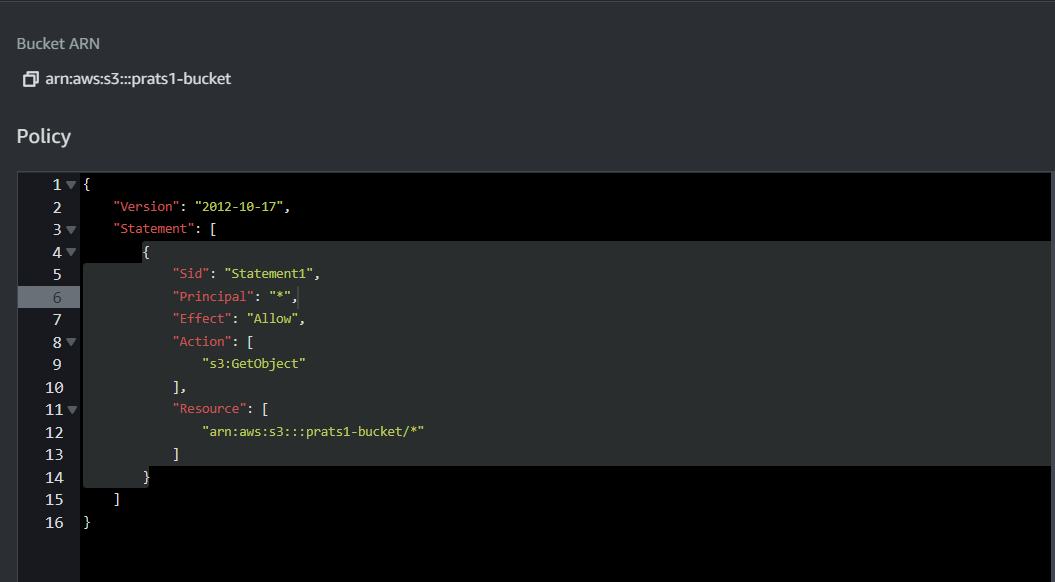
In essence, this policy opens up the S3 bucket to public read access, allowing anyone with the URL of an object within the bucket to retrieve that object. This might be useful for making certain content publicly accessible on the internet, like images, documents, or other resources. However, you should be cautious and consider the security implications of granting public access to your S3 bucket, especially for sensitive or confidential data.
- Then go back to your bucket and click on “Upload” as we are now ready to upload our files into the bucket.
- Add the files you want to upload into the bucket and then click on “Upload”.
After heading to the uploaded file, you will get to know about 2 URLs – one is the “OPEN” button itself present on the top navigation bar and another one is present in the properties section named as “Object URL”. You can see both the URLs marked as “red” in the image below. ( First one – marked as 1, Second one – marked as 2)

Let’s know what’s the difference between the two URLs.
URL marked as 1 (i.e., Object URL)
In Amazon S3, the “Object URL” in the properties section of an uploaded object refers to the unique URL that provides direct access to the specific object in your S3 bucket. This URL is also known as the object’s Amazon S3 URL or endpoint.
The format of the object URL typically follows this pattern:
https://s3.amazonaws.com/<bucket-name>/<object-key>
The object URL allows you to access and download the object directly from a web browser or through HTTP requests. It’s a convenient way to share or reference the specific object stored in your S3 bucket.
URL marked as 2(i.e., Presigned URL)
This URL is also known as “Presigned URL”. A presigned URL for an object in an Amazon S3 bucket is a time-limited, secure URL that provides temporary access to that object.
This URL is generated using AWS credentials and includes a signature as part of the URL to verify permission and authenticity. It grants temporary access to perform specific actions (e.g., GET) on the object for a defined duration.
Presigned URLs are often used to grant temporary, controlled access to S3 objects without requiring the recipient to have AWS credentials, making them useful for scenarios like sharing private files or enabling temporary access for downloads.
Note: In the context of Amazon S3 buckets, public buckets allow both the ‘Object URL’ and the ‘Presigned URL’ to open objects in a web browser. In contrast, objects stored in private Amazon S3 buckets can only be accessed using a presigned URL and not through a direct object URL.
Let’s prove the above point now –
Creating a private Amazon S3 bucket
Go to the Amazon management console and search for S3. After being redirected to the Amazon S3 page, go the “buckets” section of the left navigation bar, and then click on “Create bucket”.
- Give an unique name for your bucket(in my case, it’s “prats1-private-bucket”) and remember to tick the option “Block all public access” as we are creating a private Amazon S3 bucket.
- Then click on “Create bucket”.
- After clicking on “Create bucket”, you can see your list of buckets and then click on “Upload” as we are now ready to upload our files into the bucket.
- Add the files you want to upload into the bucket and then click on “Upload”.
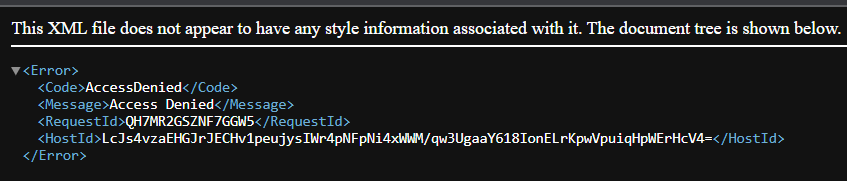
- After the object(or file) is successfully uploaded, click on the object. You can again see 2 URLs – Object URL and Presigned URL. But this time, as our bucket is set to private, only the presigned URL works fine, but the Object URL won’t work and when opened, it shows an error on the web browser similar to this –
Distributed Data Storage with Amazon DynamoDB
Amazon DynamoDB
- Amazon DynamoDB is a fully-managed NoSQL database service offered by AWS. It works on key-value pair and other data structure documents provided by Amazon. It does not requires a schema to create a table. Hence, it can store any amount of data and serve any amount of traffic. It also scales well with traffic and its easy to use.
- There are three fundamentals components of DynamoDB ( Attribute → Item → Table )
- Attribute – Attributes are the key-value pairs that represent data within DynamoDB items.
- Item – Items are individual data records within a DynamoDB table. Each item is a collection of attributes, where attributes represent data values.
- Table – Tables are the primary data storage structure in DynamoDB. They store your data in a structured format and are similar to tables in a relational database.
- DynamoDB Key Terms →
- Primary Key – Primary Key is a unique attribute that is necessary while creating a table, it cannot be null at any given point. Hence, while inserting an item into the table, a primary key attribute is a must.
- Secondary Index – A secondary index can be understood as the attribute that lets you query the data, with or without the help of a Primary key. DynamoDB has these secondary indexes that help you achieve this additional access.
- DynamoDB Streams – DynamoDB streams is an additional/optional feature provided by DynamoDB to keep a track of data modification events in a table. Here, each event is represented by a stream record.
Why DynamoDB ?
- Scalability – DynamoDB is designed for seamless scalability, regardless of traffic spikes or changing workloads. Whether your application caters to a handful of users or a global audience, DynamoDB ensures that your database can effortlessly handle the demands of your users. You can wave goodbye to the days of manual provisioning and constant monitoring. DynamoDB dynamically scales to meet your application’s needs, and it does so automatically.
- Customizable – Every application is unique, and DynamoDB understands that. The database is highly customizable, allowing you to structure your data in a way that aligns with your application’s priorities. With DynamoDB, you have the freedom to define your schema, choose data types, and organize your data to best serve your specific use case. This flexibility is invaluable, especially for applications with evolving data requirements.
- Data Types – Data comes in many forms, and DynamoDB is equipped to handle them all. The database supports a wide range of data types, from strings and numbers to binary data, sets, lists, and maps. This means you’re not constrained to a single data format. DynamoDB adapts to your data, making it an ideal choice for applications with diverse data needs.
- Stable Performance – Stable and consistent performance is the hallmark of DynamoDB. It doesn’t matter if your application experiences unpredictable traffic surges or if you’re making frequent updates to your data. With DynamoDB, you can count on your application delivering a stable and reliable performance to your users, no matter the traffic or modifications.
DynamoDB vs Other DB Services
|
Scales seamlessly
|
Relatively easy to scale
|
More complexity in scaling
|
Relatively easy to scale
|
|
Unlimited storage
|
64TB
|
2PB
|
64TB with RDS
|
|
pay-per-Use Model
|
Generally cheaper than others
|
On-demand model with added costs
|
Pricing depends upon RDS
|
|
Maintained by AWS
|
Maintained by AWS
|
Requires more maintenance
|
No maintenance required
|
DynamoDB features
- On-demand capacity mode – DynamoDB’s On-Demand Capacity Mode is designed for applications with unpredictable workloads. In this mode, you pay for the actual read and write requests you make, without the need for manual capacity planning. DynamoDB automatically scales to handle your application’s traffic, making it an excellent choice for applications with varying workloads.
- Built-in support for ACID transactions – DynamoDB’s support for ACID (Atomicity, Consistency, Isolation, Durability) transactions ensures data integrity. With transactions, you can perform multiple operations on one or more items, and DynamoDB guarantees that all changes either succeed together or fail together. This feature is crucial for applications that require strong data consistency and reliability.
- On-demand backup – Data protection is paramount, and DynamoDB offers On-Demand Backup for your peace of mind. You can create full backups of your tables anytime you need to. These backups are stored in Amazon S3, providing an additional layer of data durability and security. With On-Demand Backup, you have the flexibility to recover your data at any point in time.
- Point-in-time recovery – Accidents happen, but with DynamoDB’s Point-in-Time Recovery, you’re prepared for them. This feature allows you to restore your table data to any point in time within a specified recovery window. It’s an invaluable tool for recovering from unintentional data changes, providing data retention, and ensuring business continuity.
- Encryption at rest – Data security is a top priority, and DynamoDB ensures your data is protected with encryption at rest. Your data is automatically encrypted using AWS Key Management Service (KMS) keys. This encryption adds an extra layer of protection, safeguarding your data from unauthorized access.
Creating a Table on Amazon DynamoDB
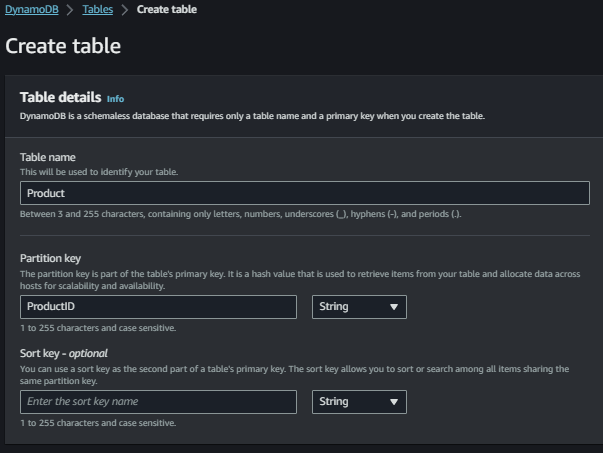
Step 1: Go to the AWS management console and search for DynamoDB. On the DynamoDB page, click on “Tables” present in the left navigation bar. Then click on “Create table”.
Step 2: Let’s now fill the necessary table details. Go for a table name of your own choice(in my case, it’s “Product”).
Step 3: Fill the field named “Partition key” which is actually the primary key of the table you are creating. As mentioned above, this attribute needs to be unique and not null. In my case, it’s “ProductID”. And we can assume that the “ProductID” field can be alphanumeric, so let it be of type “string”.
Step 4: Then scroll down and click on “Create Table”.
Step 5: Click on the newly created table and you will be redirected to the table description. Then click on the button “Explore table items” to create the items for the table.
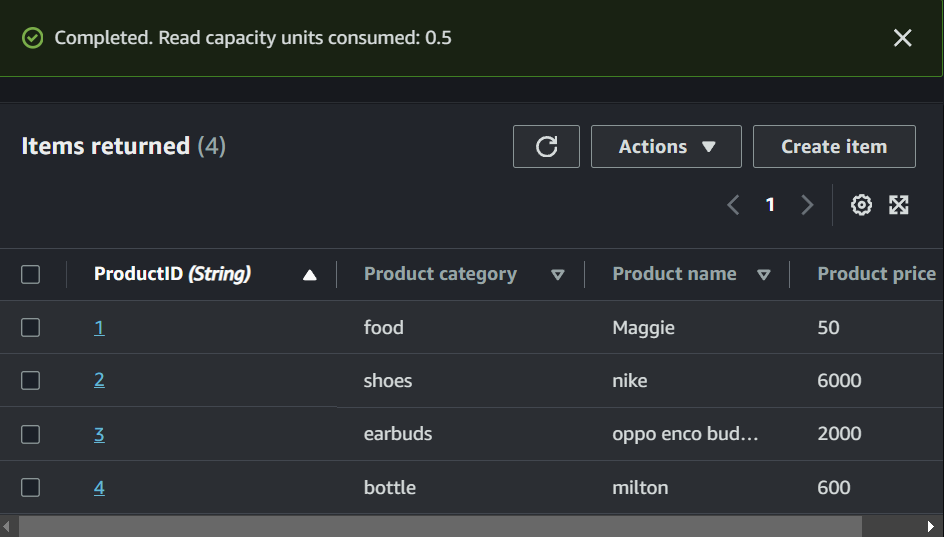
Step 6: Scroll down and click on “Create item”. Their you can add as many attributes ass you can for each item. Remember, as the DynamoDB is a NoSQL database, you can add any different attributes for each item. For simplicity purpose, I am adding 4 particular attributes to each item i.e., ProductID, Product name, Product price, Product category. And below you can see my created table.
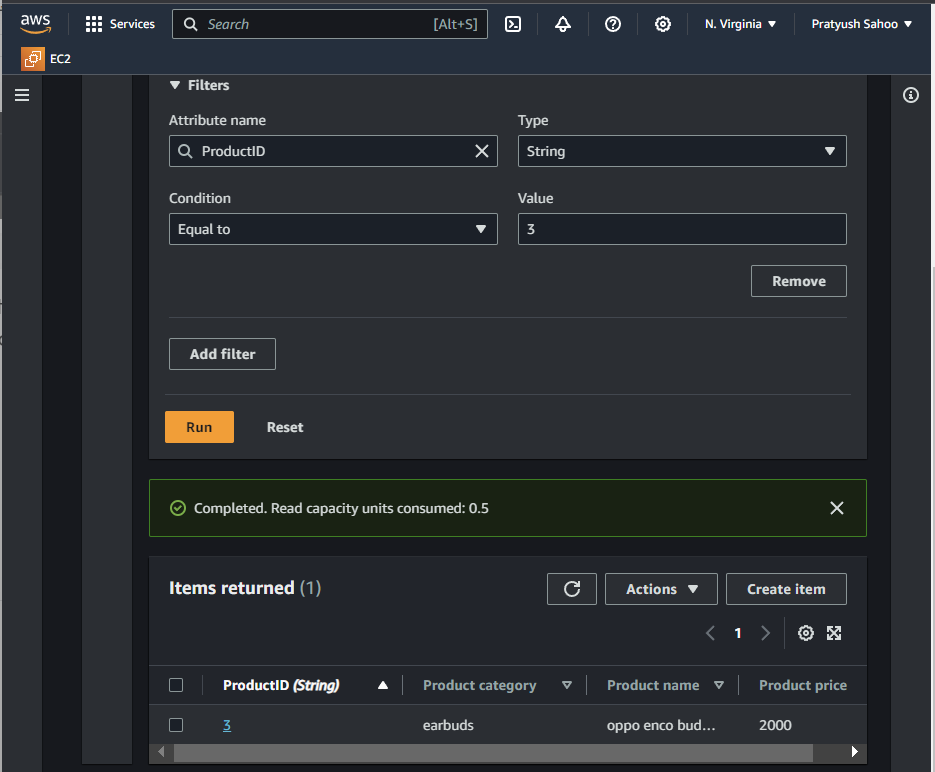
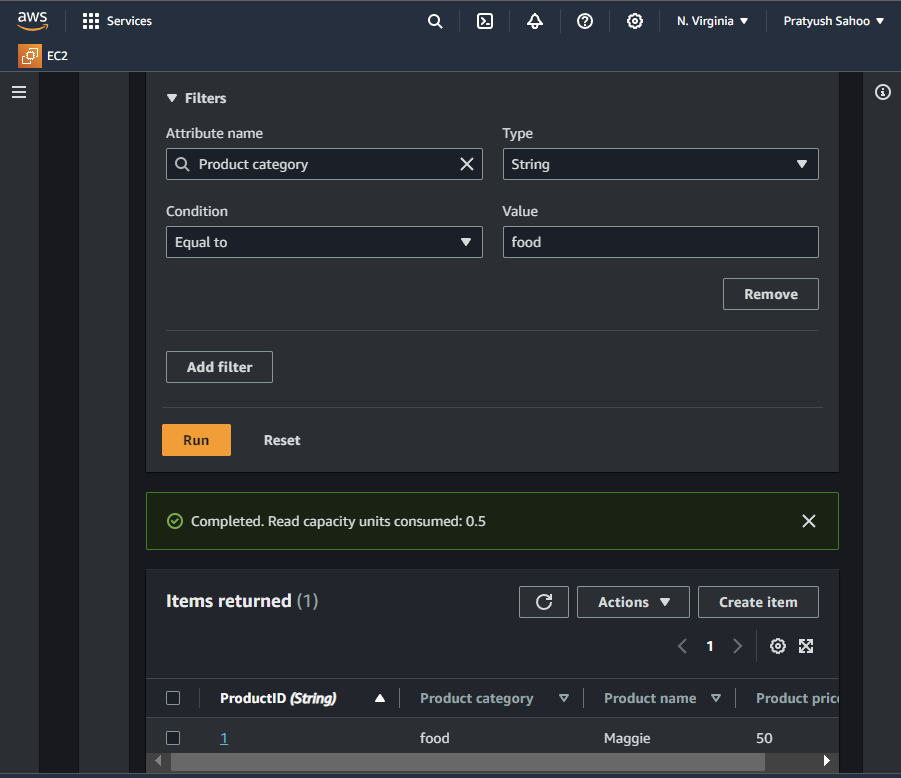
Step 7: After you have created the table, you have scan or query items from your table. On that same page, click on “filters”, the dropdown menu will appear with all the fields which is required to design a query. You can refer to some of my examples shown below in the images.
Query – 1
- Attribute name : ProductID
- Type : String
- Condition : Equal to
- Value : 3
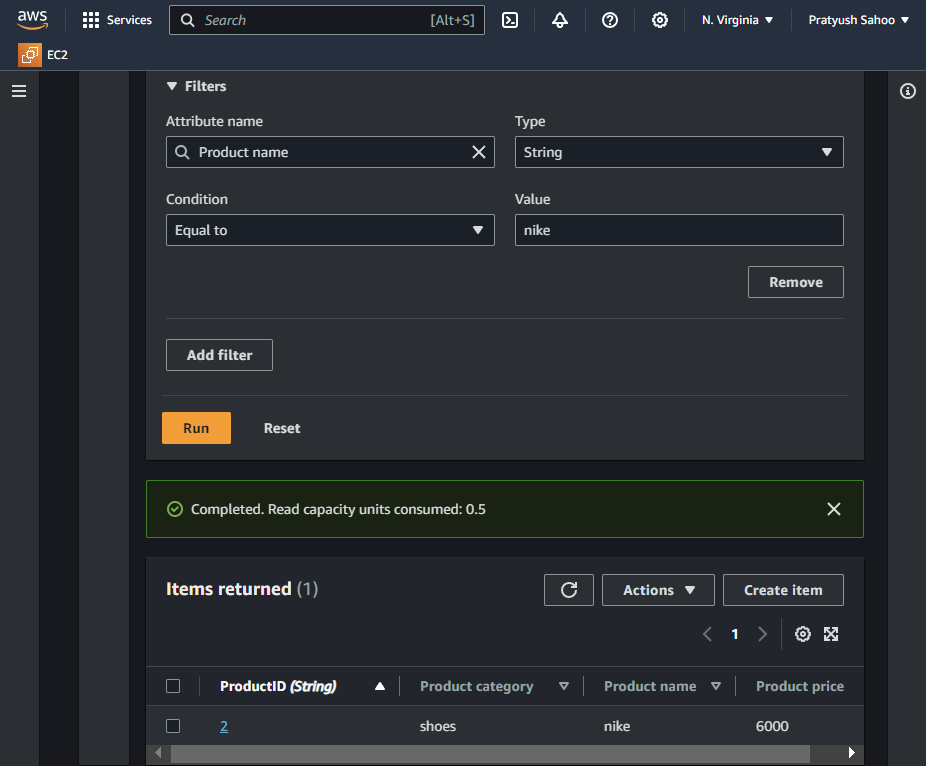
Query – 2
- Attribute name : Product name
- Type : String
- Condition : Equal to
- Value : nike
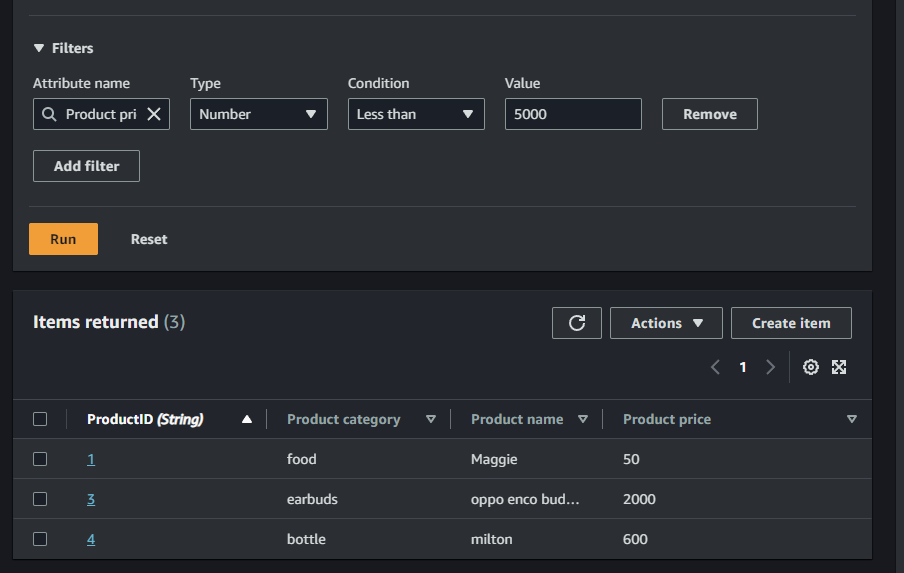
Query – 3
- Attribute name : Product price
- Type : Number
- Condition : Less than
- Value : 5000
Query – 4
- Attribute name : Product category
- Type : String
- Condition : Equal to
- Value : food
Use Cases of Amazon DynamoDB
- Web and Mobile Applications: Its ability to handle unpredictable traffic and deliver low-latency responses makes it ideal for web and mobile apps.
- Gaming: Online games often experience unpredictable loads, making DynamoDB a great fit for game developers.
- Internet of Things (IoT): IoT applications require a database that can quickly ingest and retrieve data from numerous devices, and DynamoDB is up to the task.
- Content Management: Content-heavy applications can benefit from DynamoDB’s ability to manage vast amounts of data.
Frequently Asked Questions On Data Storage with Amazon S3 and Amazon DynamoDB
1. What are some strategies for optimizing query performance in DynamoDB?
Strategies for optimizing query performance include designing efficient schema structures, using appropriate primary and secondary keys, and making use of partitioning and indexing.
2. How does DynamoDB handle security and access control?
DynamoDB provides fine-grained access control through AWS Identity and Access Management (IAM) and resource-based policies. You can control who can read, write, and manage your DynamoDB tables.
3. How does DynamoDB handle schema changes and data migration?
Schema changes can be handled by adding or removing attributes. You can use item versioning or create a new table with the updated schema for smooth data migration. Data migration can be achieved using Data Pipeline or custom scripts.
4. How does DynamoDB handle backup and restore operations?
DynamoDB offers automated and on-demand backups. The process involves creating backups, setting up retention policies, and performing restores. Point-in-Time Recovery allows you to restore a table to a specific moment in time.
Share your thoughts in the comments
Please Login to comment...