When working with embedded systems in C, there are so many design patterns that are particularly very useful. Many design patterns can be applied to embedded systems development in C. In this article, we will discuss design patterns for Embedded Systems in C, let’s see all of them one by one with the help of examples.
Important Topics for Design Patterns for Embedded Systems in C
Design patterns are defined as the general reusable solutions to the common problems that occur during software development and software designing.
They provide a template for solving certain types of problems and help the developers structure the code in a way that makes it more modular, maintainable, and scalable.
2. Creational Design Pattern for Embedded Systems in C
In embedded systems development in C, creational design patterns are used to abstract the instantiation process of objects, providing flexibility in creating and configuring objects.
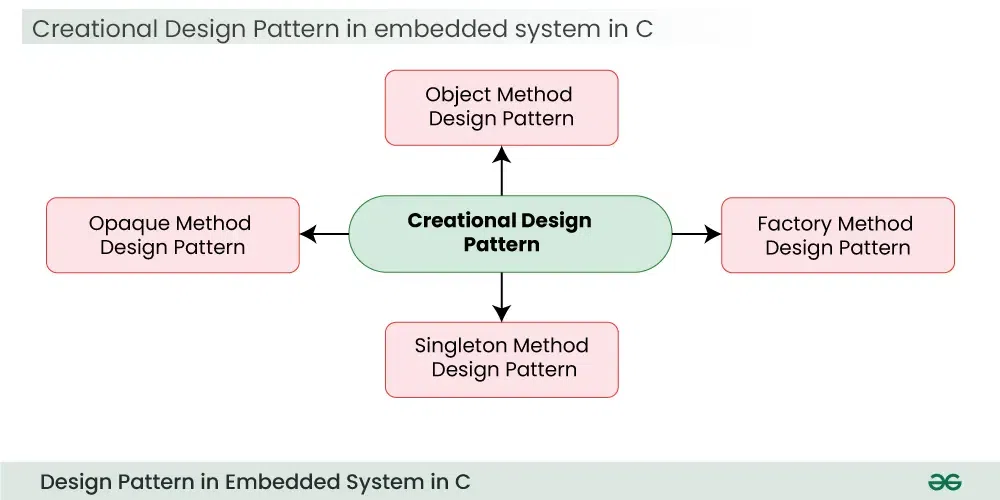
2.1 Factory Method Design Pattern
One commonly used creational design pattern is the Factory Method Pattern. Let’s see an example of how we can implement the Factory Method Pattern in C for an embedded system:
C
#include <stdio.h>
typedef struct {
void (*operation)(void);
} Product;
typedef struct {
Product base;
} ConcreteProduct;
void concreteProductOperation(void) {
printf("Concrete product operation\n");
}
typedef struct {
Product* (*createProduct)(void);
} Creator;
typedef struct {
Creator base;
} ConcreteCreator;
Product* createConcreteProduct(void) {
ConcreteProduct* product = (ConcreteProduct*)malloc(sizeof(ConcreteProduct));
if (product == NULL) {
return NULL;
}
product->base.operation = concreteProductOperation;
return &product->base;
}
int main() {
Creator* creator = (Creator*)malloc(sizeof(ConcreteCreator));
if (creator == NULL) {
return 1;
}
creator->createProduct = createConcreteProduct;
Product* product = creator->createProduct();
if (product != NULL) {
product->operation();
}
free(creator);
free(product);
return 0;
}
|
Output
Concrete product operation
Explaination of above Code:
In the above code,
- We have a Product interface that defines the common operations for all products, and a ConcreteProduct that implements these operations.
- Creator interface declares the createProduct factory method.
- ConcreteCreator provides a concrete implementation of this factory method for creating ConcreteProduct instances.
2.2 Object Method Design Pattern
In the embedded systems programming in C, the Object Pattern is typically implemented using structures and functions that operate on those structures. While C does not have native support for object-oriented programming.
We can achieve similar concepts through a combination of structures and function pointers. Let’s see a simple example for illustrating the Object Pattern in C for an embedded system.
C
#include <stdio.h>
typedef struct {
int value;
void (*print)(const struct MyObject *);
} MyObject;
void printValue(const MyObject *obj) {
printf("Object value: %d\n", obj->value);
}
void initializeObject(MyObject *obj, int initialValue) {
obj->value = initialValue;
obj->print = &printValue;
}
int main() {
MyObject myObj;
initializeObject(&myObj, 42);
myObj.print(&myObj);
return 0;
}
|
Explanation of the above Code:
- MyObject is a structure that encapsulates data and functionality.
- The printValue function acts as a method for the object, printing its value.
- The initializeObject function initializes an instance of MyObject and sets its initial value.
2.3 Opaque Method Design Pattern
In the embedded systems programming, an opaque pattern is often used to hide the implementation details of a data structure or module from the outside world. This helps in encapsulating the internal details, providing a clean interface, and enhancing code maintainability.
The basic idea is to declare a structure in the source file that contains the implementation details, and then provide a header file with only the necessary information for using the module.
Problem Statement of Opaque Method Design Pattern
Let’s see the simple example of how we might use an opaque pattern in embedded C:Suppose we want to create a module for handling a temperature sensor, and we wants to keep the details of the sensor structure hidden from the external code.
temperature_sensor.h (Public header file):
C
#ifndef TEMPERATURE_SENSOR_H
#define TEMPERATURE_SENSOR_H
typedef struct TemperatureSensor TemperatureSensor;
TemperatureSensor* temperature_sensor_create(void);
void temperature_sensor_destroy(TemperatureSensor* sensor);
float temperature_sensor_read(TemperatureSensor* sensor);
#endif // TEMPERATURE_SENSOR_H
|
temperature_sensor.c (Private implementation file):
C
#include "temperature_sensor.h"
struct TemperatureSensor {
float last_reading;
};
TemperatureSensor* temperature_sensor_create(void) {
TemperatureSensor* sensor = malloc(sizeof(TemperatureSensor));
if (sensor != NULL) {
sensor->last_reading = 0.0;
}
return sensor;
}
void temperature_sensor_destroy(TemperatureSensor* sensor) {
free(sensor);
}
float temperature_sensor_read(TemperatureSensor* sensor) {
sensor->last_reading += 0.5;
return sensor->last_reading;
}
|
Explanation of above Code:
- By the help of this Process, external code can include temperature_sensor.h and use the functions declared in the header file without knowing the details of the TemperatureSensor structure.
- The actual implementation details are hidden in the temperature_sensor.c file, providing a clean separation between the interface and the implementation.
2.4 Singleton Method Design Pattern
The Singleton Pattern is basically a type of design pattern that restricts the instantiation of a class to a single instance and provides a global point of access to that instance. This pattern is often used to control access to resources such as databases, file systems, or network connections.
In embedded systems, where resource utilization is crucial, the Singleton Pattern can be especially very useful.
C
#include <stdio.h>
typedef struct {
int data;
} Singleton;
static Singleton instance;
Singleton* getSingletonInstance() {
return &instance;
}
void initializeSingleton() {
instance.data = 0;
}
int main() {
initializeSingleton();
Singleton* singleton = getSingletonInstance();
printf("Initial data: %d\n", singleton->data);
singleton->data = 42;
printf("Modified data: %d\n", singleton->data);
return 0;
}
|
Explanation of the above Code:
- Basically, In this example, we have a Singleton struct representing the Singleton class. The instance of this class (instance) is declared as a static variable to ensure there is only one instance.
- The getSingletonInstance function provides a way to access the singleton instance.
- The initializeSingleton function is used to initialize any necessary data or perform other setup tasks.
3. Structural Design Patterns for Embedded Systems in C
Structural design patterns in embedded systems help to organize and structure the code in a way that makes it more modular, flexible, and easier to maintain.
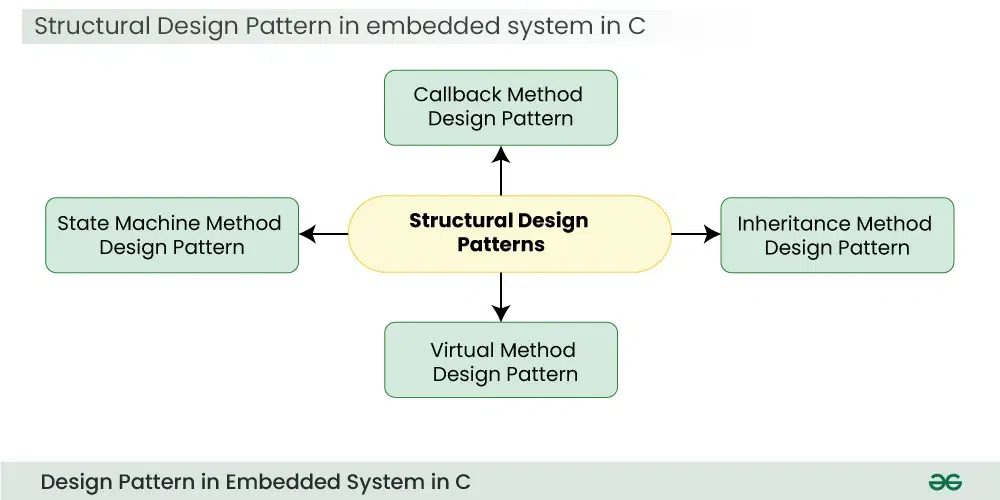
3.1 Callback Method Design Patterns
The callback pattern in embedded systems is a design pattern where a function (callback function) is registered to be called later when a specific event or condition occurs.
This pattern is commonly used in event-driven programming, where the flow of the program is determined by events rather than a linear sequence of statements.
Problem Statement of Callback Method Design Pattern:
Let’s see an example of implementing a simple callback pattern in C for an embedded system. In this example, we’ll create a system that performs some actions when a button is pressed.
C
#include <stdio.h>
typedef void (*CallbackFunction)(void);
void registerCallback(CallbackFunction callback) {
CallbackFunction registeredCallback = callback;
printf("Callback registered successfully\n");
printf("Event occurred, calling the callback\n");
registeredCallback();
}
void callbackFunction1(void) {
printf("Callback Function 1 executed\n");
}
void callbackFunction2(void) {
printf("Callback Function 2 executed\n");
}
int main() {
registerCallback(callbackFunction1);
registerCallback(callbackFunction2);
return 0;
}
|
Output
Callback registered successfully
Event occurred, calling the callback
Callback Function 1 executed
Callback registered successfully
Event occurred, calling the callback
Callback Function 2 executed
Explanation of the above Code:
- We define a callback function type (CallbackFunction) using a function pointer.
- The registerCallback function takes a callback function as an argument and stores it for later use.
- We simulate the occurrence of an event (e.g., button press) by calling the registerCallback function.
- The registered callback is then called, simulating the execution of actions associated with the event.
3.2 Inheritance Method Design Pattern
In embedded systems programming with C, inheritance is not directly supported as it is in some object-oriented languages like C++.
However, we can achieve similar functionality through other means, such as using structures and function pointers to simulate polymorphism.
Problem Statement of the Inheritance Method
Let’s see a simple example to illustrate this concept. Suppose we are working on an embedded system that involves different types of sensors (e.g., temperature sensor, pressure sensor, and light sensor). We want to create a generic interface for these sensors to simplify the handling of various sensor types in our system.
C
#include <stdio.h>
typedef struct {
void (*initialize)(void);
int (*read)(void);
void (*cleanup)(void);
} Sensor;
void performSensorOperations(Sensor* sensor) {
sensor->initialize();
int value = sensor->read();
printf("Sensor value: %d\n", value);
sensor->cleanup();
}
void temperatureSensorInitialize(void) {
printf("Initializing temperature sensor...\n");
}
int temperatureSensorRead(void) {
printf("Reading temperature sensor...\n");
return 25;
}
void temperatureSensorCleanup(void) {
printf("Cleaning up temperature sensor...\n");
}
void pressureSensorInitialize(void) {
printf("Initializing pressure sensor...\n");
}
int pressureSensorRead(void) {
printf("Reading pressure sensor...\n");
return 1000;
}
void pressureSensorCleanup(void) {
printf("Cleaning up pressure sensor...\n");
}
int main() {
Sensor temperatureSensor = {
.initialize = temperatureSensorInitialize,
.read = temperatureSensorRead,
.cleanup = temperatureSensorCleanup
};
Sensor pressureSensor = {
.initialize = pressureSensorInitialize,
.read = pressureSensorRead,
.cleanup = pressureSensorCleanup
};
performSensorOperations(&temperatureSensor);
performSensorOperations(&pressureSensor);
return 0;
}
|
Output
Initializing temperature sensor...
Reading temperature sensor...
Sensor value: 25
Cleaning up temperature sensor...
Initializing pressure sensor...
Reading pressure sensor...
Sensor value: 1000
Cleani...
Explanation of the above Code:
In this example,
- The Sensor structure serves as a generic interface for different types of sensors.
- The structure contains function pointers for initialization, reading, and cleanup operations.
- Concrete sensor types (e.g., temperature sensor and pressure sensor) implement these operations, and their instances can be used interchangeably through the generic Sensor interface.
3.3 Virtual API Method Design Pattern
The Virtual API design pattern, sometimes called the Virtual Function Table (VFT) pattern, is a valuable technique in embedded C programming for providing a common interface to different implementations of the same functionality.
Problem Statement of Virtual API Method Design Pattern:
Let’s consider a scenario where we have an existing library that provides functionality to control a motor, but we want to use a new motor control library that has a different interface. we can create an adapter to make the old library compatible with the new interface.
C
typedef struct {
void (*startMotor)();
void (*stopMotor)();
} OldMotorController;
void oldStartMotor() {
}
void oldStopMotor() {
}
OldMotorController createOldMotorController() {
OldMotorController controller;
controller.startMotor = oldStartMotor;
controller.stopMotor = oldStopMotor;
return controller;
}
typedef struct {
void (*powerOn)();
void (*powerOff)();
} NewMotorController;
void newPowerOn() {
}
void newPowerOff() {
}
NewMotorController createNewMotorController() {
NewMotorController controller;
controller.powerOn = newPowerOn;
controller.powerOff = newPowerOff;
return controller;
}
typedef struct {
OldMotorController oldController;
} MotorAdapter;
void adapterPowerOn(MotorAdapter *adapter) {
adapter->oldController.startMotor();
}
void adapterPowerOff(MotorAdapter *adapter) {
adapter->oldController.stopMotor();
}
int main() {
NewMotorController newController = createNewMotorController();
newController.powerOn();
newController.powerOff();
MotorAdapter adapter;
adapter.oldController = createOldMotorController();
adapterPowerOn(&adapter);
adapterPowerOff(&adapter);
return 0;
}
|
Explanation of the above Code:
In this example,
- MotorAdapter allows the old motor control library to be used with the interface of the new library without modifying the existing code of the old library.
- It contains the different type of functionality like powerON, powerOf, create New Motor Controller.
- The Virtual API Design Pattern helps in maintaining compatibility and reusability in embedded C systems.
4. Other Design Patterns for Embedded System in C
4.1 Bridge Method Design Pattern
The Bridge Pattern is a structural design pattern that separates abstraction from implementation, allowing them to vary independently. This pattern is particularly useful in embedded systems where we may have different platforms, devices, or hardware that need to be supported.
Let’s see a simple example of the Bridge Pattern in C for embedded systems:
C
#include <stdio.h>
typedef struct {
void (*sendData)(const char *data);
} Implementor;
typedef struct {
Implementor implementor;
} ConcreteImplementorA;
void sendA(const char *data) {
printf("Sending data using Implementor A: %s\n", data);
}
void initializeConcreteImplementorA(ConcreteImplementorA *this) {
this->implementor.sendData = sendA;
}
typedef struct {
Implementor implementor;
} ConcreteImplementorB;
void sendB(const char *data) {
printf("Sending data using Implementor B: %s\n", data);
}
void initializeConcreteImplementorB(ConcreteImplementorB *this) {
this->implementor.sendData = sendB;
}
typedef struct {
Implementor implementor;
void (*send)(const char *data);
} Abstraction;
typedef struct {
Abstraction abstraction;
} RefinedAbstraction;
void sendData(RefinedAbstraction *this, const char *data) {
printf("Refined Abstraction is sending data: %s\n", data);
this->abstraction.implementor.sendData(data);
}
void initializeRefinedAbstraction(RefinedAbstraction *this, Implementor *implementor) {
this->abstraction.implementor = *implementor;
this->abstraction.send = sendData;
}
int main() {
ConcreteImplementorA concreteImplementorA;
initializeConcreteImplementorA(&concreteImplementorA);
ConcreteImplementorB concreteImplementorB;
initializeConcreteImplementorB(&concreteImplementorB);
RefinedAbstraction refinedAbstractionA;
initializeRefinedAbstraction(&refinedAbstractionA, &concreteImplementorA.implementor);
refinedAbstractionA.abstraction.send("Hello from Abstraction A");
RefinedAbstraction refinedAbstractionB;
initializeRefinedAbstraction(&refinedAbstractionB, &concreteImplementorB.implementor);
refinedAbstractionB.abstraction.send("Hello from Abstraction B");
return 0;
}
|
Explanation of the above Code:
- Implementor is an interface that declares the operations that concrete implementors must implement.
- ConcreteImplementorA and ConcreteImplementorB are concrete implementations of the Implementor interface.
- Abstraction is an interface that declares the operations that concrete abstractions must implement.
- RefinedAbstraction is a refined abstraction that extends the abstraction interface.
- Main function demonstrates how you can use the Bridge Pattern to decouple abstractions from implementations and switch implementations dynamically.
4.2 Concurrency Method Design Pattern
Concurrency in embedded systems is often crucial to efficiently handle multiple tasks or events concurrently. One common approach is to use a Real-Time Operating System (RTOS) or a simple scheduler for task management.
Concurrency Method Design Pattern is used for Operating System, it is helpfull for single and multiple task, task may be synchronous and asynchronus. Let suppose if there is any user send the request and there is multiple request, so let suppose when there is thread1 goes for task then thread2 have to wait. So waiting period of the other task it takes some time to execute other. In this process we can use the Concurrency Method.
Problem Statement of Concurrency Method Design Pattern
In the above example of a simple concurrency pattern in embedded C using a cooperative multitasking approach without an RTOS. In this example, tasks are executed in a round-robin fashion.
C
#include <stdio.h>
#include <stdint.h>
typedef void (*TaskFunction)(void);
typedef struct {
TaskFunction function;
uint32_t interval;
uint32_t lastExecutionTime;
} Task;
void task1(void) {
printf("Task 1 executed\n");
}
void task2(void) {
printf("Task 2 executed\n");
}
void task3(void) {
printf("Task 3 executed\n");
}
Task tasks[] = {
{task1, 1000, 0},
{task2, 500, 0},
{task3, 2000, 0},
};
#define NUM_TASKS (sizeof(tasks) / sizeof(Task))
void scheduler(void) {
uint32_t currentTime = 0;
for (int i = 0; i < NUM_TASKS; ++i) {
Task *currentTask = &tasks[i];
if ((currentTime - currentTask->lastExecutionTime) >= currentTask->interval) {
currentTask->function();
currentTask->lastExecutionTime = currentTime;
}
}
}
int main() {
for (int i = 0; i < 10; ++i) {
scheduler();
}
return 0;
}
|
Explanation of the above Code:
- In this example demonstrates a simple scheduler that iterates over an array of tasks, checks if each task should be executed based on its interval, and then executes it if needed.
- The tasks run in a cooperative manner, meaning each task must yield control to the scheduler voluntarily. In a real-world scenario, this could be implemented using timer interrupts or a more sophisticated scheduler in an RTOS.
4.3 Spinlock Method Design Pattern
A spinlock is a synchronization mechanism commonly used in embedded systems and other low-level programming scenarios to protect shared resources from concurrent access.
Unlike traditional locks that may put a thread to sleep when it cannot acquire the lock, a spinlock repeatedly checks the lock’s availability in a loop until it becomes available.
Let’s see a simple example of a spinlock in C for an embedded system:
C
#include <stdint.h>
#include <stdbool.h>
typedef struct {
volatile bool locked;
} Spinlock;
void spinlock_init(Spinlock* lock) {
lock->locked = false;
}
void spinlock_acquire(Spinlock* lock) {
while (__sync_lock_test_and_set(&lock->locked, true)) {
}
}
void spinlock_release(Spinlock* lock) {
__sync_lock_release(&lock->locked);
}
int shared_resource = 0;
Spinlock resource_lock;
int main() {
spinlock_init(&resource_lock);
spinlock_acquire(&resource_lock);
shared_resource += 10;
spinlock_release(&resource_lock);
return 0;
}
|
Explanation of the above Code:
In this example,
- The Spinlock structure contains a locked flag that indicates whether the lock is currently held or not.
- The spinlock_acquire function uses the __sync_lock_test_and_set built-in function to atomically set the locked flag to true and return the previous value.
- If the previous value was already true, indicating that the lock was held, the function enters a spin loop until the lock becomes available. The spinlock_release function simply sets the locked flag back to false to release the lock.
4.4 Mutex Method Design Pattern
In embedded systems programming, a mutex (short for mutual exclusion) is often used to ensure that only one task or thread can access a shared resource at a time. This is crucial to prevent data corruption and other synchronization issues.
Let’s see an example:
C
#include <stdio.h>
#include <stdint.h>
#include <stdbool.h>
#include <pthread.h>
typedef struct {
bool locked;
pthread_mutex_t mutex;
} Mutex;
void initMutex(Mutex *mutex) {
mutex->locked = false;
pthread_mutex_init(&mutex->mutex, NULL);
}
void lockMutex(Mutex *mutex) {
pthread_mutex_lock(&mutex->mutex);
while (mutex->locked) {
pthread_mutex_unlock(&mutex->mutex);
pthread_mutex_lock(&mutex->mutex);
}
mutex->locked = true;
pthread_mutex_unlock(&mutex->mutex);
}
void unlockMutex(Mutex *mutex) {
pthread_mutex_lock(&mutex->mutex);
mutex->locked = false;
pthread_mutex_unlock(&mutex->mutex);
}
Mutex myMutex;
void* threadFunction(void* arg) {
int threadID = *((int*)arg);
lockMutex(&myMutex);
printf("Thread %d has acquired the mutex.\n", threadID);
printf("Thread %d is in the critical section.\n", threadID);
unlockMutex(&myMutex);
pthread_exit(NULL);
}
int main() {
initMutex(&myMutex);
pthread_t thread1, thread2;
int id1 = 1, id2 = 2;
pthread_create(&thread1, NULL, threadFunction, (void*)&id1);
pthread_create(&thread2, NULL, threadFunction, (void*)&id2);
pthread_join(thread1, NULL);
pthread_join(thread2, NULL);
pthread_mutex_destroy(&myMutex.mutex);
return 0;
}
|
Explanation of the above Code:
In this example,
- A simple mutex using a binary semaphore. The lockMutex function is responsible for acquiring the mutex, and the unlockMutex function releases it.
- The critical section between these two calls is protected, ensuring that only one thread can access it at a time.
- The pthread library is used for thread management. Make sure to link your program with the pthread library when compiling (-lpthread flag).
4.5 Conditional Method Design Pattern
In embedded systems programming, conditional statements are frequently used to make decisions based on certain conditions. The most common conditional statements in the C programming language are if, else if, and else.
Problem Statement:
Let’s see an simple example of conditional patterns in C for embedded systems:
C
#include <stdio.h>
int main() {
int sensorValue = 75;
int thresholdLow = 50;
int thresholdHigh = 70;
if (sensorValue < thresholdLow) {
printf("Sensor value is too low. Take corrective action.\n");
} else if (sensorValue >= thresholdLow && sensorValue <= thresholdHigh) {
printf("Sensor value is within acceptable range. No action needed.\n");
} else {
printf("Sensor value is too high. Take corrective action.\n");
}
return 0;
}
|
Output
Sensor value is too high. Take corrective action.
Explanation :
- We have a sensor reading represented by the variable sensorValue.
- We set threshold values (thresholdLow and thresholdHigh) to define the acceptable range for the sensor reading.
- The if, else if, and else statements are used to check different conditions based on the sensor value.
- Depending on the condition met, different actions are taken. For an embedded system, these actions might involve adjusting system parameters, activating or deactivating devices, or triggering alarms.
4.6 Behavioral Method Design Pattern
In the embedded systems, behavioral patterns can be applied to improve the design and organization of software components. One commonly used behavioral pattern is the State Pattern. The State Pattern allows an object to alter its behavior when its internal state changes. This pattern is particularly useful in embedded systems where the system’s behavior is expected to change based on its state.
Let’s simple example of the State pattern in embedded C:
C
#include <stdio.h>
typedef struct {
void (*stateHandler)();
} Context;
void state1() {
printf("State 1\n");
}
void state2() {
printf("State 2\n");
}
void initializeContext(Context* context) {
context->stateHandler = state1;
}
void changeState(Context* context, void (*newState)()) {
context->stateHandler = newState;
}
void performAction(Context* context) {
context->stateHandler();
}
int main() {
Context myContext;
initializeContext(&myContext);
performAction(&myContext);
changeState(&myContext, state2);
performAction(&myContext);
return 0;
}
|
UML Diagram of Behavioral Method Design Pattern:
.jpg)
In this example,
- We have a Context struct that contains a function pointer stateHandler pointing to the current state’s handler function. We then define two state functions (state1 and state2).
- The initializeContext function sets the initial state to state1, and the changeState function updates the state to the specified function.
- The performAction function is called to execute the behavior associated with the current state.
- In the main function, we create a Context, initialize it with state1, perform an action, change the state to state2, and perform another action.
Conclusion
In summery while working with embedded systems, it’s essential to consider the resource constraints and real-time requirements. The chosen design patterns should align with the specific needs of the embedded system in terms of performance, memory usage, and responsiveness.
Share your thoughts in the comments
Please Login to comment...